


BEFORE
YOU
BEGIN
INTRODUCTION
IMPORT
ANT
PRECAUTIONS
ASSEMBL
Y
BEFORE
YOU
BEGIN
ELLIPTICAL
OPERA
TION
LIMITED
W
ARRANTY
TROUBLESHOOTING
&
MAINTENANCE
CONDITIONING
GUIDELINES
BEFORE YOU
BEGIN
ASSEMBL
Y
INTRODUCTION
IMPORT
ANT
PRECAUTIONS
ELLIPTICAL OPERA
TION
CONDITIONING GUIDELINES
TROUBLESHOOTING &
MAINTENANCE
LIMITED WARRANTY
TOOLS INCLUDED
PARTS INCLUDED
c
5mm T Wrench
c
Phillips Screw Driver
c
13/15mm Flat Wrench
c
1 Console
c
1 Console Mast
c
1 Front Stabilizer Tube
c
1 Left Handlebar
c
1 Right Handlebar
c
2 Foot Pads
c
Console Mast Boot
c
Power Adaptor
c
7 Hardware Bags
c
2 Handlebar Covers
CONSOLE
RIGHT HANDLEBAR
LOWER LINK ARM
ELBOW COVER
PULSE GRIP
CONSOLE MAST
DISPLAY
FOOT PAD
PEDAL ARM
c
2 Elbow Covers
c
2 Pedal Arm Covers
c
1 Water Bottle Holder
c
1 Water Bottle
c
2 Pedal Arms/Lower Link Arms
c
1 Top Cap
c
1 Foot Leveler Axle
c
2 Foot Levelers
c
2 Wheel Covers
BOTTLE HOLDER
POWER ADAPTOR SOCKET
If you have questions or if there are any missing parts, contact Customer Tech Support.
Contact information is located on the back panel of this manual.
For a complete exploded diagram, visit us at www.advancedfitnessgroup.com
HANDLEBAR COVERS
FOOT LEVELER
FRONT STABILIZER TUBE
CONSOLE MAST BOOT
TOP CAP
LEFT HANDLEBAR
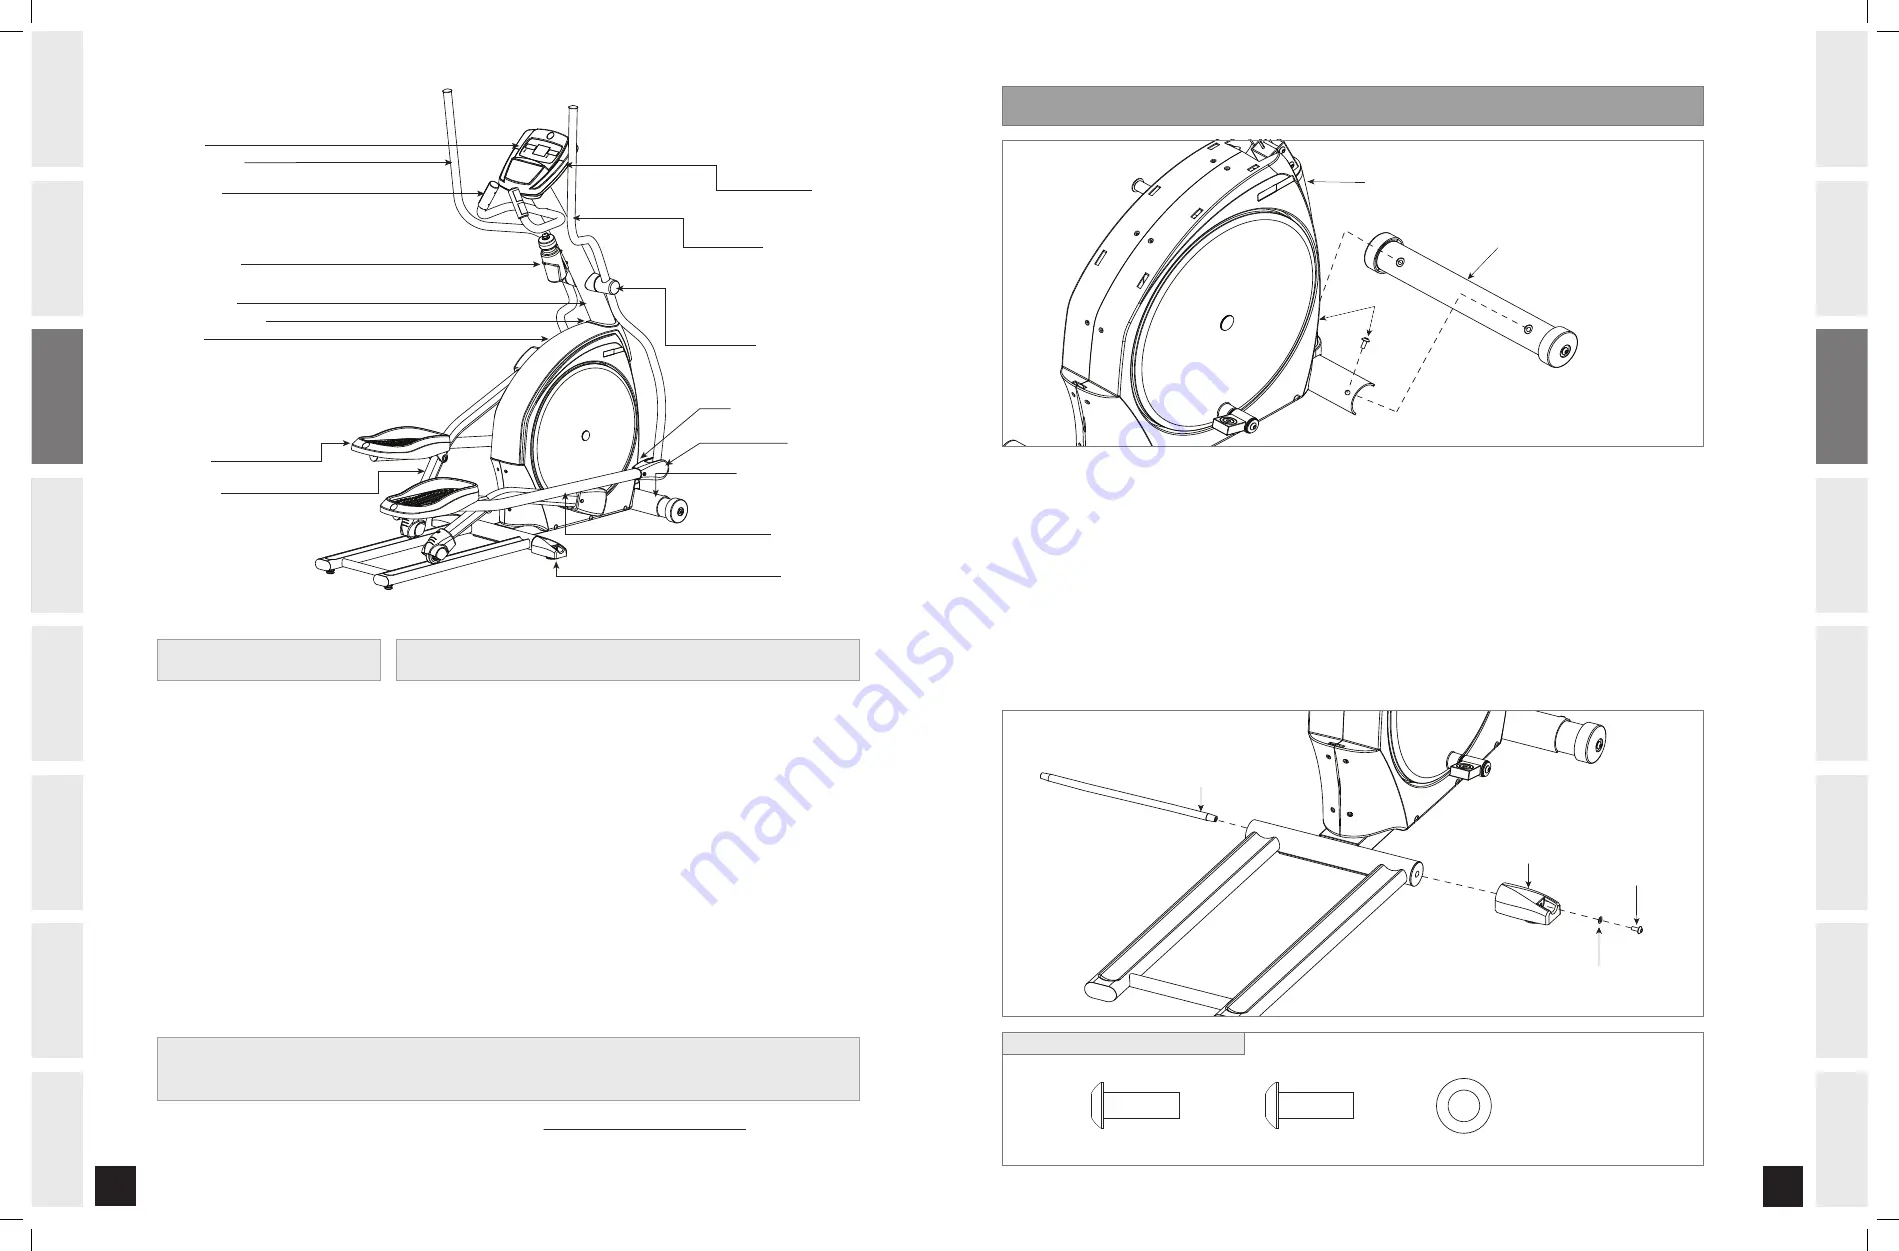
ASSEMBLY
STEP 1
A) Open
HARDWARE BAG FOR STEP 1
.
B) Attach the
FRONT STABILIZER TUBE
to the
MAIN FRAME
using 2
BOLTS (A).
C) Slide
FOOT LEVELER AXLE
through
MAIN FRAME TUBE
. (The
FOOT LEVELER AXLE
is on top of bottom
styrofoam, beside the side shroud).
D) Slide left and right
FOOT LEVELERS
onto the
AXLE
.
C) Attach
FOOT LEVELERS
to the
FOOT LEVELER AXLE
using 2
BOLTS
with
BLUE
THREAD LOck
(B)
and
2
FLAT WASHERS (c)
.
BOLT (A)
20 mm
Qty: 2
BOLT (B)
20 mm
Qty: 2
FLAT WASHER (C)
16 mm
Qty: 2
BLUE THREADS
HARDWARE BAG FOR STEP 1 CONTENTS :
BOLT (A)
FRONT STABILIZER TUBE
MAIN FRAME
BOLT (B)
FLAT WASHER (C)
STABILIZER BAR
CAP THINGY
MID-STABILIZER COVER
BOLT (A)
FRONT STABILIZER TUBE
MAIN FRAME
BOLT (B)
FLAT WASHER (C)
FOOT LEVELER
FOOT LEVELER AXLE
2.0 AE_Rev.1.6.indd 6-7
8/27/07 3:29:55 PM


