


BEFORE
YOU
BEGIN
10
INTRODUCTION
IMPORT
ANT
PRECAUTIONS
ASSEMBL
Y
BEFORE
YOU
BEGIN
ELLIPTICAL
OPERA
TION
LIMITED
W
ARRANTY
TROUBLESHOOTING
&
MAINTENANCE
CONDITIONING
GUIDELINES
BEFORE YOU
BEGIN
ASSEMBL
Y
11
INTRODUCTION
IMPORT
ANT
PRECAUTIONS
ELLIPTICAL OPERA
TION
CONDITIONING GUIDELINES
TROUBLESHOOTING &
MAINTENANCE
LIMITED WARRANTY
ASSEMBLY
STEP
FOOTPAD
WASHER (K)
LINK ARM
BOLT (J)
SCREW (L)
WHEEL COVER
NUT (R) WASHER (Q) BOLT (P)
SPACER AND SPACER RINGS
LOWER HANDLEBAR
LOWER LINK ARM
LOWER LINK ARM
SPACER
SPACER RINGS
LOWER
HANDLEBAR
FOOTPAD
WASHER (K)
LINK ARM
BOLT (J)
SCREW (L)
WHEEL COVER
NUT (R) WASHER (Q) BOLT (P)
SPACER AND SPACER RINGS
LOWER HANDLEBAR
LOWER LINK ARM
LOWER LINK ARM
SPACER
SPACER RINGS
LOWER
HANDLEBAR
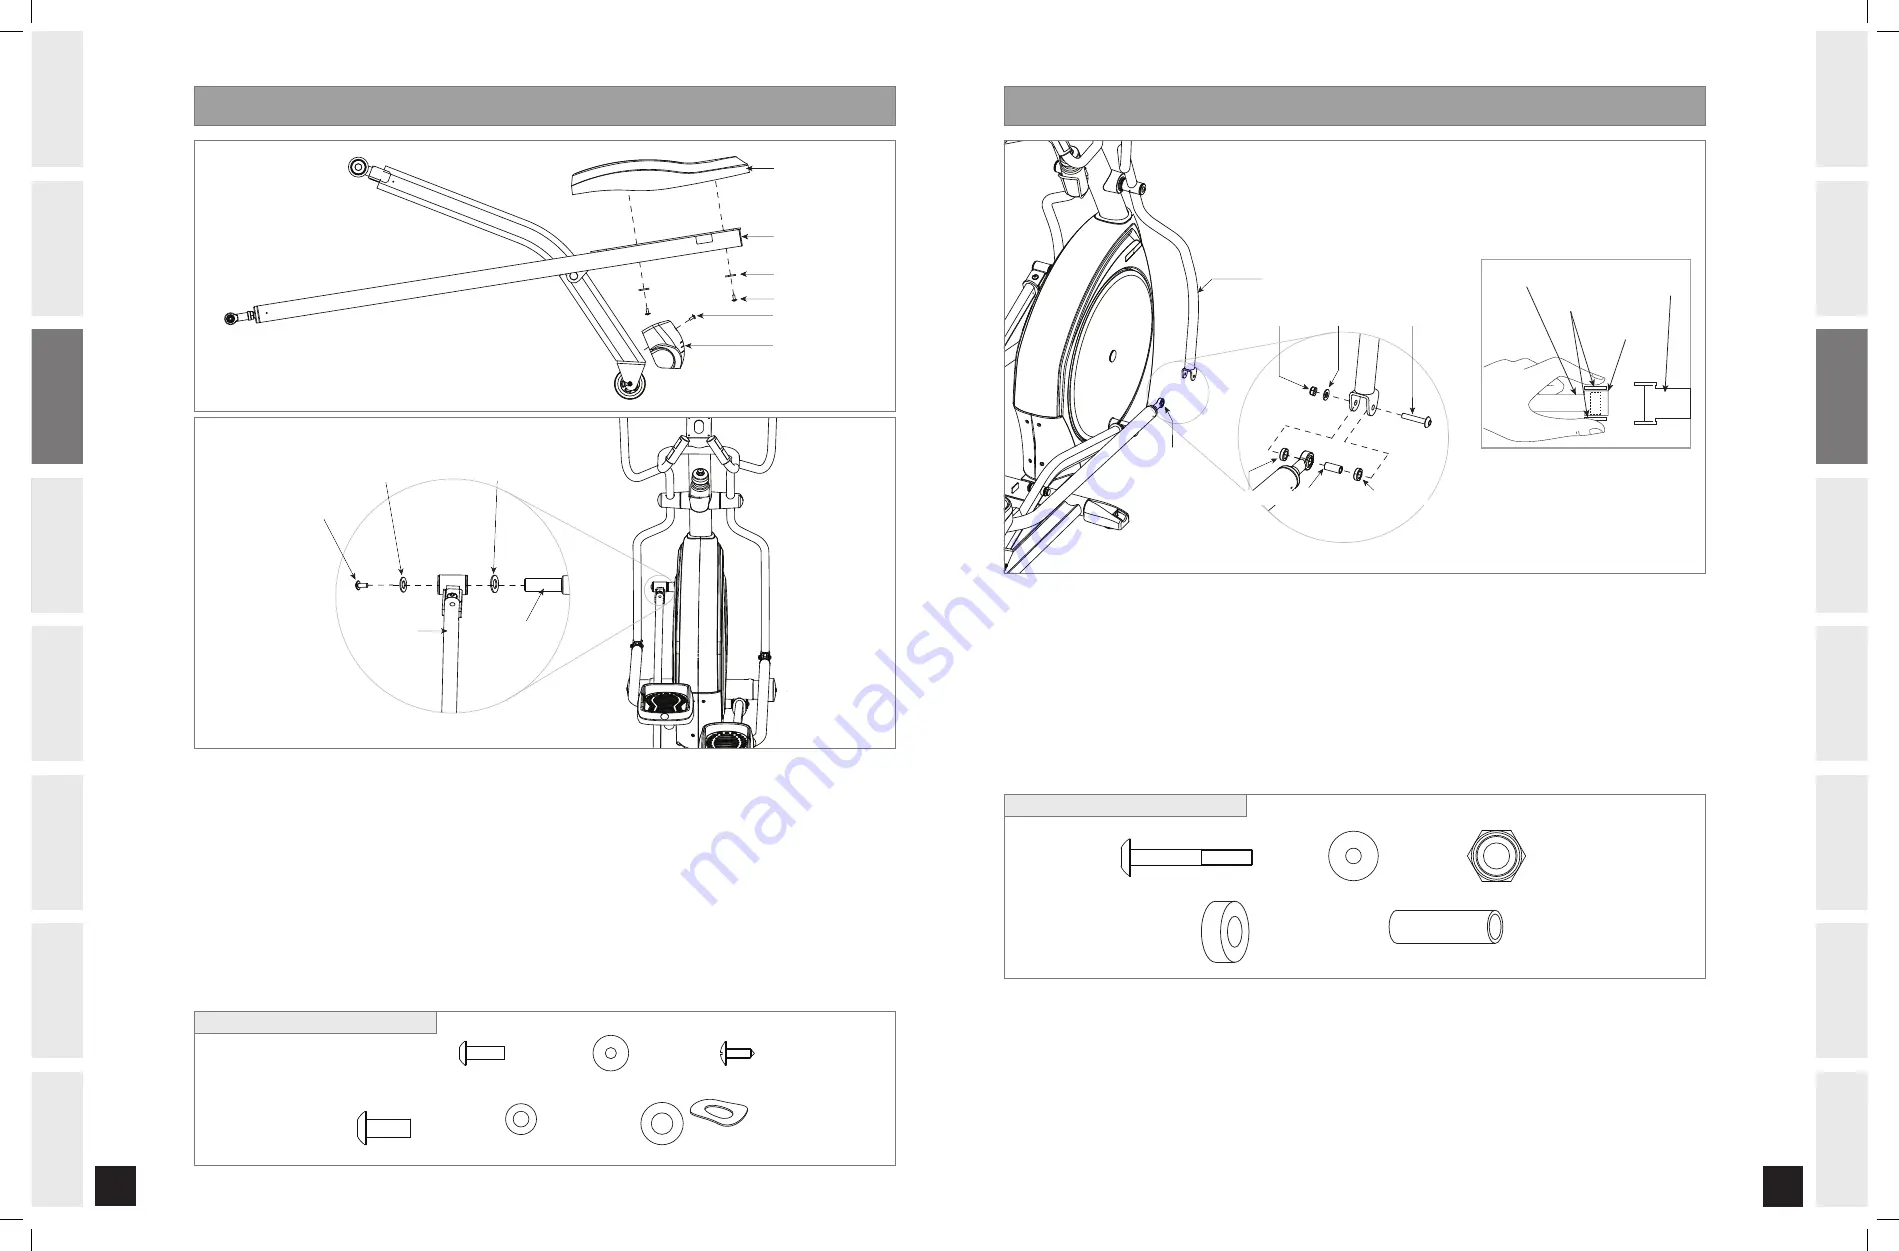
A) Open
HARDWARE BAG FOR STEP 4.
B) Attach
FOOTPAD
to
LINk ARM
using 4
BOLTS (J)
and
4 WASHERS (k).
C) Attach
WHEEL cOVER
to
PEDAL ARM
using 1
ScREW (L).
D)
Repeat on other side.
E) Attach
PEDAL ARM
to
PIVOT TUBE
using 1
BOLT (M),
1
WASHER (N)
and
1
WAVY WASHER (O).
F) Repeat on other side
.
BOLT (J)
12 mm
Qty: 8
BOLT (M)
20 mm
Qty: 2
WASHER (K)
15 mm
Qty: 8
SCREW (L)
12 mm
Qty: 2
WASHER (N)
Qty: 2
WAVY WASHER (O)
Qty: 2
SIDE VIEW
HARDWARE BAG FOR STEP CONTENTS :
ASSEMBLY
STEP
WASHER (Q)
Qty: 2
NUT (R)
Qty: 2
BOLT (P)
45 mm
Qty: 2
SPACER RING
Qty: 4
SPACER
Qty: 2
HARDWARE BAG FOR STEP CONTENTS :
WASHER (K)
LINK ARM
BOLT (J)
WAVY WASHER (O)
WASHER (N)
BOLT (M)
PEDAL ARM
PIVOT TUBE
WHEEL COVER
A) Open
HARDWARE BAG FOR STEP 5.
B) Slide
SPAcER
into
LOWER LINk ARM
.
C) Place
SPAcER RINGS
on both sides of the
SPAcER
. While holding
SPAcER RINGS
, slide
LOWER LINk ARM
into bottom end of
LOWER HANDLEBAR
.
D) Insert 1
BOLT (P)
into
LOWER HANDLEBAR
and secure using 1
WASHER (Q)
and 1
NUT (R)
.
E) Repeat on other side.
2.0 AE_Rev.1.6.indd 10-11
8/27/07 3:30:04 PM


