background image

BEFORE

YOU 
BEGIN

10

INTRODUCTION

IMPORT

ANT

PRECAUTIONS

ASSEMBL

Y

BEFORE

YOU 
BEGIN

BIKE

OPERA

TION

LIMITED

W

ARRANTY

TROUBLESHOOTING

MAINTENANCE

CONDITIONING

GUIDELINES

BEFORE YOU 

BEGIN

ASSEMBL

Y

11

INTRODUCTION

IMPORT

ANT

PRECAUTIONS

BIKE

OPERA

TION

CONDITIONING GUIDELINES

TROUBLESHOOTING & 

MAINTENANCE

LIMITED WARRANTY

ASSEMBLY

 STEP 

ASSEMBLY

 STEP  

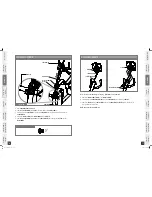
CONSOLE WIRES

CONSOLE MAST WIRES

CONSOLE

CONSOLE

PRE-ATTACHED SCREWS

BOLT (E)
10 mm
Qty: 8

HARDWARE BAG FOR STEP  CONTENTS :

Open 

hardware bag for step 4

.

Slide 

top Cap groMMet

 and 

top Cap

 onto the bottom of the 

ConsoLe Mast

.

Carefully pull the 

ConsoLe wIre

 through the 

ConsoLe Mast

 using the twist tie located inside the  

ConsoLe Mast

.

Attach the

 ConsoLe Mast

 to the 

MaIn fraMe

 using 8 

boLts (e).

Slide 

top Cap groMMet

 and 

top Cap

 down 

ConsoLe


Mast

 and carefully snap 

top Cap

 into the  

MaIn fraMe

.

A.
B.
C.

D.
E.

note:  there is no hardware bag for this step.  all hardware is pre-attached.

Attach the 

ConsoLe Mast wIres

 to the 

ConsoLe wIres

.

Carefully tuck the 

ConsoLe Mast wIres

 into the 

ConsoLe Mast

 before attaching 

ConsoLe

.

Attach the 

ConsoLe

 to the 

ConsoLe Mast

 using the 4 

pre-attaChed sCrews

 (screws will have to be 

removed from the console first). 

note: be Careful not to pinch wires!

A.

B.

C.

BOLTS (E)

TOP CAP

TOP CAP GROMMET

CONSOLE MAST

CONSOLE WIRE

MAIN FRAME

CONSOLE WIRES

CONSOLE MAST WIRES

CONSOLE

CONSOLE

PRE-ATTACHED SCREWS

3.0AR SHOWN

2.0_3.0_AR_Rev.2.3.indd   10-11

8/1/07   11:42:02 AM

Summary of Contents for 2.0AR

Page 1: ...RECUMBENT USER S GUIDE FOR MODELS 2 0 AR 3 0 AR 2 0_3 0_AR_Rev 2 3 indd 1 8 1 07 11 41 42 AM...

Page 2: ...need to get stronger and healthier faster Because we re committed to designing fitness equipment from the inside out we use only the highest quality components It s a commitment we back with one of t...

Page 3: ...to any opening Unplug bike before moving or cleaning it To clean wipe surfaces down with soap and slightly damp cloth only never use solvents See MAINTENANCE This bike should not be used by persons we...

Page 4: ...Wrench c Phillip Screwdriver c 1 Console c 1 Console Mast c 2 Pedals c 1 Top Cap c 1 Top Cap Grommet c 1 Seat Back c 1 Seat Base c 1 Rear Plastic Cap c 4 Hardware Bags c 1 Rear Stabilizer Tube c 1 Fra...

Page 5: ...Bar Press COVERED PULSE GRIP WIRES into the PLASTIC CLIP as shown above Tuck EXPOSED WIRES into RECESS under PULSE GRIP BAR Attach the Pulse Grip Bar to the Seat SLIDE using 4 bolts B Note Tuck in wir...

Page 6: ...e Console Mast using the twist tie located inside the Console Mast Attach the Console Mast to the Main Frame using 8 Bolts E Slide Top Cap Grommet and Top Cap down CONSOLE Mast and carefully snap Top...

Page 7: ...r home This guide provides you with basic information for using and enjoying your new machine LOCATION OF THE BIKE Place the bike on a level surface There should be 6 feet of clearance behind the bike...

Page 8: ...ile your legs are in the extended position Lock the mechanism by rotating it down until handle tightens NOTE It is recommended that you do not sit on the seat while adjusting its position BIKE OPERATI...

Page 9: ...utton for 4 5 seconds Press ENTER again to turn off scan feature 2 0AR 3 0AR CONSOLE OPERATION 1 Turn on Bike 2 Press START button and begin exercising 3 Program will automatically default to Manual P...

Page 10: ...ing the resistance MANUAL INTERVALS ROLLING WEIGHT LOSS GOLF COURSE RACE CUSTOM 1 CUSTOM 2 THR ZONE 1 THR ZONE 2 VALLEY TOUR REVERSE TRAIN RANDOM WORKOUT CALENDAR CONSTANT WATTS 3 0AR only Automatical...

Page 11: ...ned by your goals If you use your machine to prepare for a 5K workout you will probably work out at a higher intensity than if your goal is general fitness Regardless of your long term goals always be...

Page 12: ...should gradually bring your heart rate into your Target Heart Rate Zone COOL DOWN Never stop exercising suddenly A cool down period of 3 5 minutes allows your heart to readjust to the decreased demand...

Page 13: ...MBLY WEEKLY LOG SHEETS WEEK WEEKLY GOAL WEEKLY TOTALS DAY SUNDAY MONDAY TUESDAY WEDNESDAY THURSDAY FRIDAY SATURDAY DATE DISTANCE CALORIES TIME COMMENTS WEEK WEEKLY GOAL WEEKLY TOTALS DAY SUNDAY MONDAY...

Page 14: ...making sure that the cables are securely inserted into the console YOU MAY EXPERIENCE AN ERRATIC READOUT UNDER THE FOLLOWING CONDITIONS Gripping the heart rate handlebars too tight Try to maintain mo...

Page 15: ...CAN I MOVE THE BIKE EASILY ONCE IT IS ASSEMBLED Your bike has a pair of transport wheels built into the front It is easy to move your bike by rolling it on the front transport wheels It is important...

Page 16: ...r not recommended by AFG Incidental or consequential damages AFG is not responsible or liable for indirect special or consequential damages economic loss loss of property or profits loss of enjoyment...

Page 17: ...rt Hotline 1 877 GOAFG55 Email comments advancedfitnessgroup com Website www advancedfitnessgroup com Every employee at AFG takes pride in providing you with a high quality product We want to know if...

Reviews: