11
Light Source and Power Meter Operation
Light Source Settings and Features
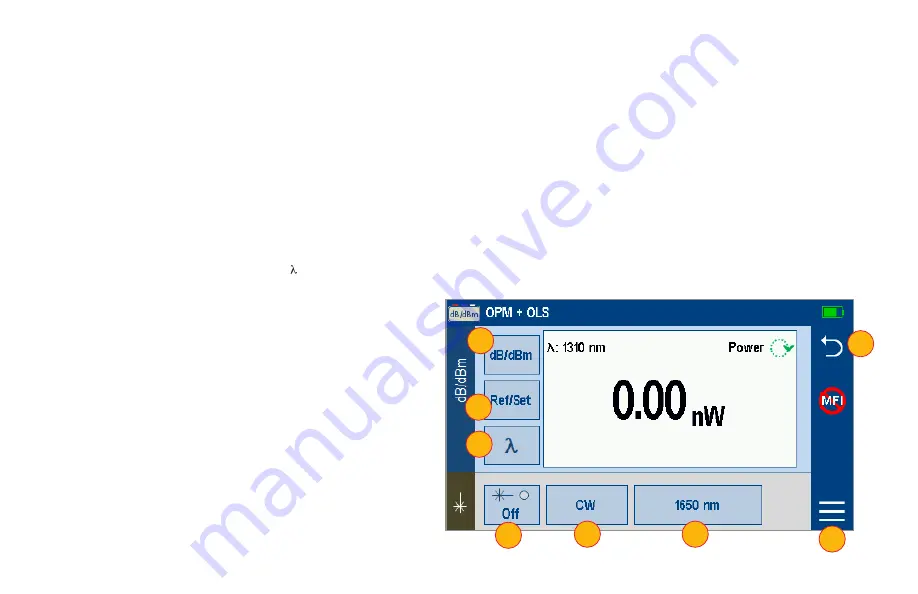
1. Touch Laser On/Off to enable/disable light source. RED Laser indicates that source is ON.
2. Touch Modulation field to select source modulation: Wave ID, CW, Tone (270 Hz, 330 Hz, 1 kHz, 2 kHz).
–
Select Wave ID mode for fastest loss measurements. While in this mode, the FlexScan source transmits wavelength information, enabling a
Wave ID power meter to synchronize and measure power at received wavelength(s).
–
Use CW mode to generate continuous wave light at a single wavelength for loss measurements with non-Wave ID power meter.
–
Generate Tone for fiber identification (270 Hz, 330 Hz, 1 kHz, 2 kHz).
3. Touch Wavelength field to select test wavelength.
Power Meter Settings and Features
4. If used with non-Wave ID source, touch to select wavelength.
If used with Wave ID source, power meter automatically
synchronizes to and indicates received wavelength(s).
5. Touch and hold Ref/Set to store new reference(s) at received
wavelength(s). Touch and release Ref/Set to view stored
reference(s).
6. Touch dB/dBm to toggle between power (dBm or Watts
(mW, μW, nw)) and loss (dB) mode.
–
Power meter detects and indicates fiber identifying tones
when used with a light source capable of generating a
modulated Tone signal.
Notes:
7. Touch Menu to select Test/Home screen Menu.
–
Allows user to Save or Send OPM results.
8. Touch Back to return to the previous screen.
1
2
3
4
5
6
8
7


