46 Installation
4510001 REV B – 220620
AC Power
Experience has shown that the AC power in locations where the LX-150 is installed can be
subject to line noise, brownouts, and blackouts. If line noise, brownouts, or blackouts occur
on a regular basis, install a good-quality Line Conditioner to ensure data integrity. In many
cases, these devices may not be necessary; it is acceptable to start an installation without
them. However, if system lockups or occasional label misfires occur, the first corrective
measure should be to isolate and clean up the AC power.
Work Area
For safety, the work area should have a Fire Extinguisher.
Orientation
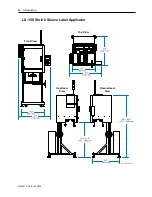
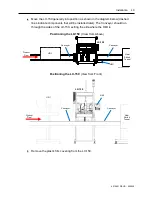
Looking at the front of the LX-150, the Conveyor enters on the left and exits on the right.
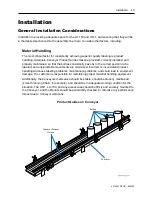
The UR-1 should be positioned before the LX-150 in the production line, but may need to be
at an angle to avoid interfering with the Conveyor flow. In this case, a Turn Bar will be
needed to redirect the film into the LX-150 (see “Turn Bar” on page
Mandrel Position
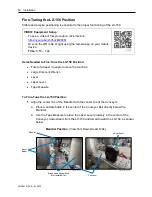
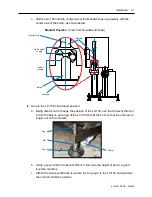
The center line of the Conveyor will need to run beneath the central axis of the Mandrel (see
“Fine-Tuning the LX-150 Position” on page
).
Maintenance Access
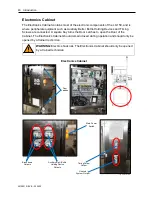
When planning the installation, allow for easy access to the Front Door and Electronics
Cabinet of the LX-150, as well as to the HMI, so that setup, operation, and maintenance can
be done conveniently. Additionally, ensure that both sides of the UR-1 are easily accessible
for fast and convenient changeover and splicing of Label Film Spools and for maintenance.
Ventilation
A Heat Shrink Tunnel usually immediately follows the LX-150 on the product path, shrinking
the placed labels onto the product. Depending on the product and label material used,
hazardous fumes can result from the heat shrink process. Ensure that the work area has
proper ventilation.
WARNING:
Hazardous fumes – ensure that work area has adequate
ventilation.
Summary of Contents for LX-150
Page 1: ...LX 150 Shrink Sleeve Label Applicator User Guide ...
Page 2: ...2 Abbreviations 4510001 REV B 220620 ...
Page 4: ...4 Abbreviations 4510001 REV B 220620 ...
Page 12: ...12 Abbreviations 4510001 REV B 220620 ...
Page 76: ...76 Installation 4510001 REV B 220620 ...
Page 132: ...132 Setup 4510001 REV B 220620 ...
Page 146: ...146 Operation 4510001 REV B 220620 ...
Page 186: ...186 Electrical Schematics 4510001 REV B 220620 LX150N J002 220V Indicator Lamp Circuit ...
Page 187: ...Electrical Schematics 187 4510001 REV B 220620 LX150N J003 220V PLC ...
Page 189: ...Electrical Schematics 189 4510001 REV B 220620 LX150N J005 220V ...
Page 190: ...190 Electrical Schematics 4510001 REV B 220620 LX150N J006 220V ...
Page 191: ...Electrical Schematics 191 4510001 REV B 220620 LX150N J007 220V HMI ...
Page 192: ...192 Electrical Schematics 4510001 REV B 220620 LX150N J008 220V UR1 Unwind Circuit ...
Page 193: ...Electrical Schematics 193 4510001 REV B 220620 LX150N J009 220V UR1 Unwind Cable ...
Page 194: ...194 Electrical Schematics 4510001 REV B 220620 LX150N J010 220V Film Roll Motor ...
Page 195: ...Electrical Schematics 195 4510001 REV B 220620 LX150N J011 220V Timing Screw Motor Drive ...
Page 196: ...196 Electrical Schematics 4510001 REV B 220620 LX150N J012 220V Timing Screw Motor ...
Page 197: ...Electrical Schematics 197 4510001 REV B 220620 LX150N J013 220V Brushdown Circuit ...
Page 200: ...200 Electrical Schematics 4510001 REV B 220620 LX150N J016 220V PLC I O Extension ...
Page 202: ...202 Electrical Schematics 4510001 REV B 220620 LX150N J002 480V Indicator Lamp Circuit ...
Page 203: ...Electrical Schematics 203 4510001 REV B 220620 LX150N J003 480V PLC ...
Page 205: ...Electrical Schematics 205 4510001 REV B 220620 LX150N J005 480V ...
Page 206: ...206 Electrical Schematics 4510001 REV B 220620 LX150N J006 480V ...
Page 207: ...Electrical Schematics 207 4510001 REV B 220620 LX150N J007 480V HMI ...
Page 208: ...208 Electrical Schematics 4510001 REV B 220620 LX150N J008 480V UR1 Unwind Circuit ...
Page 209: ...Electrical Schematics 209 4510001 REV B 220620 LX150N J009 480V UR1 Unwind Cable ...
Page 210: ...210 Electrical Schematics 4510001 REV B 220620 LX150N J010 480V Film Roll Motor ...
Page 211: ...Electrical Schematics 211 4510001 REV B 220620 LX150N J011 480V Timing Screw Motor Drive ...
Page 212: ...212 Electrical Schematics 4510001 REV B 220620 LX150N J012 480V Timing Screw Motor ...
Page 213: ...Electrical Schematics 213 4510001 REV B 220620 LX150N J013 480V Brushdown Circuit ...
Page 216: ...216 Electrical Schematics 4510001 REV B 220620 LX150N J016 480V PLC I O Extension ...
Page 219: ...Diagrams and Parts Lists 219 4510001 REV B 220620 Dancer Assembly ...
Page 221: ...Diagrams and Parts Lists 221 4510001 REV B 220620 Cutter Assembly ...
Page 225: ...Diagrams and Parts Lists 225 4510001 REV B 220620 Applicator Assembly ...
Page 227: ...Diagrams and Parts Lists 227 4510001 REV B 220620 LX 150 Frame ...
Page 229: ...Diagrams and Parts Lists 229 4510001 REV B 220620 Head Height Adjust ...
Page 235: ...Diagrams and Parts Lists 235 4510001 REV B 220620 Support and Film Drive Wheel Assemblies ...
Page 238: ...238 Diagrams and Parts Lists 4510001 REV B 220620 400mm Timing Screw Assembly ...
Page 240: ...240 Diagrams and Parts Lists 4510001 REV B 220620 ...

