background image

Ice will not form when the tank is not fi ed. 

e careful of the sharp blade of the knife and the sharp edge of the tank.
e careful to prevent water from flowing into the electronic parts.

re uently clean the ice shaver to keep it clean and prevent sanitary issues. 

nplug the power cord when cleaning the ice shaver or replacing parts.

Do not directly spray water on the ice shaver. This may cause failure  short circuit  electric shock or fire. 

Do not use powder detergent  benzene  thinner  hydrochloric acid  petroleum  hot water or rough brushes.

  This may cause corrosion or damage to the product.  

When using a detergent  wet a soft towel in lukewarm water or a neutral detergent and wipe the product. 
After using a detergent  wipe the product with a clean wet towel once more. 

Cleaning

CIM- 5/Series

Press the Cleaning button        during operation or after stopping the product for   seconds.

The compressor will stop working and the drum will work for   minute.

Press the Mode button, and the Water supply valve wil be opened or closed.

3 Press the  peration button or Cleaning button for   seconds to stop cleaning.Cleaning will stop.

The Cleaning icon        will flash on the  CD screen during cleaning.

e careful to prevent water from flowing into the control box when cleaning the product.

Failure to do so may cause operational failure, short circuit or errors.

 Cleaning  unction 

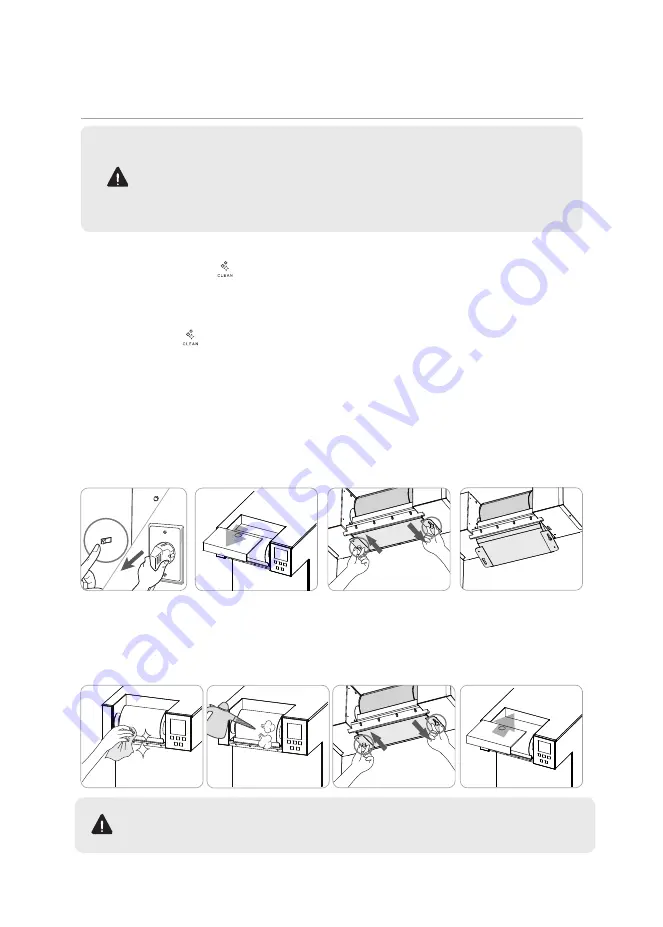
Turn the Power off and unplug the power cord from the outlet.

emove the container for additives and open the top plate of the ice shaver.

3

pen the tank cap and screws at the bottom of the ice shaving drum and completely remove water or milk 

    from the tank. Push the fix bolt to the direction of the arrow to separate the tank from the back.

Dilute dishwashing detergent in lukewarm water and wet a clean cloth or towel withthis. Clean the tank and the drum.

terilize the drum and inside the drum using the disinfectant or a steam cleaner and wipe with clean cloth.

6

ssemble the tank in the reverse order of tank disassembly.  e careful to prevent water from flowing into the 

electronic parts.

Close the top plate of the ice shaver.

 Cleaning inside the  roduct 

Summary of Contents for CIM-15 Series

Page 1: ...i e r si s e r Si e e e esi i r e ser i e i s er ser i e e ers er e r S e i ree i e er i re i s er e s Snow ICE FAST SLOW SELECTION CLEAN Snow ICE SELECTION SLOW Please read this user manual prior to use to ensure proper usage of the product Comply with warnings and cautions in this user manual before using Keep this user manual in an easily accessible place etain this user manual as it includes t...

Page 2: ...Contents 1 S e i i i 1 s e e i 1 rr 1 I s i 11 er I s i 1 se 1 C e i 15 C e e re e es r Ser i e 15 rr rs i s r i s C i s r S e er 5 I s i i i es r s se C r e ...

Page 3: ...dous events that could cause death or severe inury if not observed azardous events that could cause wounding or severe in ury if not observed The compulsory Instruction mark indicates information that must be observed The Prohibition mark for a certain action indicates actions that are prohibited Use a grounded outlet rated C 0 over Do not plug cords for several procucts into one outlet This may c...

Page 4: ... damaged power cord or power plug or a loose outlet This may cause electric shock or fire Do not replace damaged power cord or power plug Contact the customer service center for a replacement Plug the power cord facing down ward Failure to do so may cause electric shock or fire Unplug the power cord for the maintenance or repair of the product or replacement of any parts Failure to do so may cause...

Page 5: ...Pa over water temperature is and ambient temperature is 0 0 Connect to the cold water pipe when installing the product Connection to a hot water pipe will cause the failure of the product Connect to a water pipe when installing the product If no water is supplied the prduct will not work properly This may cause external dis tortion of the product Keep at least 0cm from the wall to allow for ventil...

Page 6: ...ause failure electric shock or fire Do not clean the product with water benzene or thinner This may cause electric shock or fire If water leaks inside the product or collects around the product close the water supply valve unplug the power cord and contact the customer service center Do not place or use heating appliances such as electric ovens or electric toasters on the product This may cause el...

Page 7: ...e CIM 15 5 Series e r ie Knife Drum Tank utter utton Control Panel Snow ICE FAST SLOW SELECTION CLEAN Cooling Water Control witch Fuse Power witch Water upply for Ice Making Power Cable Coolant Drain Coolant upply d ustment egs ...

Page 8: ...e Water upply alve wil be opened or closed et the drum speed et the drum speed from to Drum peed and rror Codes are displayed depending on the operating mode efer to the rror Codes Table on the page for the rror Codes This is displayed when the Container Mode is activated This is displayed when the Water Mode is activated This is displayed when the Cleaning Mode is activated This is displayed when...

Page 9: ...ccur C i er C r S i d ust the swich depending on the cooling water temperature very time the button is pressed the operating mode will change from Container Mode to Water Mode and from Water Mode to Container Mode The default mode is Container Mode Container Mode elect for pouring milk in the container to make ice snowflakes efer to the page for the description on the mode Water Mode elect for mak...

Page 10: ... s Container Container Cap upport Cap Container Cap pen Wrench eserve Packing at patula Mesh Fiter 3 dapter all alve 3 Tubing ine Tubing ine 3 3 Way Connector User Manual Manual Fuse Power witch Water upply for Ice Making Power Cable Coolant Drain Coolant upply dustment egs n additional monitor may be re uired depending on the length of the drain hose Connect the pipes for coolant supply and drain...

Page 11: ... 15 0 30 15 0 30 I e r is se i i r s e e 1 i r r er e i e e r i e re e The machine is designed for 0 and 50 z so the exclusive outlet should be used 1 er C e i emove all water inside be aware of the danger of freezing and bursting in winter and unplug the product when the product will not be used for a long time When draining re uired please contact authorised service center or dealer ree e r e i ...

Page 12: ...ling water control switch C i er Place the container for additives at the top of the product er Use only water without any additives sec ow to se the Container Fillthe container with additives and firmly close it using the container cap open wrench Put the container upside down in the container compartment on the top 3 Press the container mode using the container mode on the control panel very tim...

Page 13: ...e Press the Mode button and the Water supply valve wil be opened or closed 3 Press the peration button for seconds to stop cleaning Cleaning will stop The Cleaning icon will flash on the CD screen during cleaning e careful to prevent water from flowing into the control box when cleaning the product Failure to do so may cause operational failure short circuit or errors Cleaning unction Turn the Pow...

Page 14: ... Mode button and the Water supply valve wil be opened or closed 3 Press the peration button or Cleaning button for seconds to stop cleaning Cleaning will stop The Cleaning icon will flash on the CD screen during cleaning e careful to prevent water from flowing into the control box when cleaning the product Failure to do so may cause operational failure short circuit or errors Cleaning unction Turn...

Page 15: ... no ice in the drum or ice in one side in the drum Does the buzzer sound while the Container LED flashes Does the compressor workproperly Are there any heating appliancesnear Does the buzzer sound while the Water LED flashes Contact the customer service center after checking Place the additives in the container Contact the customer service center after checking Keep as far away from heating applia...

Page 16: ... x D x Ice having Capacity Weight ated oltage ated Current efrigerant Condenser perating Temperature rum Type Ice haver I eries mm e cept the container and ad ustment legs cc min kg 5 a ater ooling Type 6 e e s e r e esi s e i i i i is ser M re s e e i ri r i e e s re e i i r e e e r ...

Page 17: ...ries 38 35 mm e cept the container and ad ustment legs cc min kg 5 a ater ooling Type Product ame Model Dimension W x D x Ice having Capacity Weight ated oltage ated Current efrigerant Condenser perating Temperature e e s e r e esi s e i i i i is ser M re s e e i ri r i e e s re e i i r e e e r ...

Page 18: ...e written Delivery of ew Product Customers Collection of ld Product aste Rec cling The Company collects and recycles the products in cooperation with the government for a better environment as specified below When customers purchase new products and dispose of the old ones the Company will collect the old products from customers without charge Agenc aste ome A liances is osal lant Warranty ...

Page 19: ...MEMO ...

Page 20: ...nsibilityfor any issues caused by using other parts or filters except genuine parts or filters for the Ice haver The appearance and specifications of the product are sub ect to change without prior notice to ensure the improvement of the product ...

Reviews: