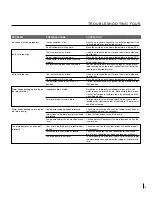
PROBLEM
Unit does not operate.
Unit operates but does not produce
any ice.
T R O U B L E S H O O T I N G O N E
13
POSSIBLE CAUSE
The unit is unplugged.
Breaker is tripped or fuse is blown.
Ice machine selector switch is in the "OFF"
position.
The unit has just been started and it has
been less than 6 hours.
Typical ice production cycle can take up to
1.5 hours. Initial startup cycles can be
longer.
The selector switch is in the "OFF" or
"CLEAN" position.
No water in the reservoir.
Distributor tube is restricted.
Build up of deposits on evaporator plate.
Condenser fan air flow is restricted.
Room and/or water temperature is too
warm.
Leaking drain valve.
Inadequate drain system.
Grid cutter is unplugged.
Circulation pump is unplugged.
CORRECTION
Plug in the unit.
Reset breaker or replace fuse. Check to make sure there is
not a short in the electrical circuit.
Set the rocker switch on the grille of the ice machine to the
"ON" position.
Ice produced when the unit is initially started will melt off in
the bin. Ice will accumulate in the bin. In 6 hours there can
be a few cubes in the bin. This is normal operation.
Check the unit in 24 hours for ice accumulation in the bin.
Set the rocker switch on the grille of the ice machine to the
"ON" position.
Make sure that the reservoir drain plug is installed. Check
the water line to the unit to make sure it is on and that there
are no restrictions or kinks in the line. Check all filters to
make sure they are not restricted or plugged.
See "CLEANING YOUR ICE MACHINE" section for clean-
ing the unit for proper operation.
See "CLEANING YOUR ICE MACHINE" section for clean-
ing the unit for proper operation.
Make certain the grille in the front of the unit is free and
open for proper air circulation. Check and clean the con-
denser coil by removing the grille in the front of the unit.
Clean the condenser with a vacuum and brush attachment.
Move the unit to an area where ambient temperature is
below 90°. F. The unit should not be placed next to a heat
source such as an oven. Check for cold water connection.
See "CLEANING YOUR ICE MACHINE" section for clean-
ing the unit. This will also dissolve and flush out foreign
material in the drain valve causing it to leak.
Restriction in drain lines will cause ice in the bin to melt. If
using a gravity drain, make certain there are no kinks or
restrictions in the drain lines. If using a drain pump, check
the inlet screen, discharge line, and vent line for any build
or restrictions.
Plug in the grid cutter so that ice slabs can be cut into cube.
Plug in the circulation pump so that water from the reservoir
can be circulated over the evaporation plate.


