12
Reversible door (single door only)
The door of the wine cabinet can be hung on the right hand
or left hand side.
This procedure is best performed with the wine cabinet
free from undercounter position, empty of wine bottles and
shelves and disconnected from the mains power supply.
Access to the bottom hinge plate may need the appliance to
be tilted backwards, please take care to adequately support
your appliance.
If you have to lie the appliance down, please make sure any
flooring is adequately protected and when you finish the
procedure allow 12/24 hours for the refrigerant to settle back
into the compressor before turning your appliance back on.
Refit as required in the under counter position.
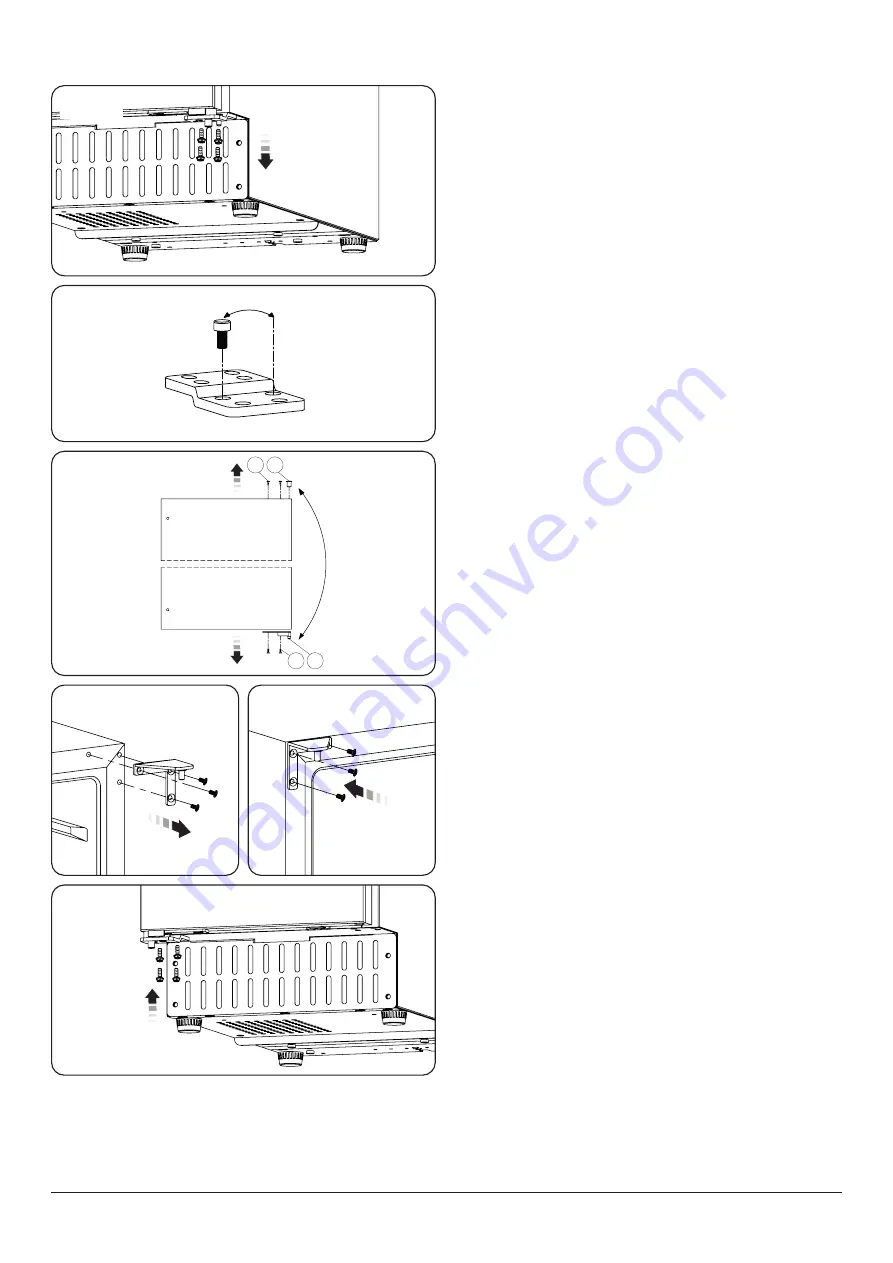
Step 1
Remove and retain the four fixings screws from the
bottom hinge bracket of the appliance (
Note:
Take care to support the door as it will now drop away
from the top hinge bracket.
Retain the bottom hinge bracket and the door for use.
Step 2
Move the screw and replace in the hole shown
).
Step 3
) Remove the door hinge bracket (
1
) by
removing the two screws (
2
) – Retain the parts for use.
Remove the hinge bush (
3
) and the two blanking plugs (
4
)
and retain for use.
Fit the door hinge bracket (
1
) to the top of the door with two
screws (
2
)
.
Fit the two blanking plugs (
4
) to the bottom edge of the door.
Fit the hinge bush (
3
) to the bottom edge of the door.
Step 4
Remove the RH upper hinge bracket, retaining the
screws for use (
Remove the three blanking plugs from the LH hinge position
and refit into the screw holes of the RH upper hinge bracket.
Fix the new LH hinge bracket as shown using the 3 screws
from the RH upper hinge bracket (
Step 5
Rotate the door and fit to the LH side of your
appliance. Ensure the top hinge pin is correctly located in the
hinge bush (
3
)
Support the door and fit the bottom hinge (
Adjusting your door
After reversing the opening direction of your appliance door,
it may need adjusting, to ensure alignment with the outer
carcass of the appliance.
Adjustment can be made by loosening the two screws (
2
) and
aligning the door. Retighten the screws once door is aligned.
Fig. 4.9
4
2 1
3
Fig. 4.12
Fig. 4.13
Fig. 4.8
Fig. 4.11
Fig. 4.10


