The various controls are removed and replaced as
follows.
Note
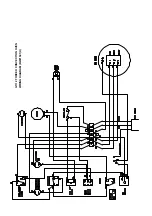
When replacing connections, refer to wiring diagram
in this manual. It can be seen that all wires are
numbered.
3.2.2 Pilot Lamps
Pull off push-on connectors at back and remove hex
nut which secures lamp to panel then withdraw lamp
from front.
Replace in reverse order.
3.2.3 Oven Light Push-Button
Remove push-on connectors at rear. Hold aluminium
front ring and turn switch body slightly anti-clockwise,
thus enabling ring to be fully unscrewed until free of
its thread. Grasp ring and pull it together with black
plastic button, away from switch body.
Replace in reverse order, positioning hex nut so that
the black push-button is approximately flush with
aluminium ring.
3.2.4 Oven Thermostat
Pull off connections at rear, also control knob.
Remove hex nut securing thermostat to panel.
Open oven doors and remove grid shelves.
Remove screws in bottom of oven back panel. Ease
bottom of panel forward slightly and pull down to
release top location thus enabling panel to be
withdrawn from oven.
Ease rear back of RH panel slightly toward centre,
then remove it backward to release front location.
Remove panel from oven thus revealing thermostat
phial. Remove clips securing phial, also slacken clip
retaining capillary tube to inside wall of control gear
compartment.
Withdraw thermostat, feeding capillary tube and phial
through hole in oven wall.
Replace in reverse order, taking car to replace
insulating sleeving on the capillary tube, and to coil
excess tubing out of the way of live parts.
Note
Re-calibration of thermostat requires use of a special
tool, and therefore, cannot be undertaken other than
by qualified personnel.
3.2.5 Power Switch
Pull off connections at rear. Compress plastic
securing tabs inwards, enabling switch to be
withdrawn from front.
To replace, simply push switch into hole, ensuring it is
the correct way up. The locating tabs automatically
spring into position.
3.2.6 Timer
Remove push-on connections at the rear. Pull off
control knob, and undo the screws holding timer to
panel. Replace in reverse order.
3.3 GAS CONTROLS
3.3.1 To Remove Gas Control-Valve
I S O L A T E A P P L I A N C E F R O M GA S A N D
ELECTRICITY SUPPLIES
a) Withdraw control panel as described in
b) Remove burner grille (4 x M5 Pozidriv screws)
c) Remove RH outer side panel. To facilitate this,
appliance may have to be temporarily withdrawn
from its location.
d) Undo union nuts securing thermocouple and pilot
supply pipe, at rear of piezo ignitor.
e) Remove the screws holding fixing bracket to the
oven wall. Pull off lead from piezo ignitor.
f) Remove plastic terminal box cover from valve and
disconnect wiring.
g) Undo nuts on compression fittings on both inlet and
outlet gas pipes.
h) Remove screw holding control bracket to front tie
and remove control valve complete with piezo
ignitor.
j) Replace in reverse order.
When fitting a replacement control valve, transfer gas
fittings and fixing bracket, complete with piezo unit
from old control to the new one.
Check adjustment of a replacement valve as
described in the beginning of this instruction.
3.3.2 Open Top Gas Taps
Service
Remove two screws from tap body front. Withdraw
spindle and niting arrangement to allowing plug to be
eased out. For details of regreasing procedure,
consult section.
Replace in reverse order.
Removal
Undo brass nut of compression fitting on gas supply
pipe at gas tap rear.
Undo 2 x M5 hex head saddle mounting screws and
gently remove tap from supply manifold.
Draw tap forward and remove thermocouple
connection from FFD section of tap.
Replace in reverse order.
3.3.3 Regreasing
Clean gas tap plug with a soft rag and regrease using
an approved high temperature lubricant. Take care
not to over-grease as surplus may cause blockage in
the gasways.
Replace parts in correct order and check for gas
soundness.
Note
Plugs and bodies are machined in pairs and are
therefore NOT INTERCHANGEABLE. Always clean
one tap at a time.


