WARNING – SERVICING TO BE CARRIED OUT ONLY BY AN AUTHORISED PERSON
Disconnect from electricity and gas before servicing. Check appliance is safe when you have finished.
9
Technical Data
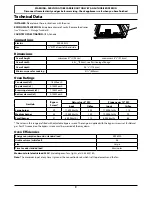
INSTALLER:
Please leave these instructions with the user.
RATING PLATE LOCATION:
Inside base drawer of cavity. Remove the drawer
(see ‘Overview’ > ‘Storage’ for details)
.
COUNTRY OF DESTINATION:
USA, Canada.
Connections
Electric
240 V 60 Hz
Gas
½” NPT at rear left-hand side
Dimensions
Overall height
minimum 37
3
/
8
” (95 cm)
maximum 38
3
/
8
” (97.5 cm)
Overall width
35
7
/
16
” (90 cm); see
‘Positioning of Range’
.
Overall depth
28
1
/
8
” (714 mm)
Minimum space for cooktop
31½” (800 mm)
Oven Ratings
Fan element (x2)
1.8 kW each
Top element (x2)
0.75 kW each
Browning element (x2)
1.15 kW each
Bottom element (x2)
0.75 kW each
Gas Hob
Bypass
Screw*
Natural gas 4” WC
Propane gas 10” WC
Input
Orifice
Input
Orifice
Large burner
49
17,500 btu/hr
205
17,500 btu/hr
118
Medium burner
38
12,000 btu/hr
150
12,000 btu/hr
99
Small burner
31
6,000 btu/hr
112
6,000 btu/hr
68
* The valves in this range are fitted with adjustable bypass screws. The range is supplied with the bypass screws set for Natural
gas. For LPG conversion the bypass screws must be screwed all the way down.
Oven Efficiencies
Energy consumption based on standard load
0.99 kWh
Usable volume (cubic feet)
3.8
Size
Large
Time to cook standard load
44 minutes
Maximum total electric load 240 V:
(including oven fans, lights, etc.) 3.85 kW, 16 A
Note:
The maximum input at any time is given as the convection broil, which is all top elements and the fan.
ArtNo280-0090 Drawer Cavity & Badges
Summary of Contents for Professional 90
Page 1: ...Professional 90 Dual Fuel F200094 01 Service Instructions...
Page 2: ...ii...
Page 10: ...10...
Page 11: ...11...


