background image

istruzioni di montaggio / Instructions for installation

agape srl

 Via Po Barna, 69 - 46031 Bagnolo S.Vito (MN) Italia

tel. 0376/250311 - www.agapedesign.it   06231/02-06231/02 

01/2009


"DOCCE FLAT D"

E1P - preparazione / 

"FLAT D SHOWERS"

E1P - preparation

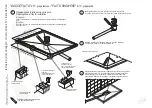
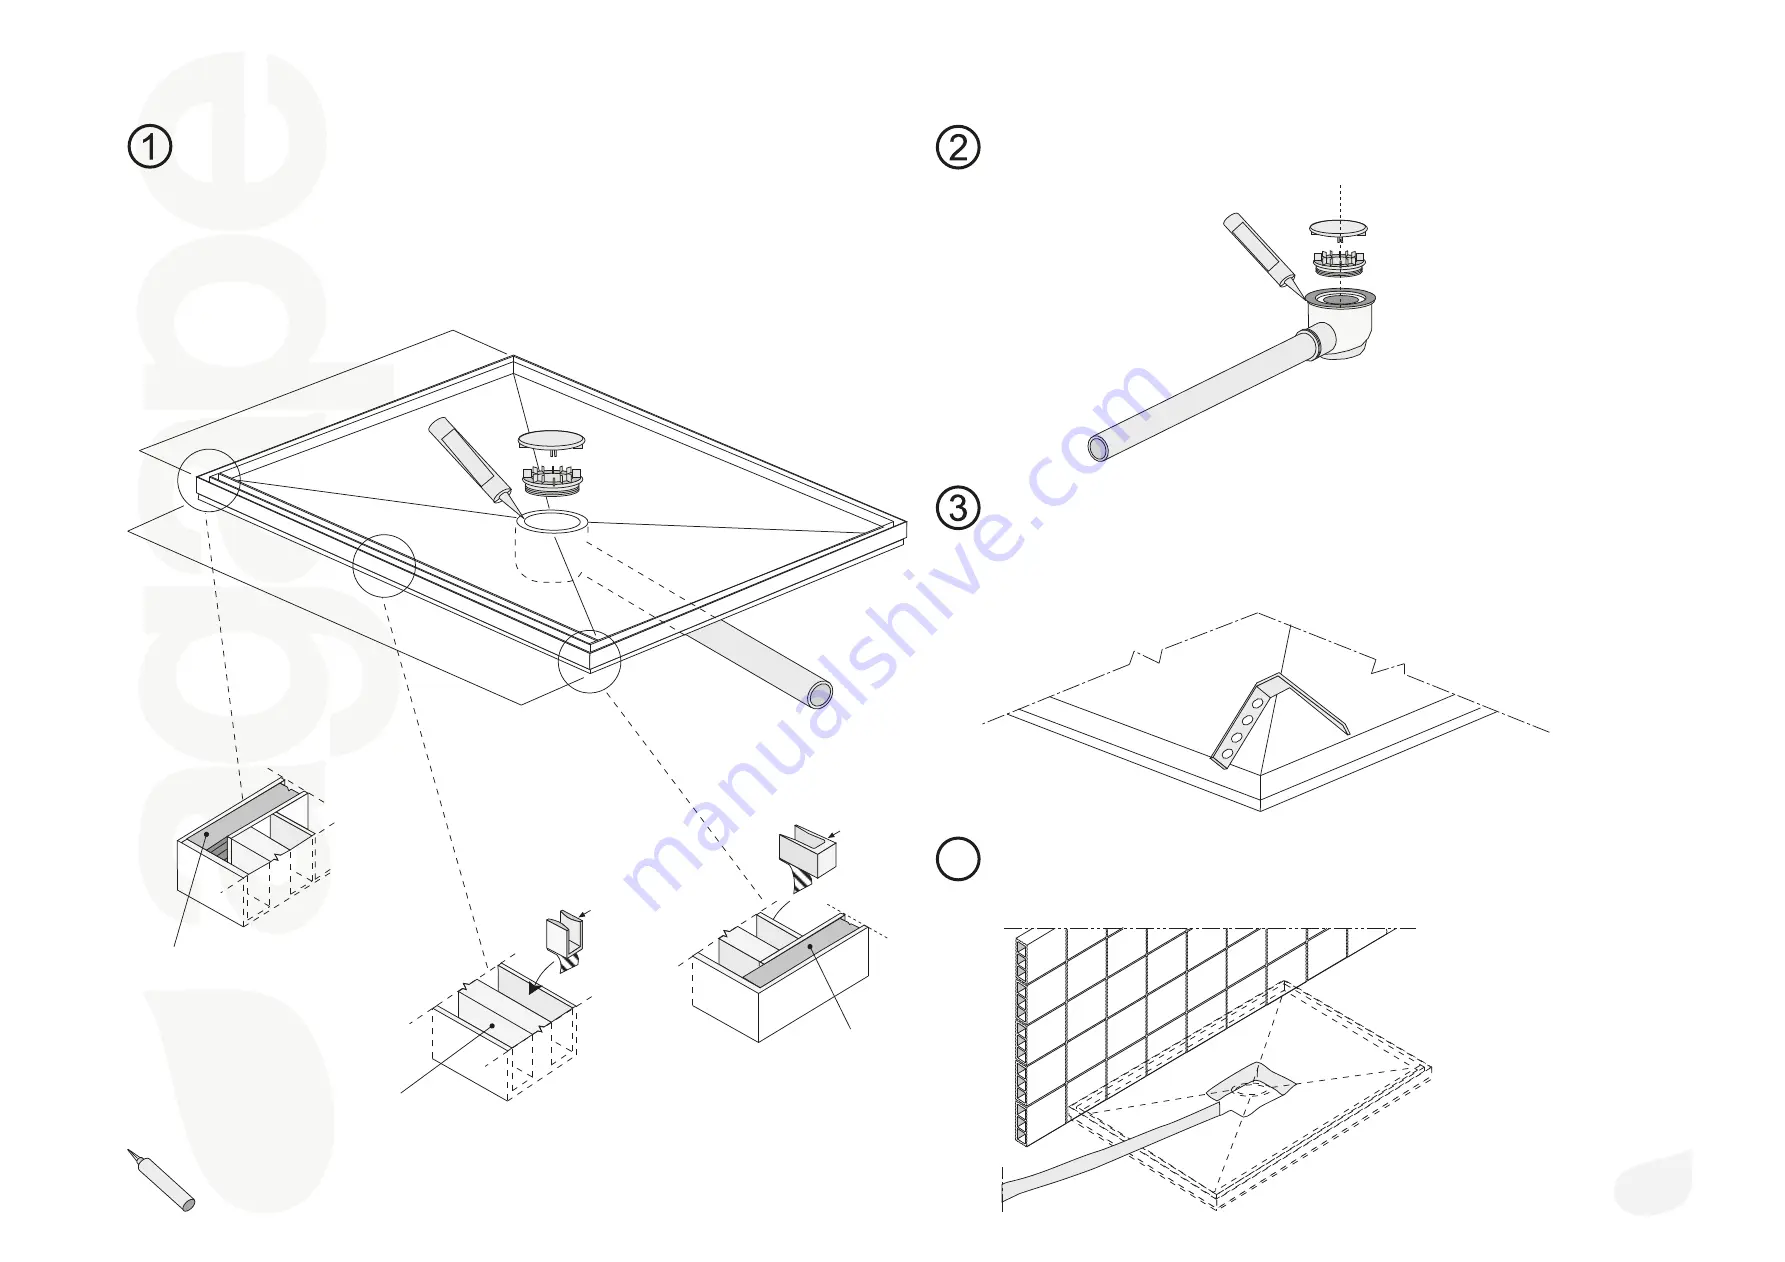
Applicare alla piletta un tubo ø 40 mm che esca dal perimetro del piatto.

Fix a ø 40 mm tube to the waste, so that it reaches outside the perimeter of the tray.

Ripiegare le alette per un fissaggio efficace con la malta di sottofondo.

Fold the wings in order to fix effectively with mortar.

1218/1418/1618/1818

(47"61/64)/(55"53/64)/(63"45/64)/(71"37/64)

818/918/1018

(32"13/64)/(36"9/64)/(40"5/64)

riempitivi di protezione

protective inserts

riempitivi di protezione

protective inserts

riempitivi di protezione

protective inserts

vista sotto / 

view from below

*

utilizzare silicone trasparente antimuffa

*

use clear antimould silicone

silicone

Preparazione del piatto doccia per la posa

Preparing shower tray for installation

ATTENZIONE!

Il piano va installato con i 4 riempitivi di protezione in poliuretano espanso all’interno della

cava.

ATTENTION!

The shower tray has to be  installed with the 4 protective inserts made of polyurethane foam

in the channels.

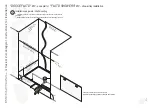
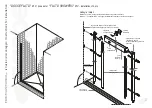
guida fine corsa

siliconata nella cava

end of run stopped fixed into

the channel with silicone

guida siliconata al centro

della cava

rail fixed with silicone at the

centre of the channel

*

silicone

2

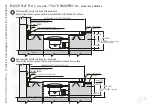
Realizzare pozzetto e spaccatura per collegamento con scarico esterno al piatto

(tubo diametro 40 mm). Per la profondità dello scavo vedi sezione a pagina 3.

Build recess and gap for connection to  external drain of the shower tray

(tube of 40 mm diametre). For the depth of  the recess see section at page 3.

4

*

*

*

*

silicone

Summary of Contents for FLAT D E1P

Page 1: ...rs Place the water drain outside the shower perimeter All measurements are in mm Assemblato Assembled 1 818 918 1018 32 13 64 36 9 64 40 5 64 1182 1382 1582 1782 46 17 32 54 13 32 62 9 32 70 5 32 1218 1418 1618 1818 47 61 64 55 53 64 63 45 64 71 37 64 2000 78 3 8 2 4 Elenco delle parti List of components 1 guida rail 2 aste e carter bar and guard 3 fianco side panel 4 anta door 5 dima anta door te...

Page 2: ...s vista sotto view from below utilizzare silicone trasparente antimuffa use clear antimould silicone s i l i c o n e Preparazione del piatto doccia per la posa Preparing shower tray for installation ATTENZIONE Il piano va installato con i 4 riempitivi di protezione in poliuretano espanso all interno della cava ATTENTION The shower tray has to be installed with the 4 protective inserts made of poly...

Page 3: ...finito piastrelle o altro 800 900 1000 31 1 2 35 7 16 39 3 8 sigillare finished wall surface e g tiles etc seal seal finished floor pozzetto con piletta sifonata waste trap solaio floor sottofondo underfloor surface protezione cava poliuretano espanso protective insert made of polyurethane foam rivestimento finito piastrelle o altro sigillare finished wall surface e g tiles etc seal seal finished ...

Page 4: ...checking gap between finished wall surfaces parete al finito finished wall surface parete al rustico unfinished wall pavimento finito finished floor Installazione a parete Wall mounting Verificare che l asta in prossimità di eventuali spigoli possa essere vincolata con sicurezza Make sure that the bar is securely fixed when placed close to the edge of the wall sottofondo underfloor surface 1182 13...

Page 5: ...na outer channel fissare l asta con la guida superiore già inserita fix the bar once the upper rail has been fixed 5 90 guida superiore upper rail Dettaglio Detail Attenzione Le asole della guida superiore definiscono la posizione del fianco Attention The elliptical holes in the upper rail determine the position of the vertical side panel istruzioni di montaggio Instructions for installation agape...

Page 6: ...ttamente make sure that the bushes are correctly installed Applicare il fianco alla guida superiore Insert the side panel into the upper rail spessori 4 mm thickness 4 mm 5 32 istruzioni di montaggio Instructions for installation agape srl Via Po Barna 69 46031 Bagnolo S Vito MN Italia tel 0376 250311 www agapedesign it 06231 02 06231 02 01 2009 ...

Page 7: ...uperiore Attach the door to the wheels of the upper railA foro maniglia hole to take F o r o m a n i g l i a v e r s o l a p a r e t e vista interna Inside view spessori 14 mm thickness 14 mm 35 64 istruzioni di montaggio Instructions for installation agape srl Via Po Barna 69 46031 Bagnolo S Vito MN Italia tel 0376 250311 www agapedesign it 06231 02 06231 02 01 2009 ...

Page 8: ...hat the handle does not hit the side panel vista interna Inside view 8 silicone s i l i c o n e silicone ATTENZIONE attendere 24 ore prima dell utilizzo della doccia ATTENTION allow 24 hours before using the shower silicone Interno Inside 8 mm 5 16 istruzioni di montaggio Instructions for installation agape srl Via Po Barna 69 46031 Bagnolo S Vito MN Italia tel 0376 250311 www agapedesign it 06231...

Reviews: