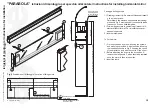
55 (2”1/8)
45 (1"3/4)
100 (3"7/8)
agape sr
l. via P
o Bar
na,69- 46031 Bagnolo S
. Vito (MN) Italia
tel 0376.250311 - Cod.
05016/05 - MARZO 2007
"PARABOLA"
Istruzioni di montaggio per specchio orizzontale / Instructions for installing horizontal mirror
1/2
Istruzioni di monta
g
gio / Instructions f
or installation
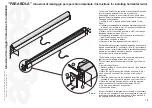
Part. A
D
V
T
R
100 (3"7/8)
Lo specchio Parabola è composto di due elementi distinti tra
loro: la lampada dotata di schermo e lo specchio.
Il montaggio avviene in due momenti distinti, prima viene
fissata a parete la lampada e successivamente lo specchio.
Fissaggio della lampada:
1) Svitare le viti V e togliere entrambe le testate T (vedi
Part.A).
2) Collocare la lampada nella posizione desiderata seguendo
le indicazioni riportate in fig.1 e 2 e segnare sulla parete
la posizione dei fori da realizzare.
3) Infilare nei fori i tasselli ed avvitare le viti D in dotazione
lasciando sporgere almeno 20 mm.
4) Posizionare la lampada e bloccarla con le rondelle ed i
dadi R in dotazione (vedi Part.A).
5) Rimontare entrambe le testate.
6) Procedere con il collegamento dei cavi elettrici.
Per procedere alla sostituzione della lampadina è necessario
togliere una estremità (T) e sollevare il vetro (S) per accedere
al vano interno; ruotare la lampadina in corrispondenza degli
attacchi quindi sfilarla, procedere in senso contrario per
l’inserimento della nuova lampadina.
The Parabola mirror is made of two separate elements: a
light fixure with reflectin screen, and a mirror.
These must be installed separately: first the light, then the
mirror.
To install the light fixture:
1) Remove screws (V) and both end plates (T) (see detailed
drawing Part. A).
2) Place the light in the desired position as shown in Fig.1
and 2 and mark on the wall the position of the holes to
be drilled.
3) Place the wall plugs into the holes and insert the screws
supplied (D) leaving them to protrude by at least 20 mm.
4) Place the light into position and fix it with the washers
and nuts supplied (R) (see detailed drawing Part. A).
5) Fix both end plates back into position.
6) Connect the power.
In order to proceed to replacement of the bulb it is necessary
to remove one end plate (T) and raise the glass to enter the
inner space; rotate the bulb and remove it, then proceed in
the opposite direction to put the new bulb in.


