4-3 ATTACHING TO THE TRACTOR
4-3.1
Align the tractor drawbar with the ma-
chine. Raise or lower the Soil Finisher ring
hitch, as needed, using the swivel jack. At-
tach the unit with proper size hitch pin.
4-3.2
Clean all hydraulic couplings and attach
to the tractor. When properly attached, the
hydraulic control lever should cause the Soil
Finisher to:
a.
Lower to the ground when the control arm is
moved forward or downward, and
b.
Raise when the control arm is moved back-
ward or upward.
4-3.3
Fully extend the hydraulic gauge wheel
cylinders, and place the cylinder lockouts in
the transport lock position over the cylinder
rods. Secure the lockouts with the lockout
pins.
4-3.4
Always place the swivel jack on the in-
terior mount before setting the machine in
motion.
4-4 FIELD OPERATION
4-4.1
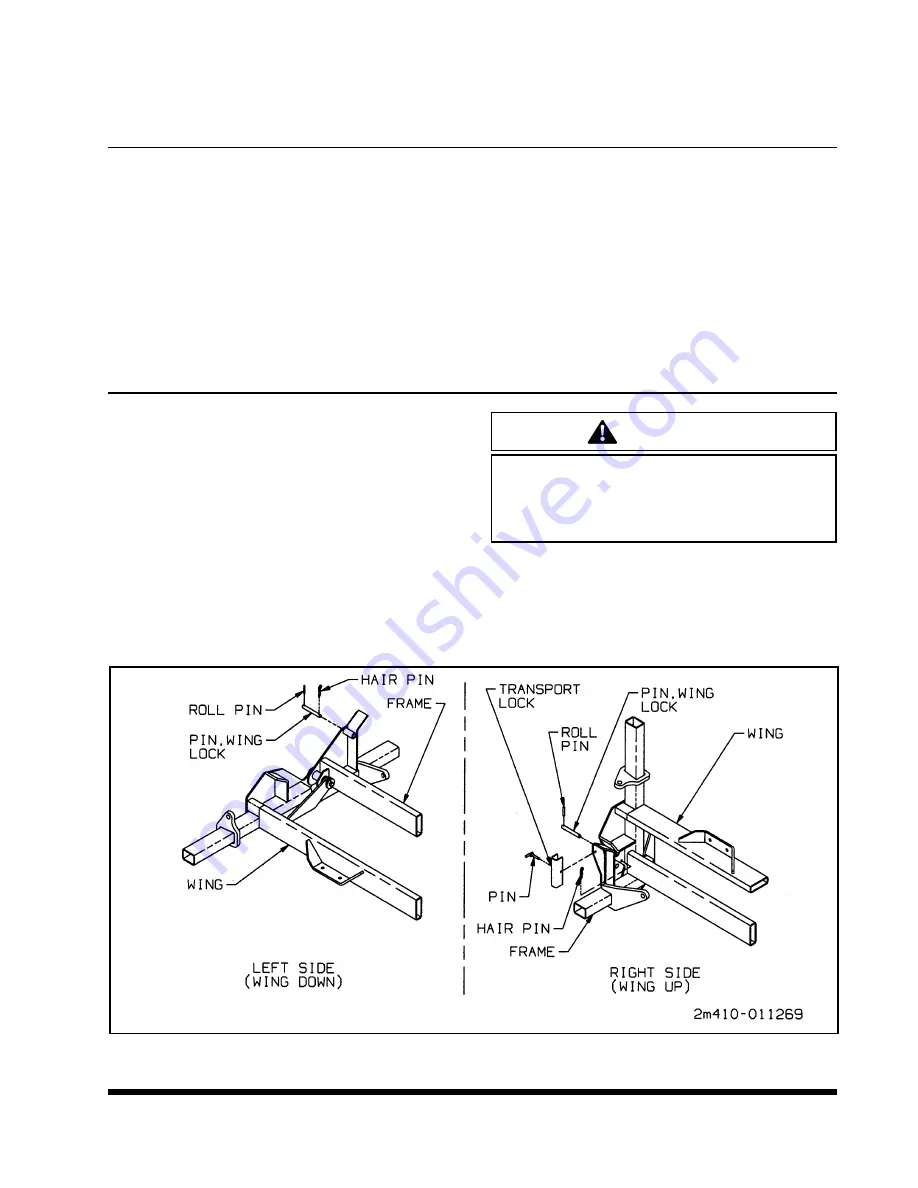
Raise the unit to take the weight off of
the transport locks. Remove the transport
locks from the lift cylinders (on the main
frame only). Store the transport locks on the
front hinge brackets
(See Figure 4-2)
.
4-4.2
Remove the wing lock pins and store in
the extra hole in the hinge bracket. Unfold
the wings and extend the fold cylinders com-
pletely
(See Figure 4-2)
.
CAUTION
FAILURE TO REMOVE WING LOCK
PINS BEFORE UNFOLDING WINGS
WILL CAUSE PERMANENT EQUIP-
MENT DAMAGE.
4-4.3
Check the front to rear leveling of the
frame. Adjust radius rod until frame is level
at working depth and lock it with the jam nut.
4-3
Figure 4-2 Transport Locks
Summary of Contents for Glencoe SF4800
Page 1: ...Glencoe MODEL SF4800 SOIL FINISHER OPERATOR S MANUAL Form No 79019152 March 2001...
Page 2: ......
Page 3: ...MODEL SF4800 SOIL FINISHER OPERATOR S MANUAL PURCHASED FROM DATE ADDRESS PHONE NO SERIAL NO...
Page 4: ......
Page 11: ...2 4 Figure 2 1 11 4 Shank Placement Assembly...
Page 12: ...2 5 Figure 2 2 14 0 Shank Placement Assembly...
Page 13: ...2 6 Figure 2 3 16 8 Shank Placement Assembly 1 of 2...
Page 14: ...2 7 Figure 2 4 16 8 Shank Placement Assembly 2 of 2...
Page 15: ...2 8 Figure 2 5 19 4 Shank Placement Assembly 1 of 2...
Page 16: ...2 9 Figure 2 6 19 4 Shank Placement Assembly 2 of 2...
Page 17: ...2 10 Figure 2 7 22 0 Shank Placement Assembly 1 of 2...
Page 18: ...2 11 Figure 2 8 22 0 Shank Placement Assembly 2 of 2...
Page 19: ...2 12 Figure 2 9 24 8 Shank Placement Assembly 1 of 2...
Page 20: ...2 13 Figure 2 10 24 8 Shank Placement Assembly 2 of 2...
Page 21: ...2 14 Figure 2 11 27 4 Shank Placement Assembly 1 of 2...
Page 22: ...2 15 Figure 2 12 27 4 Shank Placement Assembly 2 of 2...
Page 23: ...2 16 Figure 2 13 30 0 Shank Placement Assembly 1 of 2...
Page 24: ...2 17 Figure 2 14 30 0 Shank Placement Assembly 2 of 2...
Page 25: ...2 18 Figure 2 15 32 8 Narrow Frame Shank Placement Assembly 1 of 2...
Page 26: ...2 19 Figure 2 16 32 8 Narrow Frame Shank Placement Assembly 2 of 2...
Page 27: ...2 20 Figure 2 17 32 8 Wide Frame Shank Placement Assembly 1 of 2...
Page 28: ...2 21 Figure 2 18 32 8 Wide Frame Shank Placement Assembly 2 of 2...
Page 29: ...2 22 Figure 2 19 35 4 Shank Placement Assembly 1 of 2...
Page 30: ...2 23 Figure 2 20 35 4 Shank Placement Assembly 2 of 2...
Page 31: ...NOTES 2 24...
Page 33: ...3 2 Figure 3 1 Frame Assembly 30 to 35...
Page 35: ...3 4 Figure 3 2 Rockshaft Installation Frame Figure 3 3 Rockshaft Installation Frame 30 and 35...
Page 37: ...3 6 Figure 3 5 Wing and Wing Extensions 17 35 Models...
Page 40: ...3 9 Figure 3 9 Fold Cylinder Bracket 17 through 27...
Page 41: ...3 10 Figure 3 10 Fold Cylinder Bracket 30 and Larger...
Page 42: ...3 11 Figure 3 11 Installation of Fittings in Manifold...
Page 43: ...3 12 Figure 3 12 Installation of Shanks and Clamps...
Page 45: ...3 14 Figure 3 14 Spring Shank Assembly Figure 3 15 Ratchet Jack Installation...
Page 46: ...3 15 Figure 3 16 Disc Gang Hydraulic Assembly...
Page 49: ...3 18 Figure 3 19 Leveling Assembly Installation...
Page 51: ...3 20 Figure 3 20 Warning Light Installation...
Page 53: ...3 22 Figure 3 21 Hydraulic Radius Rod...
Page 54: ...3 23 Figure 3 22 Rear Hitch Assembly Option...
Page 57: ...NOTES 3 26...
Page 64: ...4 7 Figure 4 6 Spike Harrow 3 and 5 Bar Figure 4 7 Spike Harrow Tilloll Style...
Page 67: ...4 10 Figure 4 11 Lubrication Schedule...
Page 69: ...NOTES 4 12...
Page 72: ...NOTES 5 3...
Page 73: ......
Page 74: ......
Page 75: ...Glencoe AGCO CORPORATION 4205 River Green Parkway Duluth Georgia 30096 Printed in U S A...


