background image

S n a p S c a n   1 2 3 6 s 

O w n e r ’ s   G u i d e 


P r e f a c e 

T h i s  c h a p t e r  g i v e s  y o u  g e n e r a l  i n f o r m a t i o n  a b o u t  t h e  S n a p S c a n  1 2 3 6 s ™  a n d 
a b o u t  


h o w  t o  u s e  t h i s  g u i d e 


C h a p t e r  1  —  P r e p a r i n g  t h e  S c a n n e r 

“ P r e p a r i n g  t h e  s c a n n e r ”  e x p l a i n s  h o w  t o  p r e p a r e  y o u r  S n a p S c a n  f o r 
i n s t a l l a t i o n . 


C h a p t e r  2  —  I n s t a l l i n g  t h e  S c a n n e r  f o r  t h e  M a c i n t o s h  C o m p u t e r 

T h i s  c h a p t e r  t e l l s  y o u  h o w  t o  s e t  u p  y o u r  S n a p S c a n  f o r  t h e  A p p l e ® 

M a c i n t o s h ® . 


C h a p t e r  3  —  I n s t a l l i n g  t h e  S c a n n e r  f o r  t h e  P C 

T h i s  c h a p t e r  s h o w s  y o u  h o w  t o  s e t  u p  y o u r  S n a p S c a n  f o r  t h e  P C . 


C h a p t e r  4  —  M a k i n g  y o u r  F i r s t  S c a n 

T h i s  c h a p t e r  s h o w s  y o u  h o w  t o  m a k e  y o u r  f i r s t  s c a n . 


A p p e n d i x  A  —  U s i n g  t h e  T r a n s p a r e n c y  O p t i o n 

T h i s  a p p e n d i x  i n s t r u c t s  y o u  h o w  t o  c o n n e c t ,  u s e  a n d  c l e a n  t h e  t r a n s p a r e n c y 
o p t i o n . 


A p p e n d i x  B  —  U s i n g  t h e  A u t o m a t i c  D o c u m e n t  F e e d e r 

T h i s  a p p e n d i x  i n s t r u c t s  y o u  h o w  t o  c o n n e c t ,  u s e  a n d  c l e a n  t h e  a u t o m a t i c 
d o c u m e n t  f e e d e r . 


A p p e n d i x  C  —  T r o u b l e s h o o t i n g 

“ T r o u b l e s h o o t i n g ”  c a n  b e  h e l p f u l  w h e n  y o u  c o m e  a c r o s s  p r o b l e m s . 


A p p e n d i x  D  —  T e c h n i c a l  i n f o r m a t i o n 

T h i s  a p p e n d i x  p r o v i d e s  t h e  s p e c i f i c a t i o n s  f o r  y o u r  S n a p S c a n  1 2 3 6 s . 


A p p e n d i x  E  —  S n a p S c a n  R e g u l a t i o n  c o m p l i a n c e 

T h i s  a p p e n d i x  g i v e s  y o u  i n f o r m a t i o n  a b o u t  s a f e t y  r e g u l a t i o n s  a n d 
e l e c t r o m a g n e t i c  i n t e r f e r e n c e . 

Summary of Contents for SNAPSCAN 1236S

Page 1: ...can for the PC Chapter 4 Making your First Scan This chapter shows you how to make your first scan Appendix A Using the Transparency Option This appendix instructs you how to connect use and clean the transparency option Appendix B Using the Automatic Document Feeder This appendix instructs you how to connect use and clean the automatic document feeder Appendix C Troubleshooting Troubleshooting ca...

Page 2: ... and Omnipage L E are registered tradmarks of the Caere Corporation Color It is a trademark of MicroFrontier Inc Corel is a registered trademark of the Corel Corporation Intel and Pentium are registered trademarks of Intel Corporation Windows and Windows NT are trademarks or registered trademarks of Microsoft Corporation in the United States of America and other countries Other product or company ...

Page 3: ...he Image Editing Software 18 Installing the Scanner Software 19 Connecting the Scanner to your Macintosh Computer 20 Choosing a SCSI ID Number 20 Setting the Scanner to a SCSI ID Number 21 Connecting the Scanner 22 Testing the Connection 26 Installing Additional Software 26 C h ap t e r 3 In st allin g t h e S can n e r f o r t h e P C 2 7 Hardware Requirements 28 Installation with the Agfa Suppli...

Page 4: ...ext Pages in your Automatic Document Feeder 61 Correcting Paper Jams 62 Cleaning the Automatic Document Feeder 64 Cleaning the Transparent Guide Flap 64 Roller Cleaning 65 A p p e n d ix C T ro u b le sh o o t in g 6 6 General Problems 66 Installation Problems for Windows 95 and 98 68 Installation Problems for Windows NT 4 0 72 A p p e n d ix D T e ch n ical In f o rmat io n 7 5 Specifications 76 ...

Page 5: ...Pref ac e 5 Preface About SnapScan Environmental Requirements Precautions Cleaning your Scanner SCSI Devices How to Use this Guide How to Print this Guide ...

Page 6: ... tool in making presentations come to life If you purchased the automatic document feeder you can scan up to 60 sheets of text fast and without interruption Some software packages allow you to convert the scanned sheets of text into most of the commercially used text file formats If you purchased the transparency option you can scan transparent originals for example slides as well SnapScan support...

Page 7: ... might occur Precautions For your own safety and that of your equipment respect conscientiously the Environmental Requirements and always take the following precautions C au t io n For the reason of safety besides the personal maintenance mentioned in this Owner s Guide do not try to remove any mechanical parts or any electronic devices If your scanner needs service our dealer and service offices ...

Page 8: ...nd lenses inside the scanner n Do not use liquid cleaners or aerosol cleaners SCSI Devices SnapScan is a Small Computer System Interface SCSI device It communicates with your computer via the SCSI cable and SCSI card of your computer The SCSI communication allows you to have up to seven devices connected to your computer Examples of SCSI devices are a SCSI Hard Disk a SCSI CD ROM drive and so on A...

Page 9: ...d of your SCSI chain The supplied ISA SCSI card PC only has an ISA connector If you want to use a SCSI card for PCI slots you can order one from your PC dealer v Note Your SnapScan does not have a built in terminator C au t io n If two SCSI devices have the same ID number your system will not work properly and you may damage your SCSI devices For more information see Choosing a SCSI ID number ...

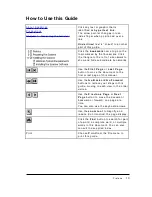
Page 10: ...Use the F irst P ag e or L ast P ag e button to move the document to the first or last page of this manual Use the Go B ack and Go F o rward buttons to retrace your steps in this guide moving to each view in the order visited Use the P re vio u s P ag e or N e xt P ag e button to move the document backward or forward one page at a time You can also use the keyboard arrows Use the z o o m t o o l t...

Page 11: ...ref ac e 11 How to Print this Guide 1 Choose Page Setup from the File menu 2 Choose your paper format from the Paper pop up menu 3 Select Orientation Portrait 4 Click OK 5 Choose Print from the File menu ...

Page 12: ...reparing t he Sc anner 12 Chapter 1 Preparing the Scanner This chapter helps you to prepare your SnapScan for installation Unpacking the Scanner Taking a Closer Look Unlocking the Scanner Performing a Power on Test ...

Page 13: ...heck each item to make sure that you have everything listed on the box and the packing list Check if there is no visible defect If something is missing contact your dealer 3 Remove the plastic wrapping and the packing materials from the scanner v Note Save the packing materials to protect the scanner during later transport ...

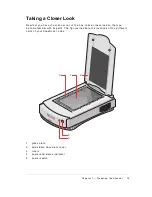
Page 14: ... the scanner out of the box take a closer look so that you become familiar with its parts The figures illustrate the locations of the different parts of your SnapScan 1236s 3 1 2 4 5 1 glass plate 2 adjustable document cover 3 rulers 4 power and status indicator 5 power switch ...

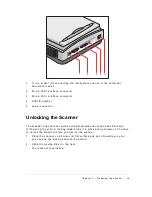
Page 15: ...onnector Unlocking the Scanner The scanner s optical box contains all optical components and rides back and forth during the scan A locking slider holds it in place during shipment You have to unlock the scanner before you turn on the scanner 1 Place the scanner on a horizontal flat surface and pull it towards you until you can see the locking slider at the bottom 2 Slide the locking slider to the...

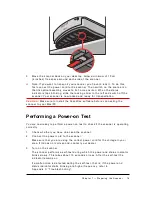
Page 16: ...e ScanWise software before connecting the scanner to your Mac PC Performing a Power on Test You are now ready to perform a power on test to check if the scanner is operating correctly 1 Check whether you have unlocked the scanner 2 Connect the power cord to the scanner Make sure that you are using the correct power cord for the voltage in your area If it does not correspond contact your dealer 3 T...

Page 17: ...irements Installing the Image Editing Software Installing the Scanner Software Connecting the Scanner to your Macintosh computer Choosing a SCSI ID Number Setting the Scanner to a SCSI ID Number Connecting the Scanner If your SnapScan is the only SCSI device to be connected to your computer If your SnapScan will be connected to your computer together with other SCSI devices Testing the Connection ...

Page 18: ...save it You need minimum 20 MB free hard disk space Installing the Image Editing Software C au t io n Make sure to install the ScanWise software before connecting the scanner to your Macintosh computer 1 Disable the virus protection software You can turn it off in the Extensions Manager Control Panel or you can drag the software out of the System Folder v Note After installing enable the virus pro...

Page 19: ... Click the dotted right arrow or move the slider to install 6 Click ScanWise to start the installation 7 Follow the instructions on your screen When ScanWise is installed you may be asked to restart your computer In this case repeat step 1 to 3 before continuing this procedure Then click the dotted right arrow or move the slider to install 8 Click Acrobat Reader to start the installation You need ...

Page 20: ...ned and which numbers are free 1 Make sure that your scanner is disconnected 2 Check in the SCSI ID list if SCSI ID number 2 is free Open the Apple System Profiler that you find under the menu For system 8 1 Select the menu Device and Information For minimum system 8 5 Click the tab Devices and Volumes o If SCSI ID number 2 is free check at the rear of the scanner if the SCSI ID number is set to n...

Page 21: ...ng the Scanner to a SCSI ID Number 1 Make sure that your scanner is turned off and that it is disconnected from your computer 2 Choose an unassigned SCSI ID number 3 Push the button above or underneath the SCSI ID number at the rear of the scanner until you see the number you want ...

Page 22: ... the beginning and one at the end You put the device with the terminator at the end of your SCSI chain Some SCSI devices such as the external hard disk have built in terminators and must therefore be placed at the end of your SCSI chain Check the documentation of each of your SCSI devices if you are not sure whether the device has a built in terminator or not The last device of your chain has to b...

Page 23: ...you are using another or a longer SCSI cable than the one provided with your scanner you have to put a terminator on the free 25 pin SCSI socket as shown on the picture 5 Tighten the connector screws to secure the connection v Note In case of problems refer to Appendix C Troubleshooting ...

Page 24: ...or switch off the terminator from the last device in the SCSI chain 2 Connect one end of the SCSI cable to the connector that has become available on this device 3 Place the terminator on the free 25 pin SCSI socket of the scanner 4 Connect the other end of the SCSI cable to the other connector of the scanner 5 Tighten the connector screws to secure the connection v Note In case of problems refer ...

Page 25: ...f the two other devices 2 Connect the free end of this SCSI cable to the scanner 3 Connect one end of the SCSI cable the one supplied with your scanner to the other adjacent SCSI device 4 Connect the other end of the SCSI cable the one supplied with your scanner to the scanner 5 Tighten the connector screws to secure the connection 6 Make sure that the last device in the chain is terminated v Note...

Page 26: ...t 15 seconds or less After the self test the indicator remains on If a malfunction is detected during the self test that is if the power and status indicator starts blinking at a higher frequency refer to Appendix C Troubleshooting 4 Turn on any other SCSI devices you may have attached and wait for them to start up 5 Turn on your Macintosh As your Macintosh computer starts up it performs a series ...

Page 27: ... the SCSI Driver Windows 95 and Windows 98 Windows NT Version 4 0 Installing the Scanner Software Windows 95 Windows 98 and Windows NT Version 4 0 Connecting the Scanner to your PC Choosing a SCSI ID Number Setting the Scanner to a SCSI ID Number Connecting the Scanner Installation If your PC already has a SCSI Card Connecting the Scanner to your PC Choosing a SCSI ID Number Setting the Scanner to...

Page 28: ...e your own SCSI card if you have one Some SCSI cards require a special SCSI cable for example wide SCSI Contact your supplier for the proper cable If you do not use the ISA SCSI card that is supplied with your SnapScan you should look at your PC s documentation for information about installing SCSI cards Check the installation and set up guidelines in the documentation that is supplied together wi...

Page 29: ...r connecting the scanner to your PC and instructions for testing the connection Installing the ISA SCSI card SnapScan requires a SCSI card to work with your Pentium PC C au t io n We assume that you have no other SCSI devices installed and that you use the card and cable that are supplied by Agfa 1 Turn off your computer and disconnect the power cord 2 Remove the cover of your computer 3 Find a fr...

Page 30: ... more information refer to your computer manual 4 Remove the corresponding slot cover from the back of the computer chassis Keep the screw that held the cover in place 5 Touch some metal part of the computer and then remove the SCSI card from its antistatic bag holding it by its metal support bracket Static electricity can damage your card 6 Position the SCSI card in the expansion slot and press d...

Page 31: ... he Sc anner f or t he PC 31 7 Secure the card with the screw that you removed in step 4 8 Put back the cover of the computer For more information refer to the installation guide of the ISA SCSI card and to your computer manual ...

Page 32: ...l the driver for your ISA SCSI card Now you are ready to install the scanner software Windows NT Version 4 0 v Note Make sure your scanner is not connected to your computer 1 Turn on your computer 2 Open the Control Panel 3 Open SCSI Adapters The SCSI Adapters dialog box appears 4 Select the Drivers page and click Add The Install Driver dialog box appears 5 Select Adaptec in the Manufacturers list...

Page 33: ...tation 3 Click the up or down arrow to select your type of scanner if needed 4 Click the dotted right arrow or move the slider to about ScanWise A demonstration of ScanWise will start 5 Click the dotted right arrow or move the slider to install 6 Click Acrobat Reader to start the installation You need Acrobat Reader to read the documentation 7 Follow the instructions on your screen When the instal...

Page 34: ...sconnected 2 Check at the rear of the scanner if the SCSI number is set to SCSI ID number 2 If it is not set it to SCSI ID number 2 To do this properly refer to Setting the scanner to a SCSI ID Number Setting the Scanner to a SCSI ID Number 1 Make sure that your scanner is turned off and that it is disconnected from your computer 2 Choose an unassigned SCSI ID number 3 Push the button above or und...

Page 35: ...cord 2 Plug one end of the SCSI cable into the SCSI card connector of your computer A SCSI cable is supplied with your scanner 3 Plug the other end of the SCSI cable into the SCSI connector at the rear of the scanner 4 Tighten the connector screws to secure the connection 5 Connect the power cord to the computer 6 Connect the power cord to the scanner v Note If you are using another or a longer SC...

Page 36: ...dicator remains on v Note If a malfunction is detected during the self test that is if the power and status indicator starts blinking at a higher frequency refer to the Troubleshooting section at the end of this chapter 8 Turn on your computer The operating system will now detect the scanner and will install the necessary files for the scanner hardware driver v Note In case of problems refer to Ap...

Page 37: ...nected 2 Check at the rear of the scanner if the SCSI ID number is set to number 2 n If it is not set it to number 2 To do this properly refer to Setting the Scanner to a SCSI ID number n If SCSI ID number 2 is already assigned you need to set the scanner to a free SCSI ID number To do this properly refer to Setting the Scanner to a SCSI ID number Setting the Scanner to a SCSI ID Number 1 Make sur...

Page 38: ...tors and must therefore be placed at the end of your SCSI chain Please check the documentation of each of your SCSI devices if you are not sure whether the device has a built in terminator The last device in your chain has to be terminated Your SnapScan has no built in terminator For more information about SCSI devices see earlier in this chapter SCSI devices Never try to connect the scanner to th...

Page 39: ...you have to put a terminator on the free 25 pin SCSI socket as shown on the picture 5 Tighten the connector screws to secure the connection v Note In case of problems refer to Appendix C Troubleshooting Your PC has a 25 pin connector and your SnapScan will be connected to your computer together with other SCSI devices þ If you install the scanner at the end of your SCSI chain 1 Remove or switch of...

Page 40: ...install the scanner between two other devices C au t io n Do not connect a terminator directly to the scanner in this configuration 1 Disconnect your SCSI cable from one of the two other devices 2 Connect the free end of this SCSI cable to the scanner 3 Connect one end of the SCSI cable the one supplied with your scanner to the other adjacent SCSI device 4 Connect the other end of the SCSI cable t...

Page 41: ...SI cable 1 Turn off your scanner and disconnect the power cord 2 Turn off your computer and disconnect the power cord 3 Connect the larger 50 pin end of the SCSI cable to the connector at the rear of your PC 4 Connect the smaller 25 pin end of the SCSI cable to the 25 pin plug of the scanner 5 Put a terminator on the free 25 pin SCSI socket as shown on the picture 6 Tighten the connector screws to...

Page 42: ... the last device in the SCSI chain 2 Connect one end of the SCSI cable to the connector that has become available on this device 3 Put the terminator on the 25 pin socket of the scanner 4 Connect the other end of the cable to the scanner 5 Tighten the connector screws to secure the connection v Note In case of problems refer to Appendix C Troubleshooting n If you install the scanner between two ot...

Page 43: ...ollow the instructions on your screen To install image editing software insert the Corel CD ROM and follow the instructions on your screen If the Installer Program does not appear automatically use the Windows Explorer to start the installation program For a general overview of the possible workflows and to see how the software works together please refer to the Navigation Map which is supplied wi...

Page 44: ...he glass plate However the specified scan quality is guaranteed for the entire scan area If you put more than one original on the glass plate position them as close to the center line as possible to optimize quality 2 Lower the document cover of the scanner v Note The adjustable document cover makes it possible to scan from books and magazines When you put a thick original on the reflective glass ...

Page 45: ...se 5 Click Yes when the system asks to guide you 6 Follow the steps described in the ScanWise Guide Me mode For more information refer to the ScanWise Application Guide and the Technical Support document here you find all local Agfa support centers and other software suppliers After installation you can access these documents v Note If you encounter problems please refer to the ScanWise Read Me fi...

Page 46: ...g the Transparency Option This appendix describes the procedure for installing the transparency option About your Transparency Option Unpacking the Transparency Option Unlocking the Transparency Option Connecting the Transparency Option Placing Transparent Originals ...

Page 47: ... is delivered ready to be mounted onto the scanner in place of the document cover Unpacking the Transparency Option 1 Open the packing box and take out all the items 2 Check if you have the template and the slide holders and make sure that there is no visible defect If something is missing or damaged contact your dealer 3 Remove the plastic wrapping and the packing materials from the transparency ...

Page 48: ...the base of the transparency option 2 Turn the screw counterclockwise and remove it Keep it for later transport Your transparency option is unlocked Connecting the Transparency Option 1 Check if your scanner and your transparency option are properly unlocked 2 Turn off your scanner 3 Turn off your computer 4 If the automatic document feeder is installed disconnect it from your scanner ...

Page 49: ...wn in the figure Insert the guide pins into the holes originally used by the scanner s document cover 6 Lower the transparency option 7 Connect the 15 pin plug of the transparency option to the 15 pin socket at the rear of the scanner Secure the connection by tightening the connector screws ...

Page 50: ...Appendix A Us ing t he Trans parenc y Opt ion 50 The transparency option is ready for use 8 Turn on your scanner 9 Turn on your computer ...

Page 51: ... covered by the transparent original and that it is clean You need the transparency option to scan transparent originals 1 Make sure the transparency option is properly installed 2 Raise the transparency option 3 Place the template on the glass plate of your scanner C au t io n Make sure that the calibration slit faces the front of the scanner and is not covered by the transparent originals ...

Page 52: ...n the glass plate with the emulsion down that is with the matte side down and with its top side towards the calibration slit This position guarantees the best quality If you place more than one slide on the glass plate position them as close to the center line as possible to optimize quality 6 Lower the transparency option ...

Page 53: ...w to install operate and maintain it About your Automatic Document Feeder ADF Unpacking the Automatic Document Feeder Taking a Closer Look Connecting the Automatic Document Feeder Operating the Automatic Document Feeder Placing Text Pages in your Automatic Document Feeder Correcting Paper Jams Cleaning the Automatic Document Feeder Cleaning the Transparent Guide Flap Roller Cleaning ...

Page 54: ... feeder s output tray The dimension of the sheets can be as large as 216 mm x 355 mm You simply replace the document cover by the ADF The ADF uses the original document guide holes of your scanner Thanks to spring plungers the feeder can be easily lowered for auto feed or lifted to put an original directly on the glass plate The ADF is a must if you have to scan a lot of documents It is an efficie...

Page 55: ...canner 1 Open the packing box and take out all the items 2 Check the ADF to make sure that there is no visible defect If there is a defect contact your dealer 3 Remove the plastic wrapping and the packing materials from the automatic document feeder v Note Save the packing materials to protect the automatic document feeder during later transport ...

Page 56: ...tomatic document feeder out of the box take a closer look so that you become familiar with its parts 6 8 7 8 5 2 3 4 1 1 transportation module 2 power indicator green 3 original indicator orange 4 paper jam indicator orange 5 cover of the transportation module 6 paper tray 7 rotating arm 8 guide arms ...

Page 57: ...k if your scanner is properly unlocked 2 Turn off your scanner 3 Turn off your computer 4 If the transparency option is installed disconnect it from your scanner 5 Remove the document cover or the transparency option from the scanner 6 Place the ADF on top of the scanner Insert the guide pins into the holes originally used by the scanner s document cover ...

Page 58: ... ic Doc ument Feeder 58 7 Connect the 15 pin plug of the automatic document feeder to the 15 pin socket at the rear of the scanner Secure the connection by tightening the connector screws 8 Open the cover of the transportation module ...

Page 59: ...Appendix B Us ing t he Aut omat ic Doc ument Feeder 59 9 Lift the rotating arm of the paper tray 9 10 10 Hook the paper tray into the transportation module 11 Lower the rotating arm ...

Page 60: ...er 60 12 Close the cover of the transportation module 13 Turn on your scanner 14 Turn on your computer Software like OmniPage Limited Edition makes it possible to convert the scanned sheets of text into most of the commercially used text file formats ...

Page 61: ... up to 60 text pages fast and without interruption Software like OmniPage Limited Edition or other OCR Optical Character Recognition software makes it possible to convert them into most of the commercially used text file formats 1 Make sure your automatic document feeder is properly installed 2 Lower the automatic document feeder 3 Lift the rotating arm of the paper tray 4 Put a pile of maximum 60...

Page 62: ...ppendix B Us ing t he Aut omat ic Doc ument Feeder 62 6 Use the two guide arms to align the paper in the center Correcting Paper Jams To remove jammed pages 1 Open the cover of the transportation module ...

Page 63: ...er turn around plate 3 Grasp both free corners of the jammed sheet and pull it out slowly 4 Lower the paper turn around plate Make sure that the paper turn around plate is properly closed 5 Close the cover of the transportation module Make sure that it is properly closed ...

Page 64: ...nting ink and other contaminants from accumulating on the flap and interfering with image quality wipe it periodically with an ink free cloth or moistened cotton swab Clean it on both sides To clean the transparent guide flap inside 1 Carefully open the transparent guide flap on the bottom of the ADF Do not remove the transparent guide flap 2 Carefully close the transparent guide flap after cleani...

Page 65: ... the feeder s input roller This reduces the efficiency of the roller Check for dirt on the roller if the ADF starts to have trouble pulling paper through properly The input roller should be cleaned periodically using an ink free cloth or moistened cotton swab v Note Do not attempt to turn the roller while cleaning it This may damage the ADF s drive mechanism ...

Page 66: ...when you turn on the scanner n The scanner was not properly unlocked Immediately turn off the scanner and unlock it properly Retry scanning If this does not help contact your dealer or local Agfa support center The power and status indicator on the scanner s operating panel starts blinking at a higher frequency after the power up sequence 15 seconds n A malfunction has been detected by the scanner...

Page 67: ...uter n Verify the power connection to the scanner n Check if the power switch is turned on n Check the Installation procedure to see if you followed the instructions Pay special attention to the setting of the SCSI ID number n Verify the terminators and the cables If there is a problem with a cable or with the SCSI board in your computer contact your dealer n Disconnect all SCSI devices and connec...

Page 68: ...our Windows version does not contain the correct drivers for the 150X you can also refer to the English Utility Adaptec directory on the AGFA ScanWise CD ROM The driver name is SPARROW MPD How to Install the 150X as Second SCSI Controller It is possible that your system already contains an on board SCSI controller or that there is already a SCSI controller present for example on a SoundBlaster car...

Page 69: ...Host Adapter Is Not Detected If the message The SCSI Host Adapter is not detected appears different solutions are possible þ Check if the SCSI board is firmly seated and secured in an ISA expansion slot þ If you have a plug and play system try setting the ISA Plug and Play mode to disable in the Advanced Configuration Options of the SCSISelect utility on the Agfa ScanWise CD ROM Your host adapter ...

Page 70: ...n the Device Manager and click the Refresh button þ Check if the SCSI cable is properly connected þ Use the Device Manager to check if the scanner is visible on the SCSI bus Your scanner should be listed under AGFA Scanners Windows 95 or under Imaging Device Windows 98 If this is not the case check under Other Devices and Scanner If you cannot locate the scanner there is a SCSI problem Verify the ...

Page 71: ...ME TXT file in this directory You can download WIN95MPD EXE from http www adaptec com This is a self extracting archive that contains the most recent SCSI mini port drivers for your interface card How to Solve Erratic Scanner Behaviour Some SCSI related installation procedures might overwrite your current SCSI mini port drivers with outdated drivers This causes erratic scanner behavior that only c...

Page 72: ...SI controllers Use the Windows NT procedure to add a SCSI controller and choose the driver for the Adaptec 1510 152X SCSI controllers instead SPARROW SYS You need the Windows NT installation media to install this board There are no Windows NT drivers provided on the Agfa ScanWise CD ROM How to Install the 150X as Second SCSI Controller It is possible that your system already contains an on board S...

Page 73: ...ing Double click the Devices icon in the Control Panel window and check the status of the Sparrow device þ If you have a plug and play system try setting the ISA Plug and Play mode to disable in the Advanced Configuration Options of SCSISelect Your host adapter must be configured manually If needed you can use the jumper on the host adapter to modify the I O Port Address Please refer to the includ...

Page 74: ...ontrol Panel window appears 2 Double click the System icon The System Properties dialog box appears 3 Select the Device Manager tab sheet 4 Open the SCSI Adapters icon If the scanner is not visible there is a SCSI problem a driver problem or a malfunctioning component Verify the installation of the 150X SCSI board þ Check if the host adapter and the scanner have unique SCSI ID s Normally the SCSI ...

Page 75: ...endix provides some technical information about your SnapScan about the transparency option and about the automatic document feeder Specifications Transparency Option Specifications Automatic Document Feeder Specifications Technical specifications are subject to change without notice ...

Page 76: ...n n in g are a Maximum 216 x 297 mm 8 5 x 11 7 L amp cold cathode P o we r o n t o re ad y t ime 15 seconds P o we r su p p ly voltage 100V to 240V frequency 47 Hz to 63 Hz power consumption 45 W D ime n sio n s length 530 mm width 375 mm height 140 mm weight 5 6 kg O p t io n s Transparency option Automatic document feeder In t e rf ace SCSI 2 1 x 25 pins plug 1 x 25 pins socket T ran smissio n s...

Page 77: ...amp fluorescent daylight P o we r su p p ly from the scanner In t e rf ace 15 pin cable with connector to scanner D ime n sio n s length 450 mm width 330 mm height 65 mm weight 2 2 kg E n viro n me n t operating temperature 10 C to 40 C 50 to 104 degrees Fahrenheit relative humidity 20 to 85 RH surrounding space 10 cm on every side C o n n e ct io n wit h scan n e r External connection 15 pin sub ...

Page 78: ...mm W x 150 H mm maximum 216 mm W x 355 H mm D o cu me n t ske w Max 1 C o n n e ct o r 15 pin cable with connector to scanner D ime n sio n s length 465 mm width 330 mm height 130 mm weight 3 5 kg P o we r su p p ly from the scanner O p e rat in g co n d it io n s temperature 10 C to 40 C 50 to 104 degrees Fahrenheit relative humidity 20 to 85 C o n n e ct io n wit h scan n e r External connection...

Page 79: ...Appendix E SnapSc an Regulat ion Complianc e 79 Appendix E SnapScan Regulation Compliance Safety Regulations Electromagnetic Compatibility ...

Page 80: ...enden die vom Hersteller zugelassen sind 3 Das Gerät ist vor Feuchtigkeit zu schützen 4 Bei der Aufstellung des Gerätes ist auf sicheren Stand zu achten Ein Kippen oder Fallen könnte Verletzungen hervorrufen Verwenden Sie nur sichere Standorte und beachten Sie die Aufstellhinweise des Herstellers 5 Die Belüftungsöffnungen dienen zur Luftzirkulation die das Gerät vor Überhitzung schütz Sorgen Sie d...

Page 81: ... to radio communications However there is no guarantee that interference will not occur in a particular installation If this equipment does cause harmful interference to radio or television reception which can be determined by turning the equipment off and on the user is encouraged to try to correct the interference by one or more of the following measures n Reorient or relocate the receiving ante...

Reviews: