198935 R17
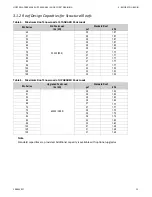
17
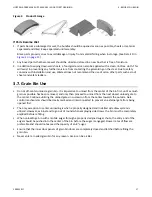
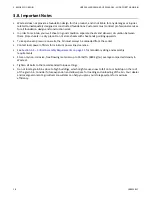
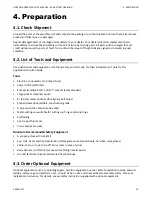
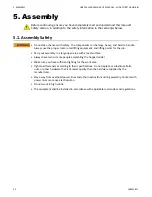
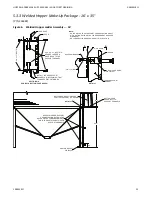
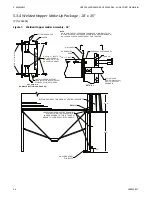
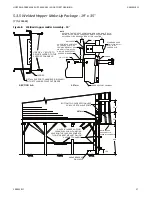
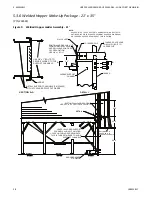
Figure 2.
Product Storage
3. White rust is not a structural concern if its development is stopped in the early stages. A
light film or powdery residue can occur after a period of heavy rainfall or a short time of
improper storage. If white rust has started to develop, separate parts and wipe off any
moisture. Next, using a clean cloth, apply a thin layer of petroleum jelly or food-grade oil
to the entire part.
4. If moisture is left on parts, this white rust can become more aggressive and turn into red
rust. Red rust can cause degradation in the material and become a structural concern.
Any parts that have red rust should be replaced immediately.
Storage Guidelines
1. Keep all bundles dry before assembly of the
bin. Start assembly as soon as possible. Do not
lay bundles on the bare ground, raise all bundles
6” – 8” off the ground on wood blocks or timbers.
Store curved wall sheets ‘hump-up’. All other
bundles material should be placed so that they are
well sloped to promote good drainage.
2.
Roof sheets must be elevated at least 12” at the
small end of the sheets.
3. Temporary storage can be provided by erecting
a simple framework supporting a waterproof tarp.
4. All bin boxes, ladder boxes and hardware boxes should be stored inside. These are not
waterproof, and will deteriorate in normal weather conditions, allowing moisture to contact
the parts inside.
If Parts Become Wet
1. If goods become submerged or wet, the
bundles should be opened as soon as possible,
sheets or material separated and dried. Keep
separated until assembly. Brace goods
properly so as to avoid damage or injury from
material falling when in storage.
2. Any boxed goods that become wet should be dried and stored in a new box that is free of
moisture.
3. In addition to wiping down wallsheets, a food-grade oil can also be applied with a clean,
lint-free cloth. This will assist in preventing any further moisture from contacting the
galvanizing on the steel. Due to safety concerns with installation and use, Westeel does
not recommend the use of oil on other parts such as roof sheets and safety ladders.
Page A10
A
3. White rust is not a structural concern if its development is stopped in the early stages. A
light film or powdery residue can occur after a period of heavy rainfall or a short time of
improper storage. If white rust has started to develop, separate parts and wipe off any
moisture. Next, using a clean cloth, apply a thin layer of petroleum jelly or food-grade oil
to the entire part.
4. If moisture is left on parts, this white rust can become more aggressive and turn into red
rust. Red rust can cause degradation in the material and become a structural concern.
Any parts that have red rust should be replaced immediately.
Storage Guidelines
1. Keep all bundles dry before assembly of the
bin. Start assembly as soon as possible. Do not
lay bundles on the bare ground, raise all bundles
6” – 8” off the ground on wood blocks or timbers.
Store curved wall sheets ‘hump-up’. All other
bundles material should be placed so that they are
well sloped to promote good drainage.
2.
Roof sheets must be elevated at least 12” at the
small end of the sheets.
3. Temporary storage can be provided by erecting
a simple framework supporting a waterproof tarp.
4. All bin boxes, ladder boxes and hardware boxes should be stored inside. These are not
waterproof, and will deteriorate in normal weather conditions, allowing moisture to contact
the parts inside.
If Parts Become Wet
1. If goods become submerged or wet, the
bundles should be opened as soon as possible,
sheets or material separated and dried. Keep
separated until assembly. Brace goods
properly so as to avoid damage or injury from
material falling when in storage.
2. Any boxed goods that become wet should be dried and stored in a new box that is free of
moisture.
3. In addition to wiping down wallsheets, a food-grade oil can also be applied with a clean,
lint-free cloth. This will assist in preventing any further moisture from contacting the
galvanizing on the steel. Due to safety concerns with installation and use, Westeel does
not recommend the use of oil on other parts such as roof sheets and safety ladders.
Page A10
B
3. White rust is not a structural concern if its development is stopped in the early stages. A
light film or powdery residue can occur after a period of heavy rainfall or a short time of
improper storage. If white rust has started to develop, separate parts and wipe off any
moisture. Next, using a clean cloth, apply a thin layer of petroleum jelly or food-grade oil
to the entire part.
4. If moisture is left on parts, this white rust can become more aggressive and turn into red
rust. Red rust can cause degradation in the material and become a structural concern.
Any parts that have red rust should be replaced immediately.
Storage Guidelines
1. Keep all bundles dry before assembly of the
bin. Start assembly as soon as possible. Do not
lay bundles on the bare ground, raise all bundles
6” – 8” off the ground on wood blocks or timbers.
Store curved wall sheets ‘hump-up’. All other
bundles material should be placed so that they are
well sloped to promote good drainage.
2.
Roof sheets must be elevated at least 12” at the
small end of the sheets.
3. Temporary storage can be provided by erecting
a simple framework supporting a waterproof tarp.
4. All bin boxes, ladder boxes and hardware boxes should be stored inside. These are not
waterproof, and will deteriorate in normal weather conditions, allowing moisture to contact
the parts inside.
If Parts Become Wet
1. If goods become submerged or wet, the
bundles should be opened as soon as possible,
sheets or material separated and dried. Keep
separated until assembly. Brace goods
properly so as to avoid damage or injury from
material falling when in storage.
2. Any boxed goods that become wet should be dried and stored in a new box that is free of
moisture.
3. In addition to wiping down wallsheets, a food-grade oil can also be applied with a clean,
lint-free cloth. This will assist in preventing any further moisture from contacting the
galvanizing on the steel. Due to safety concerns with installation and use, Westeel does
not recommend the use of oil on other parts such as roof sheets and safety ladders.
Page A10
C
3. White rust is not a structural concern if its development is stopped in the early stages. A
light film or powdery residue can occur after a period of heavy rainfall or a short time of
improper storage. If white rust has started to develop, separate parts and wipe off any
moisture. Next, using a clean cloth, apply a thin layer of petroleum jelly or food-grade oil
to the entire part.
4. If moisture is left on parts, this white rust can become more aggressive and turn into red
rust. Red rust can cause degradation in the material and become a structural concern.
Any parts that have red rust should be replaced immediately.
Storage Guidelines
1. Keep all bundles dry before assembly of the
bin. Start assembly as soon as possible. Do not
lay bundles on the bare ground, raise all bundles
6” – 8” off the ground on wood blocks or timbers.
Store curved wall sheets ‘hump-up’. All other
bundles material should be placed so that they are
well sloped to promote good drainage.
2.
Roof sheets must be elevated at least 12” at the
small end of the sheets.
3. Temporary storage can be provided by erecting
a simple framework supporting a waterproof tarp.
4. All bin boxes, ladder boxes and hardware boxes should be stored inside. These are not
waterproof, and will deteriorate in normal weather conditions, allowing moisture to contact
the parts inside.
If Parts Become Wet
1. If goods become submerged or wet, the
bundles should be opened as soon as possible,
sheets or material separated and dried. Keep
separated until assembly. Brace goods
properly so as to avoid damage or injury from
material falling when in storage.
2. Any boxed goods that become wet should be dried and stored in a new box that is free of
moisture.
3. In addition to wiping down wallsheets, a food-grade oil can also be applied with a clean,
lint-free cloth. This will assist in preventing any further moisture from contacting the
galvanizing on the steel. Due to safety concerns with installation and use, Westeel does
not recommend the use of oil on other parts such as roof sheets and safety ladders.
Page A10
D
If Parts Become Wet
1. If parts become submerged or wet, the bundles should be opened as soon as possible, sheets or material
separated and dried. Keep separated until assembly.
Brace parts properly so as to avoid damage or injury from material falling when in storage. (See Detail D in
.)
2. Any boxed parts that become wet should be dried and stored in a new box that is free of moisture.
3. In addition to wiping down wall sheets, a food-grade oil can also be applied with a clean, lint-free cloth. This
will assist in preventing any further moisture from contacting the galvanizing on the steel. Due to safety
concerns with installation and use, Westeel does not recommend the use of oil on other parts such as roof
sheets and safety ladders.
3.7. Grain Bin Use
• Do not off-center unload a grain bin. It is imperative to unload from the center of the bin first, until as much
grain as possible has been removed, and only then proceed to unload from the next closest unload gate to
the center. Continue utilizing the unload gates in succession from the center towards the outside. Gate
control mechanisms should be clearly marked and interconnected to prevent an external gate from being
opened first.
• The only exception to center unloading is when a properly designed and installed side draw system is
utilized. However, as bins tend to go out of round when employing side draws, the bin must be completely
emptied before refilling.
• When unloading a bin with a mobile auger through a properly designed auger chute, the entry end of the
auger should be pushed into the center of the bin before the auger is engaged. Slower rates of flow are
preferable and should not exceed the capacity of an 8” auger.
• Ensure that the inner door panels of grain bin doors are completely closed and latched before filling the
grain bin.
• Never enter a loaded grain bin for any reason. Grain can be a killer.
HOPPER LADDER MAKE-UP PACKAGES – WIDE-CORR® GRAIN BIN

