80
4
Installing the 2100 Bioanalyzer System
Setting up the 2100 Bioanalyzer Instrument
4
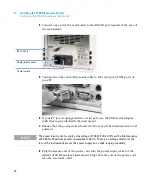
Connect one end of the serial cable to the RS-232 port located at the rear of
the instrument.
5
Connect the other end of the serial cable to the serial port (COM-port) of
your PC.
6
If your PC is not equipped with a serial port, use the USB/serial adapter
cable that is provided with the instrument.
7
Ensure that the power switch located at the rear of the instrument is in off
position.
8
Plug the female end of the power cord into the power input socket of the
Agilent 2100 Bioanalyzer instrument. Plug the male end of the power cord
into the electrical outlet.
56SRUW
3RZHULQSXWVRFNHW
3RZHUVZLWFK
N O T E
The power input socket accepts a line voltage of 100-240 VAC ±10% with a line frequency
of 50-60 Hz. Maximum power consumption is 60 VA. There is no voltage selector at the
rear of the instrument because the power supply has a wide-ranging capability.
Summary of Contents for 2100 Bioanalyzer System
Page 1: ...Agilent Technologies Agilent 2100 Bioanalyzer System Installation and Safety Guide ...
Page 14: ...14 1 Safety Information Legal Notice ...
Page 24: ...24 1 Sicherheitsinformationen Rechtlicher Hinweis ...
Page 34: ...34 1 Informations relatives à la sécurité Avis légal ...
Page 44: ...44 1 Información sobre seguridad Aviso legal ...
Page 54: ...54 1 安全に関する情報 法的規制 ...
Page 56: ...56 1 安全信息 注意 仪器安全 本仪器是一类安全仪器 有保护接地端 且已根据国际安全标准进 行制造和测试 ...
Page 64: ...64 1 安全信息 法律公告 ...
Page 76: ...76 3 Unpacking the 2100 Bioanalyzer System Damaged Packaging ...
Page 86: ...86 5 Starting the 2100 Bioanalyzer Instrument Preparing the Assay ...
Page 88: ...88 6 Maintenance of the 2100 Bioanalyzer Instrument Preparing the Assay ...
Page 91: ......


