background image

4339B

Input

Signals

The

DC

isolated

input

signals

are

connected

to

the

cathodes

of

the

LEDs

in

the

opto-isolators

.

The

anodes

of

the

LED's

are

powered

by

an

external

voltage

source

(EXT

DCV2).

The

OFF

state

voltage

(high

level)

of

the

DC

isolated

input

signals

depends

on

the

pull-up

voltage

powered

by

an

external;

voltage

source

(EXT

DCV2).

(The

input

current

is

restricted

by

using

a

switch

on

the

main

board.)

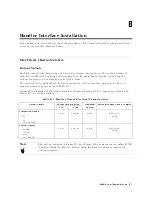
The

electrical

characteristics

of

the

input

signals

are

listed

in

T

able

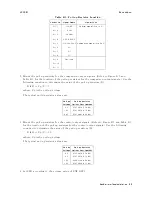
B-2 .

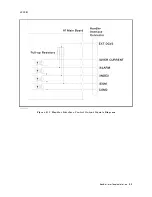
A

diagram

for

the

input

signals

is

shown

in

Figure

B-3 .

T

able

B-2.

Handler

Input

Electrical

Characteristics

Signal

Input

V

oltage

Input

Current

(Low)

Pull-up

V

oltage

Circuit

Common

Low

High

5

V

12

V

15

V

/EXT

TRIG

1

V

5

to

15

V

11.1

mA

10.5

mA

13.5

mA

COM2

/KEY

LOCK

1

V

5

to

15

V

5.2

mA

14.5

mA

18.5

mA

COM2

/HV

OFF

1

V

5

to

15

V

11.1

mA

10.5

mA

13.5

mA

COM2

Figure

B-3.

Handler

Interface

Input

Signal

Diagram

B-4

Handler

Interface

Installation

Summary of Contents for 4339B

Page 1: ...BERS This manual applies directly to instruments with serial number pre x JP1KD or rmware revision 1 04 For additional important information about serial numbers read Serial Number in Appendix A Agilent Part No 04339 90060 Printed in Japan March 2003 Ninth Edition ...

Page 2: ...yright All rights are reserved No part of this document may be photocopied reproduced or translated to another language without the prior written consent of the Agilent Technologies Agilent Technologies Japan Ltd Component Test PGU Kobe 1 3 2 Murotani Nishi ku Kobe shi Hyogo 651 2241 Japan c 1996 1998 1999 2000 2001 2002 2003 Agilent Technologies Japan Ltd ...

Page 3: ...hird Edition part number 04339 90030 August 1998 Fourth Edition part number 04339 90040 July 1999 Fifth Edition part number 04339 90050 March 2000 Sixth Edition part number 04339 90050 January 2001 Seventh Edition part number 04339 90050 September 2002 Eighth Edition part number 04339 90050 March 2003 Ninth Edition part number 04339 90060 iii ...

Page 4: ... earth blade DO NOT Operate In An Explosive Atmosphere Do not operate the instrument in the presence of ammable gasses or fumes Operation of any electrical instrument in such an environment constitutes a de nite safety hazard Keep Away From Live Circuits Operating personnel must not remove instrument covers Component replacement and internal adjustments must be made by quali ed maintenance personn...

Page 5: ...ecede potentially dangerous procedures throughout this manual Instructions contained in the warnings must be followed Warning Dangerous voltages capable of causing death are present in this instrument Use extreme caution when handling testing and adjusting this instrument v ...

Page 6: ...ervice facility designated by Agilent Technologies Buyer shall prepay shipping charges to Agilent Technologies and Agilent Technologies shall pay shipping charges to return the product to Buyer However Buyer shall pay all shipping charges duties and taxes for products returned to Agilent Technologies from another country Agilent Technologies warrants that its software and rmware designated by Agil...

Page 7: ...ial incidental or consequential damages whether based on contract tort or any other legal theory Assistance Product maintenance agreements and other customer assistance agreements are available for Agilent Technologies products For any assistance contact your nearest Agilent Technologies Sales and Service O ce Addresses are provided at the back of this manual vii ...

Page 8: ...aution sign denotes a hazard It calls attention to a procedure practice condition or the like which if not correctly performed or adhered to could result in damage to or destruction of part or all of the product Note denotes important information It calls attention to a procedure practice condition or the like which is essential to highlight A xed to product containing static sensitive devices use...

Page 9: ...stellerbescheinigung GERSCHEMISSION LpA 70 dB am Arbeitsplatz normaler Betrieb nach DIN 45635 T 19 Manufacturer s Declaration ACOUSTIC NOISE EMISSION LpA 70 dB operator position normal operation per ISO 7779 ix ...

Page 10: ......

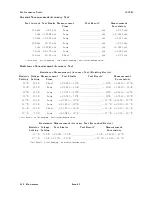
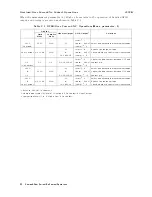
Page 11: ... on manual are for reference only Always refer to test report for the latest MU values Change 2 Add Typical Measurement Accuracy Table remarks on Chapter 8 Supplemental Performance Characteristics Page 8 8 Typical Measurement Accuracy Range Resistance Measurement of Readings 1 Current Measurement of Readings 2 100 pA 1 nA 10 nA 100 nA 1 µA 1 Rm Measured resistance value Ω Vs Voltage setting V Vo 0...

Page 12: ...00054V 257 50 V 0 18 V V 0 00096V 188 100 V 0 26 V V 0 00185V 141 200 V 0 42 V V 0 0037 V 115 201 V 0 82 V V 0 0040 V 206 250 V 0 90 V V 0 0053 V 170 500 V 1 3 V V 0 0097 V 133 1000 V 2 1 V V 0 0188 V 112 Change 2 Add TAR and change the Measurement Uncertainty value of Ammeter Offset Voltage Test Page 9 19 to the following Test Limits Test Result1 Measurement Uncertainty TAR 0 5 mV mV 0 0083 mV 60...

Page 13: ...rtainty value of Resistance Measurement Accuracy Test Floating Device Page 9 20 to the following Resistor Setting Voltage Setting Measurement Time Test Limits Test Result1 Measurement Uncertainty TAR 106 ohm 100 V Short 0 0086 x 106 ohm x 106 ohm 0 00015 106 ohm 58 2 107 ohm 100 V Long 0 0063 x 107 ohm x 107 ohm 0 0003 107 ohm 21 5 108 ohm 100 V Long 0 0073 x 108 ohm x 108 ohm 0 0006 108 ohm 11 9 ...

Page 14: ...alue of Resistance Measurement Accuracy Test Grounded Device Page 9 20 to the following Resistor Setting Voltage Setting Test Limits Test Result1 Measurement Uncertainty TAR 107 ohm 100 V 0 0066 x 107 ohm x 107 ohm 0 0003 107 ohm 22 6 1011 ohm 10 V 0 0573 x 1011 ohm x 1011 ohm 0 0035 1011 ohm 16 2 ...

Page 15: ... 0 00027 V 25 V 0 14 V V 0 00054V 50 V 0 18 V V 0 0010 V 100 V 0 26 V V 0 0019 V 200 V 0 42 V V 0 0037 V 201 V 0 82 V V 0 0040 V 250 V 0 90 V V 0 0053 V 500 V 1 3 V V 0 0097 V 1000 V 2 1 V V 0 0188 V Change 2 Change the Measurement Uncertainty value of Ammeter Offset Voltage Test Page 9 19 to the following Test Limits Test Result1 Measurement Uncertainty 0 5 mV mV 0 0083 mV Change 3 Change the Mea...

Page 16: ...Measurement Uncertainty 106 ohm 100 V Short 0 0086 x 106 ohm x 106 ohm 0 00015 106 ohm 107 ohm 100 V Long 0 0063 x 107 ohm x 107 ohm 0 0003 107 ohm 108 ohm 100 V Long 0 0073 x 108 ohm x 108 ohm 0 0006 108 ohm 109 ohm 100 V Long 0 0093 x 109 ohm x 109 ohm 0 0007 109 ohm 1010 ohm 100 V Long 0 0273 x 1010 ohm x 1010 ohm 0 0012 1010 ohm 1011 ohm 100 V Long 0 0453 x 1011 ohm x 1011 ohm 0 0035 1011 ohm ...

Page 17: ... 4339B page 1 13 Note In case the setting of the ac line frequency is not match there s any possibility the measurement error will rise Make sure the ac line frequency has been set up correctly Change 2 Add the following condition to the Measurement Accuracy page 8 4 6 The ac line frequency has been set up correctly C Copyright 2007 Agilent Technologies ...

Page 18: ... ᄌᦝ 0123 45 6789 8 A B C ᄌᦝ 3 DE FG H FG IJ B C K 9 C Copyright 2007 Agilent Technologies ...

Page 19: ...ent Technologies To reduce potential confusion the only change to product numbers and names has been in the company name prefix where a product number name was HP XXXX the current name number is now Agilent XXXX For example model number HP4294A is now model number Agilent 4294A ࡑ ࡘࠕ ࠚࡦࠫ ࡑ ࡘࠕ ࠚࡦࠫ ࡑ ࡘࠕ ࠚࡦࠫ ࡑ ࡘࠕ ࠚࡦࠫ ᄌᦝ ᄌᦝ ᄌᦝ ᄌᦝ ᧄᢥਛߩ ޟ HP 㧔YHP㧕 ޠ ޔ ߚߪ ޟ ᮮᴡ ࡅࡘ ࡄ ࠞ ᩣᑼળ ޠ ߣ ߁ ฏࠍ ޔ ޟ Agilent ޠ ޔ ߚߪ ࠫࡠࡁࠢ ࡦ...

Page 20: ......

Page 21: ......

Page 22: ......

Page 23: ...instrument If you continue to operate without repairing the instrument there is a potential fire or shock hazard for the operator n Instrument operates abnormally n Instrument emits abnormal noise smell smoke or a spark like light during the operation n Instrument generates high temperature or electrical shock during operation n Power cable plug or receptacle on instrument is damaged n Foreign sub...

Page 24: ......

Page 25: ......

Page 26: ......

Page 27: ...item means that it is currently selected 4 If the setting does not match the power line frequency press to toggle the setting between 50 Hz and 60 Hz Then press 5 Press until Exit blinks and press to exit this menu The power line frequency setting is stored and is not changed after reset or power o Once you set it you do not need to set the line frequency again as long as the same power line frequ...

Page 28: ...anel keys and terminals Chapter 4 Shows how to remotely operate the 4339B Refer to this chapter when you wish to learn about the procedures for remotely operating the 4339B via the GPIB Chapter 5 Contains complete information on remotely operating the 4339B via the GPIB Refer to this chapter when you wish to learn about the GPIB commands status reporting mechanism trigger system and data transmiss...

Page 29: ...ppendix B Contains information which is required for using the handler interface Before using the handler interface read this appendix and set the handler interface input output signal Appendix C The summary of operations when the 4339B detects OVLD Overload Over Current exceeding current limit or N C No Contact xi ...

Page 30: ......

Page 31: ...e Type Keys 1 15 Selection Type Keys 1 15 Value Setup Type Keys 1 16 Value Setup Using Numeric Keys 1 16 Value Setup Using Maximum and Minimum Keys 1 17 Value Setup Using Down and Up Arrow Keys 1 17 Value Change Using Back Space Key 1 17 Basic Operation 1 18 Connecting Test Fixture 1 19 Floating DUT Measurement 1 19 Grounded DUT Measurement 1 19 Resetting 4339B 1 20 Performing Calibration 1 20 Set...

Page 32: ...ng Measurement Sequence 2 11 Setting Contact Check 2 12 Reading the Limit Data of Contact Check Function 2 13 Reading the Capacitance Data at DUT Measurement 2 13 Setting Current Limit 2 14 Setting Current Monitor 2 14 Setting Beeper Mode 2 14 Setting Display Mode and Display Format 2 16 Changing Measurement Settings Display Mode 2 17 Saving and Recalling Instrument Settings 2 18 Locking Out the F...

Page 33: ...y 3 6 Single Mode 3 6 Continuous mode 3 6 Program Key 3 7 Time Display Function 3 8 Measurement Parameter Key 3 8 Electrode Size Key 3 8 Show Setting Key 3 10 Current Monitor Key 3 10 Auto Hold Range Key 3 10 Range Setup Key 3 10 Trigger Key 3 11 Sequence Abort Key 3 11 Local Key 3 11 Address Key 3 11 Trigger Mode Key 3 12 Delay Key 3 12 Recall Key 3 12 Save Key 3 12 Comparator Limit Keys 3 12 Lef...

Page 34: ...verall Block Diagram 3 27 Grounded and Ungrounded DUT Measurement Con guration 3 28 4 Remote Operation Introduction 4 1 Getting Started 4 2 Input Output Statements 4 2 Reading the GPIB Address 4 2 Sending a Remote Command 4 2 Returning to Local Mode 4 2 Query Commands 4 3 Getting Data from the 4339B 4 3 To Control the 4339B from an External Computer 4 4 To Set Up the 4339B 4 5 To Reset the 4339B 4...

Page 35: ...sult using FETC command 4 19 Data Retrieval 4 23 To Retrieve Data E ciently 4 24 To Use Data Bu er 4 24 To Perform a Measurement Sequence 4 25 Other Features 4 26 To Test the 4339B 4 26 To Read the Error Queue 4 26 To Report the Instrument s Status 4 26 Sample Program 4 28 If You Have a Problem 4 30 If the 4339B Hangs Up When You Send the ABORt Command 4 30 5 GPIB Reference Introduction 5 1 GPIB C...

Page 36: ...Te fONjOFFj1j0g 5 14 CALCulate3 FORMat fSECjTPCNTg 5 14 CALCulate3 MATH STATe fONjOFFj1j0g 5 14 CALCulate3 DIRECtion fUPjDOWNg 5 14 CALCulate3 BEEPer fONjOFFj1j0g 5 15 CALibration Subsystem 5 16 CALibration ALL 5 16 CALibration AUTO fONjOFFj1j0g 5 16 DATA Subsystem 5 17 DATA DATA REF numeric value 5 17 DATA DATA DBUF 5 17 DATA DATA IMON 5 18 DATA DATA TMON 5 18 DATA FEED DBUF data handle 5 18 DATA...

Page 37: ...et 5 30 STATus QUEStionable CONDition 5 30 STATus QUEStionable ENABle numeric value 5 31 STATus QUEStionable EVENt 5 31 SYSTem Subsystem 5 32 SYSTem BEEPer IMMediate 5 32 SYSTem BEEPer STATe f ON j OFF j 1 j 0 g 5 32 SYSTem ERRor 5 32 SYSTem KLOCk f ON j OFF j 1 j 0 g 5 32 SYSTem LFRequency numeric value 5 32 SYSTem PRESet 5 33 SYSTem VERSion 5 33 TRIGger Subsystem 5 34 TRIGger SEQuence1 COUNt num...

Page 38: ...n Materials 6 5 Measuring Insulation Resistance Time Characteristics of Electro Mechanical Components 6 9 7 Measurement Basics Introduction 7 1 Insulation Resistance Measurement 7 2 Residual Charge E ect 7 2 Absorption Phenomena 7 2 Voltage Coe cient and Temperature Coe cient 7 2 Shielding 7 2 Resistivity 7 3 Volume Resistivity 7 3 Surface Resistivity 7 4 High Capacitance DUT Measurement 7 5 8 Spe...

Page 39: ... Settling 8 9 DC Test Voltage Output Resistance 8 9 Continuous Memory Duration 8 9 9 Maintenance Introduction 9 1 Test Equipment 9 1 Performance Tests 9 2 Introduction 9 2 Test Equipment 9 2 Calculation Sheet 9 2 Performance Test Record 9 3 Calibration Cycle 9 3 Source Voltage Accuracy Test 9 4 Speci cation 9 4 Test Equipment 9 4 Procedure 9 4 Ammeter O set Voltage and Input Resistance Test 9 6 Sp...

Page 40: ...roduction 9 21 Test Equipment 9 21 Handler Interface Functional Test 9 22 Test Equipment 9 22 Procedure 9 22 Initial Setup 9 22 Key Lock Function Test 9 22 External Trigger Function Test 9 22 Handler Interface Output Test 9 23 Contact Check Functional Test 9 24 Test Equipment 9 24 Procedure 9 24 A Manual Changes Introduction A 1 Manual Changes A 1 Serial Number A 2 Change 1 A 3 Change 2 A 3 B Hand...

Page 41: ... using TRG command 4 18 4 6 Reading out the measured result in ASCII transfer format using the FETC command 4 20 4 7 Reading out measured result in binary transfer format using FETC command 4 22 4 8 Sample Program 4 29 5 1 Proper Use of the Colon and Semicolon 5 2 5 2 Status Reporting Structure 5 40 5 3 Status byte Register 5 41 5 4 Standard Event Status Register 5 42 5 5 Standard Operation Status...

Page 42: ...cy Test Setup Grounded 9 15 9 10 RC Box Connection Grounded 9 16 9 11 Handler Interface Functional Test Setup 9 22 9 12 Handler Interface Output Order 9 23 9 13 Contact Check Functional Test Setup 9 24 9 14 Contact Check Functional Test Setup 9 25 A 1 Serial Number Plate A 2 B 1 Handler Interface Comparison Output Signals Diagram B 2 B 2 Handler Interface Control Output Signals Diagram B 3 B 3 Han...

Page 43: ...tance 7 5 7 2 Limit Output Resistance for Each Range 7 5 7 3 Appropriate Output Resistance for Range 7 6 8 1 Measurement Accuracy 8 4 9 1 Required Equipment 9 1 9 2 Source Voltage Accuracy Test Settings 9 5 9 3 Current Measurement Accuracy Test Settings 9 11 9 4 Resistance Measurement Accuracy Test Settings 9 15 9 5 Resistance Measurement Accuracy Test Settings Grounded 9 16 A 1 Manual Changes by ...

Page 44: ......

Page 45: ...et you started using your 4339B High Resistance Meter This chapter discusses the following topics Overview Initial Inspection Ventilation Requirements Instruction for Cleaning Power Cable Preparation for Use Using the Front Panel Keys Basic Operation Getting Started 1 1 ...

Page 46: ...stance measurements of capacitors relays switches connectors materials cables and PC boards The 4339B has the capability to measure grounded DUTs Device Under Test which is gives you the ability to measure and evaluate devices such as PC board patterns The 16008B resistivity cell and the 16339A component test xture are designed for stable and safe measurements of materials or components The Measur...

Page 47: ...andard 50 mm diameter electrode Option 001 Add 26 78mm diameter electrodes Option 002 Add 26mm diameter electrode Option 003 Add 78mm diameter electrode 16117B Low Noise Test Leads 1 m Alligator clip leads 16117C Low Noise Test Leads 1 m A Set of male male triaxial and BNC cables and an interlock cable Female triaxial and Female BNC connectors are also included 16118A Tweezer Test Fixture For chip...

Page 48: ...tor indicates when voltage is applied at Output terminal 8 Measurement Parameter Key selects the measurement parameter Shift Electrode Size Key de nes the size of the test xture electrode 9 Show Setting Key selects the mode of the Measurement Settings display on the right side of the LCD display Shift Current Monitor Key sets the current monitor 10 Auto Hold Key toggles the measurement range mode ...

Page 49: ... above the front panel keys Note In this manual the blue Shift key is expressed as even though the top of the key is not labeled with the word blue 4 Key Shift Open Key executes an OPEN correction 5 Key Shift Calibration Key executes the calibration function 6 Key Shift 1 Mode Key selects the deviation measurement mode and sets the nominal value used in the deviaiton measurement Exponential Key al...

Page 50: ...ent sequence is running b Measurement Time shows measurement time Short Medium or Long c Trigger indicates trigger mode is Internal Int Manual Man or External Ext d Hold Range indicates measurement range is in hold mode In Auto mode the annunciator is not displayed e Comparator On indicates the comparator function is ON f Contact Check On indicates the contact check function is ON g Talk Only indi...

Page 51: ...troller using GPIB commands 2 Handler Interface is used to synchronize timing with an external handler 3 Ext Trigger Terminal is used to trigger a measurement using an external signal 4 Serial Number Plate gives the instrument s manufacturing information 5 Line Voltage Selector Switch is used to set the voltage to that of the AC power source 6 Line Fuse Holder 7 Power Cord Receptacle Getting Start...

Page 52: ...g material shows signs of unusual stress notify the carrier as well as the Agilent Technologies o ce Keep the shipping materials for the carrier s inspection Providing clearance to dissipate heat at installation site To ensure the speci cations and measurement accuracy of the product you must keep ambient temperature around the product within the speci ed range by providing appropriate cooling cle...

Page 53: ...4339B Initial Inspection Instruction for Cleaning For cleaning wipe with soft cloth that is soaked with water and wrung tightly without undue pressure Getting Started 1 9 ...

Page 54: ...able grounds the instrument frame The type of power cable shipped with each instrument depends on the country of destination Refer to Figure 1 1 for the part numbers of the power cables available Warning For protection from electrical shock the power cable ground must not be defeated The power plug must be plugged into an outlet that provides a protective earth ground connection 1 10 Getting Start...

Page 55: ...4339B Initial Inspection Figure 1 1 Power Cable Supplied Getting Started 1 11 ...

Page 56: ... 1 Table 1 1 Power Voltage Selector Setting Voltage Selector Line Voltage Required Fuse 100V 120Vac 610 UL CSA type Time delay 0 5A 250V Agilent part number 2110 0202 220V 240Vac 610 UL CSA type Time delay 0 25A 250V Agilent part number 2110 0201 To change the LINE voltage setting of the 4339B 1 Con rm power cable is disconnected 2 Slide the LINE Voltage selector on the rear panel to match the ac ...

Page 57: ... rst time con rm the power line frequency is set correctly a Press The following menu is displayed b Press until more blinks and press c Press until Line blinks and press A blinking item means that it is currently selected d If the setting does not match the power line frequency press to toggle the setting between 50 Hz and 60 Hz Then press e Press until Exit blinks and press to exit this menu The...

Page 58: ...ted an error message will be displayed on the LCD For more information refer to Con guration Key in Chapter 3 Warning Before turning the 4339B OFF the High Voltage indicator must be OFF When the High Voltage indicator is ON wait until the High Voltage indicator is OFF When both the High Voltage indicator and the V Output indicator are ON turn OFF the V Output rst by pressing 1 14 Getting Started ...

Page 59: ...ggle Type Keys Pressing a toggle type key will switch the setting An annunciator 9 indicates the current setting For example Press and the Meas Time annunciator 9 moves to the next measurement time mode Selection Type Keys Pressing a selection type key will display a menu or choice available for that key The blinking item is the one currently selected By using or the selection key itself the item ...

Page 60: ...ys Back Space Key Value Setup Using Numeric Keys Some commands use numeric parameters Fore example to set the test voltage value to 100 V 1 Press 2 Press You can also enter numeric parameters using exponential notation 1 Press 2 Press Note Before you press the previous setting is still the current setting even if the displayed value has changed If you press a key other than one of the keys in the ...

Page 61: ... The minimum value of source voltage 0 0 V is displayed 3 Press Value Setup Using Down and Up Arrow Keys Increases or decreases the numeric entry For example 1 Press to select current limit menu 2 Press or several times and con rm that the value changes Value Change Using Back Space Key Erases the last character entered For example 1 Press to select the source voltage menu 2 Press 3 Press and the ...

Page 62: ...9B s operation Connecting Test Fixture Resetting 4339B Performing Calibration Performing OPEN Correction Selecting Measurement Parameter Setting Test Voltage Selecting Measurement Range Applying Test Voltage Turning OFF the Test Voltage Note If you have any problems while performing the procedures refer to If You Have a Problem in Chapter 2 1 18 Getting Started ...

Page 63: ...he UNKNOWN terminals or the electrodes of the accessory When the High Voltage indicator is ON the 4339B outputs dangerous voltage level up to 1000 Vdc Before handling the 4339B or the accessory turn OFF the test voltage by pressing and con rm that the High Voltage indicator is OFF Floating DUT Measurement To measure a oating DUT connect the DUT and shunt connector as shown below Figure 1 2 Floatin...

Page 64: ...erforming Calibration Calibration cancels measurement errors due to environmental temperature change 1 Press The 4339B displays the calibration menu 2 Press or until ExecCal blinks and press The calibration is performed with the message Calibration 3 When the calibration is nished the 4339B displays the message Calibration Complete and returns to the normal measurement display Note If any error me...

Page 65: ...orrection Setting Test Voltage The 4339B has an internal DC voltage source To set voltage level of this source 1 Press to display the voltage setup menu 2 Enter the value using the numeric keys and press Getting Started 1 21 ...

Page 66: ...NKNOWN terminals or the electrodes of the xture when the V Output indicator is ON 3 Press The OPEN correction menu appears 4 Press or until OpenMeas blinks Then press The 4339B performs the OPEN correction with the message Open Correction When the OPEN measurement is completed the 4339B displays the end message Correction Complete and returns to the measurement display Note If any error message is...

Page 67: ...ll is connected to the 4339B to change volume and surface resistivity switch the volume surface selector on the resistivity cell Selecting Measurement Range The 4339B has two measurement range modes Auto and Hold The Auto mode changes the measurement range automatically to t the measured value The Hold mode xes the measurement range Auto Range mode 1 Press and the Hold Range annunciator 9 will tur...

Page 68: ...ltage is applied Warning Pressing may output dangerous voltage level up to 1000 Vdc Do NOT touch the UNKNOWN terminals or the electrodes of the xture when the V Output indicator is ON Turning OFF Test Voltage Press The V Output indicator will turn OFF Warning If the High Voltage Indicator turns ON after turning OFF the test voltage the DUT is still charged This happens especially for capacitive DU...

Page 69: ...instructions for using the 4339B High Resistance Meter It includes the following sections Measurement Con guration Making a Measurement Testing the 4339B If You Have a Problem Refer to Chapter 3 for the description of each front panel key function Operating the 4339B 2 1 ...

Page 70: ...is indicated by the annunciator 9 To select the measurement time mode Press until the measurement time mode is set to the desired mode Setting the Averaging Rate To set the averaging time 1 Press 2 Enter the desired value using the numeric keys 3 Press to set the value and to exit Setting the Trigger Delay Time To set the trigger delay time 1 Press 2 Enter the desired value using the numeric keys ...

Page 71: ...r proceed to setting Electrode Size Setting the Electrode Size To set the electrode size or to show the current setting 5 Select ResCell using or The following menu is displayed When You Use the 16008B Resistivity Cell a Select the electrode size that you want to use 26mm 50mm or 76mm using or and press For example when you select 50mm the following menu is displayed Where 50mm is the main electro...

Page 72: ...o exit c To set the e ective perimeter value select Perimeter using or and press Enter the value using the numeric keys and press to enter the value and to exit d To set the gap value select Gap using or and press Enter the value using the numeric keys and press to enter the value and to exit e To exit select Exit using or and press 6 Select Exit using or and press to exit the resistivity paramete...

Page 73: ...an trigger annunciator 9 is ON 2 Press to trigger a measurement To Trigger Externally 1 Connect an external trigger source to the Ext Trigger terminal on the 4339B s rear panel 2 Press until the Ext trigger annunciator 9 is ON 3 Apply a TTL level trigger signal to trigger a measurement Refer to External Trigger in Chapter 3 for trigger spec s Using the Comparator Function The comparator function c...

Page 74: ... or upper limit set the upper lower limit value to the maximum minimum value by using in the limit value entry menu To start sorting Press To display the sorting results Press The following menu appears Select Comprtr using or and press The Comparison Display mode shows the comparison results HIGH LOW or IN To stop sorting Press 2 6 Operating the 4339B ...

Page 75: ...pears 2 Select 1RefEnt using or and press To set the reference value by entering a value Enter the value using the numeric keys and press To set the reference value by measuring a reference DUT a Connect the reference DUT to the test xture and press to apply the voltage b Press regardless of the trigger mode The 4339B will measure the reference DUT c Press to set the measurement result as the refe...

Page 76: ...and the reference value To select the 1ABS mode Select 1ABS using or and press The 1 mode displays the the di erence between the measured value and the reference value as a percentage of the reference value To select the 1 mode Select 1 using or and press To turn OFF the deviation display mode select Off and press 4 The 4339B returns to the menu of step 1 Select Exit using or and press to exit the...

Page 77: ...ent sequence mode setting can be displayed in the Measurement Settings area of the LCD display See Changing Measurement Settings Display Mode To select the sequence mode Press and the following menu appears Select Single or Continuous using or and press If you want to turn OFF the measurement sequence function select Off Setting the Measurement Sequence Mode Parameters 1 Press The sequence paramet...

Page 78: ...of measurement points and press The current setting of the charge time interval time and memory size can be displayed in the Measurement Settings area of the LCD display See Changing Measurement Settings Display Mode Setting Time Display Function To display the elapsed time during the measurement sequence is running 1 Select TimeDisp using or and press 2 Select Mode using or and press 3 Select the...

Page 79: ... measurement sequence is started and the Seq Running annunciator 9 turns ON Warning Pressing may cause the 4339B to output dangerous voltage levels up to 1000 Vdc Do NOT touch the UNKNOWN terminals or the electrodes of the accessory when the V output indicator is ON When the time display function is ON the elapsed time T is displayed as follows Aborting Measurement Sequence Press The measurement s...

Page 80: ... annunciator 9 turns ON if the contact check function is enabled In the case of the contact check function is enabled N C No Contact will be displayed when the contacts between dut and xture are open The capacitance of the dut should be shown below to operate the contact check function properly Cdut Cs 30 05 a Where Cdut Capacitance of dut Cs Stracy capacitance at open measurement Value returned f...

Page 81: ...capacitance at open measurement Value returned from the GPIB command SENS CORR DATA SCAP b Value shown in Table 2 2 O set Data entered by OfsEnt OfsEnt is set to 0 default in normal measurement In case of a parallel capacitor measurement OfsEnt will be set to the capacitance of the parallel capacitor Table 2 2 Value b Measurement Range Measurement Time Mode Short Medium Long 100 pA 0 4 pF 0 4 pF 1...

Page 82: ...he value using the numeric keys and press Setting Current Monitor To turn ON the current monitor press The following menu is dislayed Select On using or and press The current monitor value is displayed in the Measurement Settings area See Changing Measurement Settings Display Mode Setting Beeper Mode To set the beeper mode for comparator result reporting OFF not beeping FAIL beeping when the compa...

Page 83: ...4339B Making a Measurement 2 Select Beep using or and press 3 Select the desired Beep mode using or and press 4 To exit select Exit using or and press Operating the 4339B 2 15 ...

Page 84: ...mparator results Off turns the display OFF If you select Formt the measurement data display format menu appears If you select Digit the display digits selection menu appears Select the desired display digits using or and press If you select R Unit the following menu appears You can select the display format in this menu Each mode displays the measurement data as follows Exponent mode Prefix mode 2...

Page 85: ...the LCD display The information displayed and the order of display is as follows 1 Test voltage setting Vout and Current limit Clmt 2 Averaging rate AVG and Trigger delay time DLY 3 Sequence mode SEQ and Charge time CHRG 4 Sequence interval time INTV and Memory size MEM 5 Comparator limits Hi Lo 6 Test voltage setting Vout and Current monitor value Imon Operating the 4339B 2 17 ...

Page 86: ...which you want to save the settings 3 Press to save Note Record the register number you used for future reference To recall a setting 1 Press 2 Enter the register number 0 to 9 from which you want to recall the settings 3 Press to recall Locking Out the Front Panel Keys To lockout the keys Press To unlock the keys Press again Selecting Local Mode To return the 4339B to local mode from GPIB remote ...

Page 87: ...9B s GPIB address to 31 talk only mode Press The printer will automatically begin printing the measurement data 5 To stop printing change the 4339B s GPIB address to an address other than 31 for example 17 which is the default setting Press Setting the O set Error Canceling Function The o set error calibration function cancels the o set error due to the temperature change when the measurement rang...

Page 88: ...39B has a self test function to check its basic performance 1 Press 2 Select more using or and press 3 Select Test using or and press to execute the self test If any error message is displayed refer to Error Messages 4 Select Exit and press to exit 2 20 Operating the 4339B ...

Page 89: ... personnel only 1 Press 2 Select more using or and press 3 Select SVC using or and press 4 Select KEY using or and press 5 Press the front panel key that you want to test For example if you want to test just press When the key functions properly KEY CODE 5 TRIGGER is displayed otherwise there will be no such display and the key is not functioning correctly Contact your nearest Agilent Technologies...

Page 90: ...t locks out the keys If so unlock the keys from the handler or the 16064B Press If the Indicated Value is not Stable Shield the DUT to reduce the unwanted noise and the e ect of operator proximity For example use the 16339A Component Test Fixture Do not move the test leads while measuring Changing the position of the test leads may cause noise inside the test leads Position the 4339B on a stable p...

Page 91: ...3 Function Reference Introduction This chapter provides information on all the 4339B s functions Front Panel Rear Panel Theory of Operation Function Reference 3 1 ...

Page 92: ...tings The annunciator labels are as follows Seq Running Sequence Running Indicates the measurement sequence is running Meas Time Measurement Time Indicates measurement time mode Short Medium or Long Trigger Indicates the trigger mode setting Internal Int Manual Man or External Ext Hold Range Indicates the measurement range mode when this annunciator is not lit the 4339B is in the Auto range mode C...

Page 93: ... 4339B may not work normally To prevent this wait for at least 1 second before turning ON again Interlock Connector The 4339B s Interlock Connector provides safety from high voltages and identi es which test xture is connected It enables which applies the test voltage to the test xture according to the following two tables Table 3 1 Interlock Condition for 16008B and 16339A Interlock Connector Int...

Page 94: ...e level up to 1000 Vdc Before handling the 4339B or the accessory turn OFF the test voltage pressing and con rm that the V Output indicator is OFF High Voltage Indicator The High Voltage indicator shows that the 4339B is outputting dangerous voltage levels up to 1000 Vdc When this indicator turns ON be extremely careful treating the UNKNOWN terminal and test xture Even when the V Output Indicator ...

Page 95: ...feature protects the DUT from destruction due to high current ow Current limits can be set to the following values 0 5 mA default 1 mA 2 mA at test voltage 0 to 500 V only 5 mA at test voltage 0 to 250 V only 10 mA at test voltage 0 to 100 V only Note When the 16117B Low Noise Test Leads are used the available current limit setting is 0 5 mA only Measurement Time key The measurement time key sets ...

Page 96: ...arge time for example 1 minute The single mode is performed as follows 1 At the Ready state pressing starts the measurement sequence and the test voltage is turned ON 2 The 4339B waits for the de ned Charge Time while the applied voltage is charging the DUT 3 After that the 4339B measures the charged DUT 4 At the end of the measurement sequence the 4339B turns the test voltage OFF and returns to t...

Page 97: ...Key When the sequence is running the Seq Running annunciator 9 turns ON Program Key The program key sets the parameters for a measurement sequence For details about the measurement sequence refer to Measurement Sequence Mode Key You can setup the measurement sequence parameters in the following menu Chrg The Charging time of voltage The range and resolution are as follows Range Resolution 0 s Char...

Page 98: ...yed as a negative value with the minus 0 sign Rs s Surface Resistivity Rv v Volume Resistivity The currently selected parameter is displayed on the left edge of the display The default setting is R Resistance Electrode Size Key The Electrodes Size key is used to enter the thickness of the DUT the electrode s size and the e ective area coe cient of the test xture These values are the factors used t...

Page 99: ...kness User De nes the electrode s parameters when using your own test xture Parameter Description Available Value Area E ective area 0 cm2 AREA 9999 9 cm2 5 digit number default is 19 635 cm Perimeter E ective perimeter 0 cm PERIMETER 999 99 cm 5 digit number default is 18 850 cm Gap Gap 0 001 cm GAP 99 99 cm 4 digit number default is 1 cm Surface resistivity s and volume resistivity v are calcula...

Page 100: ...wn in Show Setting Key This function is useful for checking the current value when the measurement parameter is set to R Rs or Rv Auto Hold Range Key The Auto Hold range key toggles the measurement ranging mode between Auto and Hold In the Auto mode the 4339B selects the optimum measurement range automatically within 5 measurement cycles In the Hold mode the 4339B measurement range is xed at the r...

Page 101: ...mote computer controlled operation The Local key is the only active front panel key while the 4339B is in GPIB remote mode When the 4339B is remote state the Rmt annunciator 9 will be displayed Address Key The Address key sets the 4339B s GPIB address The available GPIB address is any integer number from 0 to 30 and address 31 is the Talk Only mode in which the 4339B only outputs data through GPIB...

Page 102: ... 9 from which to recall the settings If the register selected is empty the error message RECALL FAILED is displayed Save Key The Save key stores the instrument s current settings into non volatile memory EEPROM Saved settings are the same as the items stored into backup memory in Table 3 3 Up to 10 sets of instrument settings can be saved You must enter the register number 0 to 9 to assign the reg...

Page 103: ... the secondary function printed above the keys The Shift key toggle is cleared by a single execution of a shifted function or by pressing the Shift key again The Shift annunciator 9 is displayed when the Shift key is toggled to active mode Exponential Key The Exponential key is used to enter an exponential value Back Space Key The Back Space key deletes a single preceding character of an input val...

Page 104: ... due to environmental temperature changes The calibration data are stored in backup memory Refer to Performing Calibration in Chapter 1 for more information At reset the calibration data is cleared Comparator On O Key The Comparator On O key toggles the comparator ON and OFF The comparator determines the measurement result displayed value is within the upper and lower limits set by the Comparator ...

Page 105: ... NO CONTACT pin of the handler interface is asserted Refer to Handler Interface for the pin assignment of the handler interface The measurement is still performed and the measurement result is outputted to the GPIB interface and the handler interface The decision limit value of the contact is obtained during the OPEN correction When the OPEN correction is performed unconnected capacitance is measu...

Page 106: ...C contact check failed When comparator function is OFF Always displays OFF O Turns the display OFF Used for example in GPIB remote mode If you select Formt the following display format setup menu appears Digit Sets the display digits of the measurement data to 3 4 or 5 R Unit Selects the measurement data display mode from the Exponent mode and the Prefix mode See Setting Display Mode and Display F...

Page 107: ...1 50 mm Back up memory Electrode size AREA 19 635 mm2 Back up memory Electrode size PERIMETER 18 850 cm Back up memory Electrode size GAP 1 000 cm Back up memory E ective area coe cient B 0 Back up memory Deviation measurement OFF Back up memory Deviation reference value Cleared Back up memory Measurement range mode Auto Back up memory Measurement range Auto Back up memory Measurement time mode Me...

Page 108: ...eling the beep mode and the power line frequency and to run the self test O set Sets the o set error canceling ON or OFF This function automatically cancels the o set error due to the temperature change every 30 seconds when the measurement range is 100 pA or 1 nA and the measurement time mode is the Long mode When this function is set to OFF the o set error may increase a little The default setti...

Page 109: ...detected the 4339B clears the data and restores the default data TEST Self test The self test tests the 4339B s basic performance and displays the results as the sum of error codes of each existing error The 4339B also executes its self test when it is turned ON power on test The settings of the 4339B are not a ected by the self test except when errors occur Item Result Error Code 1 Beeper beep on...

Page 110: ...ernal Trigger terminal is used to trigger the 4339B by inputting a positive going TTL pulse when the 4339B is set to external trigger mode Figure 3 5 shows the speci cations required for the TTL pulse Figure 3 5 Required External Trigger Pulse Speci cation 3 20 Function Reference ...

Page 111: ...le 1 1 Power Cord Receptacle The Power Cord Receptacle is used to plug in the power cord Power Cord The 4339B is equipped with a three conductor power cord that when plugged into the appropriate AC power receptacle grounds the instrument The o set pin on the power cord is the safety ground Serial Number Plate The serial number plate provides manufacturing information about the 4339B For details se...

Page 112: ...s Output signal Negative TRUE open collector opto isolated Decision Output Primary parameter Comparator High In Low Secondary parameter Comparator High In Low DUT and test electrode s contact failed Index Analog measurement complete Measurement complete Full measurement complete Alarm Noti cation that a momentary power failure was detected or the error occurs Input Signal Opto isolated Keylock Fro...

Page 113: ...al is asserted when the comparison result is High 3 29 IN This signal is asserted when the comparison result is In 3 30 LO This signal is asserted when the comparison result is Low 3 37 NO CONTACT This signal is asserted when the contact check failed 3 41 NOT READY Not ready This signal is asserted when the current owing through the DUT exceeds the current limit 42 ALARM Alarm This signal is asser...

Page 114: ...iagram is also applied when the contact check fails because the measurement is performed and the measurement result is output even if the contact check fails Note All the output signals are available only when the comparator function is ON 3 24 Function Reference ...

Page 115: ...of 15 devices can be connected on one bus system There are no restrictions on how the cables are connected together However it is recommended that no more than four piggyback connectors be stacked together on any one device or else the resulting structure could exert enough force on the connector mounting to damage it Every GPIB device has its own unique identi cation address The available GPIB ad...

Page 116: ... test voltage source V and an ammeter A Rs is the 4339B s source resistance Rs 1k and Ri is the input resistance Ri 1k In the resistance measurement mode the measurement parameter is R the 4339B displays the derived DUT resistance Rx In other words if the ammeter measures Ix when the source voltage is V the 4339B displays the DUT resistance Rx calculated using the following equation Rx V Ix 0 Rs R...

Page 117: ...ltage which is set by the keyboard or by an GPIB command The I V converter which is directly connected to the input converts the current into a voltage ramp of which the slope is proportional to the input current The CPU calculates the current from the voltage ramp slope then calculates the DUT s resistance by dividing the source voltage by the current Function Reference 3 27 ...

Page 118: ...nected to the ammeter circuit In Figure 3 10 b the Guard and Output terminals are connected by the shut connector and the Input terminal is connected to the grounded DUT The Output terminal supplies the test voltage to the DUT through the ammeter circuit When you measure the grounded DUT the Ground terminal may be left open however for more precise measurement the Ground terminal and the DUT s gro...

Page 119: ...pter 5 for more information Note This chapter is not intended to teach BASIC programming language or the Standard Commands for Programmable Instruments SCPI programming or to discuss GPIB theory refer to the following documents which are better suited for these tasks For more information concerning BASIC refer to the manual set for the BASIC version being used BASIC Programming Techniques BASIC La...

Page 120: ...k the address press A typical display is The displayed response is the device address When sending a remote command you append this address to the GPIB interface s select code normally 7 For example if the select code is 7 and the device address is 17 the appended combination is 717 Every device on the GPIB bus must have a unique address You can assign new GPIB addresses Sending a Remote Command T...

Page 121: ...xample have the 4339B generate a response to a query command by sending OUTPUT 717 IDN When you send a query from remote the 4339B does not display the response as it would if you executed the command from its front panel Instead the 4339B sends the response to its output bu er The output bu er is a register that holds a query response or data for a single measurement until it is read by the compu...

Page 122: ...mand with the trigger source parameter When you select BUS as the trigger source sending TRG triggers a measurement and retrieves the measurement data 3 Retrieving the data 4 Turn OFF the test voltage and end the measurement Figure 4 1 shows a simple resistance measurement program Step 1 OUTPUT 717 RST Resetting OUTPUT 717 INIT CONT ON Initializing trigger system OUTPUT 717 FUNC RES Resistance mea...

Page 123: ...For example to set the LINE frequency to 50 Hz OUTPUT 717 SYST LFR 50 To Select the Measurement Parameter The following commands select the measurement parameter SENS FUNC CALC FORM To select Resistance OUTPUT 717 SENS FUNC RES To select Volume Resistivity OUTPUT 717 SENS FUNC RES OUTPUT 717 CALC FORM VRES To select Surface Resistivity OUTPUT 717 SENS FUNC RES OUTPUT 717 CALC FORM SRES To select C...

Page 124: ...he current limit value SOUR CURR LIM For example to set 0 5 mA as the current limit value OUTPUT 717 SOUR CURR LIM 0 5MA To Select Measurement Time Mode The following command selects the measurement time mode SENS CURR APER To set the measurement time mode to SHORT OUTPUT 717 SENS CURR APER 0 01 To set the measurement time mode to MEDIUM OUTPUT 717 SENS CURR APER 0 03 To set the measurement time m...

Page 125: ... correction OUTPUT 717 OPC Wait until OPEN correction ends ENTER 717 A OUTPUT 717 OUTP OFF Turning OFF test voltage To Select the Measurement Range The following commands select the measurement range SENS CURR RANG SENS CURR RANG AUTO For example to select the Auto range mode OUTPUT 717 SENS CURR RANG AUTO ON For example to select the 1 nA range OUTPUT 717 CURR RANG AUTO OFF OUTPUT 717 CURR RANG 1...

Page 126: ...RM VRES OUTPUT 717 CALC RES STH 0 002 OUTPUT 717 CALC RES EAR 0 0019635 OUTPUT 717 CALC RES EPER 0 1885 OUTPUT 717 CALC RES GLEN 0 01 To Set Beeper Mode The following commands set the beeper mode SYST BEEP SYST BEEP STAT CALC1 LIM BEEP CALC1 LIM BEEP COND For example to set the beeper mode to emit a beep when comparison result is PASS OUTPUT 717 CALC1 LIM BEEP COND PASS To Lock Out the Front Panel...

Page 127: ... results DATA CALC MATH EXPR NAME CALC MATH EXPR CAT CALC MATH STAT For example to set the reference value using a measurement value and to calculate the absolute deviation value OUTPUT 717 FETC ENTER 717 s d OUTPUT 717 DATA REF d OUTPUT 717 CALC MATH EXPR NAME DEV OUTPUT 717 CALC MATH STAT ON To Set the O set Error Canceling Function The following command set the o set error canceling function ON...

Page 128: ...Current Instrument Settings The following command gets the current instrument settings LRN For example DIM A 1000 OUTPUT 717 LRN ENTER 717 A PRINT A To Save and Recall Instrument Settings The following commands save and recall instrument settings SAV RCL To save the instrument settings to register no 1 OUTPUT 717 SAV 1 To recall the instrument settings from register no 1 OUTPUT 717 RCL 1 4 10 Remo...

Page 129: ...mode 2 If the trigger system has not started up in the idle state use the INIT CONT command to turn ON the continuous activation of the trigger system 3 Trigger the instrument at your desired time An external controller can trigger the instrument with one of the following two commands Command Query response Applicable trigger mode TRG Yes The measured result is read out GPIB trigger TRIG No All 4 ...

Page 130: ...ed by the operation status register refer to Table 5 5 An SRQ service request is useful for detecting the completion of measurement in your program by using the information indicated by this register To detect the completion of measurement using SRQ use the following commands SRE STAT OPER ENAB The procedure is given below 1 Make the setup so that the 4339B generates an SRQ if bit 4 of the operati...

Page 131: ...ess Lines 40 to 60 Stops the trigger system and sets the trigger mode to the internal trigger Lines 80 to 90 Enables bit 4 of the operation status event register and enables bit 7 of the status byte register Lines 100 to 120 Clears the status byte register and operation status event register Lines 140 to 150 Sets the branch destination of the SRQ interrupt and enables the SRQ interrupt Lines 160 t...

Page 132: ...three commands shown in the table below can be used to read out the measured data for each measurement Available trigger mode Readout procedure Using the TRG GPIB trigger Executing TRG command Bus Readout Triggering the instrument Using the FETC command All Executing FETC Readout When you want to read out the data of several measurements in batch use the data bu er Note The TRIGGER command of HT B...

Page 133: ...display this information The program of Figure 4 4 is detailed below Line 60 Sets the GPIB address Line 70 Sets the data transfer format to the ASCII format Lines 90 to 100 Turns ON the trigger system continuous startup and sets the trigger mode to the GPIB trigger Lines 120 to 130 Reads out the ON OFF state of the comparator function and assigns it to the Comp ag variable Lines 170 to 210 After t...

Page 134: ...Reading Out Measured Result 4339B Figure 4 4 Reading out the measured result in ASCII transfer format by using the TRG command 4 16 Remote Operation ...

Page 135: ...value is 1 the comparator function is ON reads out the measurement status measured parameter result and comparator sorting result Note Binary data must be read out without formatting Therefore use an I O path Binary set up for such readout This is also applicable to Line 290 Line 290 If the Comp ag value is not 1 the comparator function is OFF reads out the measurement status and measured paramete...

Page 136: ...Reading Out Measured Result 4339B Figure 4 5 Reading out the measured result in binary transfer format using TRG command 4 18 Remote Operation ...

Page 137: ...60 Sets the GPIB address Line 70 Sets the data transfer format to the ASCII format Lines 90 to 100 Turns ON the trigger system continuous startup and sets the trigger mode to the external trigger Lines 120 to 130 Reads out the ON OFF state of the comparator function and assigns it into the Comp ag variable Lines 170 to 210 Makes the setup generate an SRQ when measurement nishes and clears the stat...

Page 138: ...Reading Out Measured Result 4339B Figure 4 6 Reading out the measured result in ASCII transfer format using the FETC command 4 20 Remote Operation ...

Page 139: ...l trigger is inputted and the measurement nishes Line 300 Executes the measured result readout command FETC Lines 310 to 340 Reads out the header part Line 360 If the Comp ag value is 1 the comparator function is ON reads out the measurement status measured parameter result and comparator sorting result Note Binary data must be read out without formatting Therefore use an I O path Binary set up as...

Page 140: ...Reading Out Measured Result 4339B Figure 4 7 Reading out measured result in binary transfer format using FETC command 4 22 Remote Operation ...

Page 141: ...put format is stat data comp Where stat Measurement status 0 Normal 1 Overload 2 No Contact 4 Over current exceeding current limit data Measurement data comp Comparison result no output when the comparator function is OFF 1 In 2 High 4 Low 8 No Contact Remote Operation 4 23 ...

Page 142: ... bu er to temporarily store the results of several measurements and then later read out these results in batch The following commands use the data bu er function DATA POIN DATA FEED DATA FEED CONT DATA For example OPTION BASE 1 DIM D 1500 OUTPUT 717 TRIG SOUR BUS OUTPUT 717 DATA POIN DBUF 500 OUTPUT 717 DATA FEED DBUF CALC OUTPUT 717 DATA FEED CONT DBUF ALW FOR I 1 TO 500 OUTPUT 717 TRIG NEXT I OU...

Page 143: ...717 SOUR VOLT 10 Test Voltage 10 V OUTPUT 717 ARM SOUR BUS Measurement Sequence ON Trigger Source Bus OUTPUT 717 ARM DEL 60 Charge time 60 s OUTPUT 717 TRIG SOUR INT Single mode OUTPUT 717 INIT CONT ON OUTPUT 717 TRG ENTER 717 S D PRINT S D To perform the continuous measurement sequence OPTION BASE 1 DIM D 20 OUTPUT 717 SOUR VOLT 10 Test Voltage 10 V OUTPUT 717 ARM SOUR BUS Measurement sequence ON...

Page 144: ... BIT A 4 THEN PRINT A D Converter Test Error IF BIT A 5 THEN PRINT Backup Memory Test Error To Read the Error Queue The following command returns the number and message of the existing error in the error queue SYST ERR For example DIM Err 50 REPEAT OUTPUT 717 SYST ERR ENTER 717 Errnum Err PRINT Errnum Err UNTIL Errnum 0 To Report the Instrument s Status The following commands report the instrument...

Page 145: ... CLS Clears status byte register OUTPUT 717 ESE 48 Sets Command Error Bit and Execution Error Bit OUTPUT 717 SRE 32 Sets Standard Event Status Register Summary Bit ON INTR 7 GOSUB Err_report Tells where to branch to when interrupted ENABLE INTR 7 2 Enable an interrupt from GPIB interface LOOP END LOOP STOP Err_report Stat SPOLL 717 Clears the SRQ bit OUTPUT 717 ESR Asks contents of the Standard Ev...

Page 146: ... 110 PRINT Error A 120 PAUSE 130 END IF 140 150 DISP Separate each electrode and close the top cover then press Continue 160 PAUSE 170 DISP OPEN Correction 180 OUTPUT Hp4339 SENS FUNC CURR 185 OUTPUT Hp4339 SENS CURR APER 0 39 190 OUTPUT Hp4339 SOUR VOLT 500 200 OUTPUT Hp4339 OUTP ON 210 REPEAT 220 OUTPUT Hp4339 FETC 230 ENTER Hp4339 S D 240 UNTIL ABS D 5 E 13 250 OUTPUT Hp4339 SENS CORR COLL OFFS...

Page 147: ... sets the trigger system being continuously initiated Lines 60 to 130 Performs calibration If any error occurs during calibration check what error occurs and stop the program Lines 150 to 330 Performs an OPEN correction 1 Selects the Current measurement mode 2 Selects the Long measurement time mode 3 Apply the test voltage 500 V 4 Wait until the current has stabled to within 0 5 pA 5 Performs an O...

Page 148: ...all GPIB addresses and connections most GPIB problems are caused by an incorrect address or bad or loose GPIB cables If the 4339B Hangs Up When You Send the ABORt Command Send the device clear command to the 4339B For example CLEAR 717 4 30 Remote Operation ...

Page 149: ...nchronization and data storage All common commands begin with an asterisk 3 Common commands are de ned in the IEEE 488 2 standard Subsystem Commands Subsystem commands include all measurement functions and some general purpose functions Each subsystem is a set of commands that roughly corresponds to a functional block inside the instrument Subsystem commands have a hierarchical structure called a ...

Page 150: ...B interprets them in the same way regardless of the current path setting Figure 5 1 Proper Use of the Colon and Semicolon Program Message Syntax This section provides the construction of SCPI program message A program message is the message that you send from a computer to an instrument Program messages consist of commands combined with appropriate punctuation and program message terminators Comma...

Page 151: ...Tem LFRequencytparameter t means a space ASCII character decimal 32 is inserted here If you send more than one parameter with a single command each parameter must be separated by a comma Parameter Types SCPI de nes di erent data formats for use in program messages and query responses The 4339B accepts commands and parameters in various formats and responds to a particular query in a prede ned and ...

Page 152: ... single binary condition that is either ON or OFF Boolean allows the following parameters ON OFF in a program message 1 0 in a program message and query response sensor function and data handle Are string parameters which contain ASCII characters A string must begin with a single quote ASCII 39 decimal or a double quote ASCII 34 decimal and end with the same character a single or double quote The ...

Page 153: ... both commas and semicolons as separators When a single query command returns multiple values a comma is used to separate each data item When multiple queries are sent in the same message the group of data items corresponding to each query are separated by a semicolon For example the ctitious query QUERY1 QUERY2 might return a response message of data1 data1 data2 data2 After the message Note that...

Page 154: ... right If a command requires one or more parameters the parameter names are listed adjacent to the command The lower case parts are optional Angular brackets enclose words or characters that are used to symbolize a program code parameter or an GPIB command Square brackets indicate that the enclosed items are optional f g When several items are enclosed by braces one and only one of these elements ...

Page 155: ...ll set any pending operation ag to FALSE for example ags that were set by the initiation of the trigger system Refer to Trigger System Unlike RST ABORt does not alter the settings programmed by other commands No query Note After the FETCh query the TRG command or the TRIGGER BASIC command the ABORt command will cause the GPIB bus to hang up To avoid this clear the GPIB bus by sending the BASIC com...

Page 156: ...he ARM subsystem controls the sequence measurement feature working with the TRIGger subsystem The purpose of the ARM subsystem is to qualify an ARMing sequence before enabling the TRIGger system to charge the DUT before measuring it For details about the ARM TRIGger system model see Trigger System COMMAND PARAMETER ARM SEQuence1 LAYer DELay numeric value MSjS SOURce BUS EXTernal MANual IMMediate 5...

Page 157: ... event detection state to the TRIG event detection state When BUS EXTernal or MANual is selected as the ARM source the 4339B automatically enables the test voltage output at the time an ARM event is detected and applies the test voltage to the DUT After the measurement the 4339B automatically turns OFF the test voltage output When IMMediate is selected the ARM event has no e ect on test voltage ou...

Page 158: ...it is listed The CALCulate subsystem is logically between the SENSe subsystem and data output to either the bus or the display and works with the SENSe subsystem the DATA subsystem and FETCh query COMMAND PARAMETER CALCulate1 FORMat REAL SRESistivity VRESistivity LIMit BEEPer CONDition FAIL PASS STATe Boolean CLEar FAIL LOWer DATA numeric value STATe Boolean STATe Boolean UPPer DATA numeric value ...

Page 159: ...s of sample CALCulate1 RESistivity STHickness Query response is REAL SRES or VRES CALCulate1 LIMit BEEPer CONDition f PASS j FAIL g De nes comparator output to beeper FAIL a beep is emitted when the comparison result is FAIL High Low or No contact PASS a beep is emitted when the comparison result is PASS In This command is e ective when SYSTem BEEPer STATe and CALCulate1 LIMit BEEPer STATe command...

Page 160: ...he lower limit OFF or 0 Disables the lower limit Query response is 1 or 0 CALCulate1 LIMit STATe f ON j OFF j 1 j 0 g Sets or queries if the limit test is enabled Where ON or 1 Sets the comparison function to ON OFF or 0 Sets the comparison function to OFF Query response is 1 or 0 CALCulate1 LIMit UPPer DATA numeric value Sets or queries the upper test limit data numeric value is numeric 09 921037...

Page 161: ...enabled or not ON 1 Enables math processing OFF 0 Disables math processing Query response is 1 or 0 CALCulate1 PATH Returns the order in which the CALCulate subsystem commands are to be performed Query only The 4339B always processes measured data in order of CALCulate1 FORMat subsystem CALCulate1 MATH subsystem and CALCulate1 LIMit subsystem Query response is always FORM MATH LIM CALCulate1 RESis...

Page 162: ... monitor function is enabled ON 1 Sets the current monitor function to ON OFF 0 Sets the current monitor function to OFF Query response is 1 or 0 CALCulate3 FORMat fSECjTPCNTg Sets or queries the time display mode of the measurement sequence program SEC displays in seconds TPCNT displays in Query response is SEC or TPCNT CALCulate3 MATH STATe fONjOFFj1j0g Sets or queries if the time display functi...

Page 163: ...the measurement sequence program is enabled ON 1 Two beeps are emitted when the sequence program is completed OFF 0 No beep is emitted Query response is 1 or 0 Note 1 of CALCulate1 can be omitted 2 3 of CALCulate2 CALCulate3 cannot be omitted The short must be CALC2 CALC3 GPIB Reference 5 15 ...

Page 164: ...or code of 0 indicates no failure CALibration AUTO fONjOFFj1j0g Sets or queries if the o set error canceling function is enabled The o set error calibration function cancels the o set error due to the temperature change when the measurement range is 100 pA or 1 nA and the measurement time mode is Long ON 1 enables o set error canceling OFF 0 disables o set error canceling Query response is 1 or 0 ...

Page 165: ...F Query response is a numeric value in NR3 format DATA DATA DBUF Returns the data in data bu er DBUF according to the format determined by the FORMat subsystem commands query only This query needs parameter DBUF which is the name of the data bu er to read Query response is set1 set2 setn Where set1 Data set of the rst measurement point set2 Data set of the second measurement point setn Data set of...

Page 166: ...he query form requires parameter DBUF such as DATA FEED DBUF Query response is CALC or null string DATA FEED CONTrol DBUF f ALWays j NEVer g Sets or queries whether data is fed into data bu er or not The data fed into the data bu er by this command is speci ed by DATA FEED DBUF command This command has no e ect when DATA FEED DBUF is set to null string Where ALWays Feeds data into data bu er whene...

Page 167: ...response is 1 or 0 DISPlay WINDow TEXT1 DIGit f3j4j5g Sets or queries the display digits of the measurement data 3 3 digits display mode 4 4 digits display mode 5 5 digits display mode Query response is 3 4 or 5 DISPlay WINDow TEXT1 PAGE f1j2g Sets or queries the display mode 1 Measure Display 2 Comparison Display Query response is 1 or 2 DISPlay WINDow TEXT1 PREFix fONjOFFj1j0g Sets or queries th...

Page 168: ...Test voltage and Current limit 2 Averaging rate and Trigger delay time 3 Sequence mode and charge time 4 Sequence interval time and Memory size 5 Comparator limits 6 Test voltage and Current monitor value Query response is 1 2 3 4 5 or 6 Note 1 of TEXT1 can be omitted but 2 of TEXT2 cannot be omitted 5 20 GPIB Reference ...

Page 169: ... output bu er Query only Query response format is stat data comp Where stat measurement status 0 Normal 1 Overload 2 No Contact 4 Over Current exceeding current limit data Measurement data comp Comparison result no output when the comparator function is OFF 1 In 2 High 4 Low 8 No Contact Data format is speci ed by the FORMat DATA command GPIB Reference 5 21 ...

Page 170: ...format for transferring numeric and array information ASCii Sets the data transfer format to ASCII REAL 64 Sets the data transfer format to IEEE 754 oating point numbers of the speci ed length of 64 bit For details on data transfer formats see Data Transfer Format Query response is ASC or REAL 64 5 22 GPIB Reference ...

Page 171: ... Then the trigger system initiates and completes one full trigger cycle Finally on completion the system returns to IDLE state No query If the 4339B is not in Idle state or if INITiate CONTinuous is set to ON an INITiate IMMediate command has no e ect on the trigger system and an error 0213 is generated INITiate CONTinuous f ON j OFF j 1 j 0 g Sets or queries whether the trigger system is continuo...

Page 172: ...whether the source voltage is ON or OFF ON or 1 Turns the source voltage ON OFF or 0 Turns the source voltage OFF Query response is 1 or 0 Warning Sending OUTPut STATe ON 1 may cause the 4339B to output dangerous voltage levels up to 1000 Vdc Do NOT touch the UNKNOWN terminals or the electrodes of the accessory when the V Output indicator is ON 5 24 GPIB Reference ...

Page 173: ... PAjNAjUAjA FUNCtion sensor function CONTact DATA LIMit OFFSet numeric value PFjF VERify Boolean SENSe AVERage COUNt numeric value Sets or queries the averaging rate numeric value is numeric 1 to 256 Query response format is a numeric value in NR1 format SENSe AVERage STATe f ON j OFF j 1 j 0 g Sets or queries if the averaging function is enabled Where ON or 1 Enables averaging OFF or 0 Disables a...

Page 174: ...r 2 for detail query only Query response is a numeric value in NR3 format SENSe CONTact OFFSet numeric value Set or queries an o set of contact check limit data numeric value is numeric 0 to 75 pF SENSe CONTact VERify f ON j OFF j 1 j 0 g Sets or queries if the contact check function is enabled Where ON or 1 Enables the contact check function OFF or 0 Disables the contact check function The refere...

Page 175: ...rrection function SENSe CURRent APERture numeric value MSjS Sets or queries the measurement time mode Short 0 01 s Medium 0 03 s Long 0 39 s numeric value is numeric 0 01 0 03 or 0 39 s Query response is a numeric value in NR2 format SENSe CURRent RANGe AUTO f ON j OFF j 1 j 0 g Sets or queries if the Auto range measurement mode is enabled Where ON or 1 Auto range mode OFF or 0 Hold range mode Que...

Page 176: ...r When an RST command is executed this is set to RESistance DC sensor function is CURRent DC Current measurement RESistance DC Resistance measurement To measure surface or volume resistivity calculate the value using the CLACulate FORMat command Query response is CURR or RES 5 28 GPIB Reference ...

Page 177: ...2 mA at test voltage 0 to 500 V only 5 mA at test voltage 0 to 250 V only 10 mA at test voltage 0 to 100 V only Query response is a numeric value in NR2 format SOURce VOLTage LEVel IMMediate AMPLitude numeric value VjKV Sets or queries the source voltage value numeric value is numeric 0 0 to 1000 0 V Resolution of the test voltage is as follows Voltage Range Resolution 0 V Test Voltage 200 V 0 1 V...

Page 178: ...ter of the Operation Status Register group numeric value is numeric Decimal expression of the contents of the register Query response is a numeric value in NR1 format STATus OPERation EVENt Returns the contents of the event register of the Operation Status Register group Reading the event register clears it Query only Query response is a numeric value in NR1 format STATus PRESet Clears the Operati...

Page 179: ...gister The 4339B has no operation to report the event to the Questionable Status Condition Register Query response is a numeric value in NR1 format STATus QUEStionable EVENt Returns the contents of the event register of the Questionable Status Register group query only Query response is always 0 because the 4339B has no operation to report the event to the Questionable Status Event Register GPIB R...

Page 180: ...luding the error beep OFF or 0 Enables the beeper Query response is 1 or 0 SYSTem ERRor Returns the number and Message of the existing error numbers in the 4339B s error queue Query only Query response is a numeric number in NR1 format and a string parameter SYSTem KLOCk f ON j OFF j 1 j 0 g Sets or queries whether the front panel keys of the 4339B are locked OFF or 0 Locks the front panel keys ON...

Page 181: ...lt states No query The default states are given in Table 3 3 SYSTem VERSion Returns the value corresponding to SCPI version to which the instrument complies Query only Query response is YYYY V Where YYYY Year version V Revision number for the year GPIB Reference 5 33 ...

Page 182: ...rg TIMer numeric value MSjS TRIGger SEQuence1 COUNt numeric value Sets or queries the size of memory when performing a Continuous measurement sequence numeric value is numeric 1 to 500 Query response is a numeric value in NR1 format TRIGger SEQuence1 DELay numeric value MSjS Sets or queries the trigger delay time numeric value is numeric 0 000 to 9 999 s Resolution of the trigger delay time is 1 m...

Page 183: ...nal An external signal from the external trigger terminal INTernal An internal signal MANual key TIMer Not Available2 BUS BUS EXTernal MANual Not Available3 INTernal Single GET or TRG command TIMer Continuous EXTernal BUS EXTernal MANual Not Available3 INTernal Single An external trigger signal from the external trigger terminal TIMer Continuous MANual BUS EXTernal MANual Not Available3 INTernal S...

Page 184: ...s to 999 s The range and resolution are as follows Range Resolution 10 ms Interval Time 10 s 1 ms 10 s Interval Time 100 s 10 ms 100 s Interval Time 999 s 100 ms Query response is a numerical value in NR3 format When the RST command is executes period is sets as follows Measurement time mode Period SHORT 10 ms MED 30 ms LONG 400 ms 5 36 GPIB Reference ...

Page 185: ...us Register Query only Query response is a numeric value in NR1 format 3IDN Queries an identi cation string which consists of four elds separated by commas Query only Query response is Field 1 Field 2 Field 3 Field 4 Where Field 1 Manufacturer always AGILENT TECHNOLOGIES Field 2 Model number always 4339A Field 3 Serial number in Agilent format like 2419J00100 Field 4 Firmware version number like 0...

Page 186: ...numeric 0 to 9 3SRE numeric value Sets the bits of the Status Byte Enable Register numeric value is numeric decimal expression of the contents of the Statue Byte Enable Register Bit 6 must be always 0 Query response is a numeric value in NOR1 format 3STB Queries the contents of the Status Byte Register Query only Query response is a numeric value in NR1 format 3TRG Triggers the 4339B when BUS is s...

Page 187: ...ing errors If there is no error the 4339B returns a 0 Test Item Error Code 1 RAM 1 2 EPROM 2 3 Calibration data EEPROM 4 4 User s data EEPROM 8 5 AD converter 16 6 Backup RAM 32 Query response is a numeric value in NR1 format 3WAI Makes the 4339B wait until all previously sent commands are completed No query GPIB Reference 5 39 ...

Page 188: ...ervice Request SRQ The 4339B can send an SRQ Service Request control signal when it requires the controller to perform a task When the 4339B generates an SRQ it also sets Bit 6 of the Status Byte Register RQS Request Service bit Service Request Enable Register allows an application programmer to select which summary messages in the Status Byte Register may cause service requests Illustrated in Fig...

Page 189: ...ter Table 5 2 Status Byte Assignments Bit No Bit Weight Description 7 128 Operation Status Register Summary Bit 6 64 Request Service Bit This bit is set when any enabled bit of the Status Byte Register has been set which indicates 4339B has at least one reason for requesting service SPOLL resets this bit 5 32 Standard Event Status Register Summary Bit 4 16 Message Available Bit This bit is set whe...

Page 190: ... Bit This bit is set if the following command errors occur An IEEE 488 2 syntax error occurred The 4339B received a Group Execute Trigger get inside a program message 4 16 Execution Error Bit This bit is set when a parameter of a GPIB command was outside of its legal input range or was otherwise inconsistent with the 4339B s capabilities 3 8 Device Dependent Error Bit This bit is set when so many ...

Page 191: ...The condition register re ects the internal states of the 4339B So each time the 4339B s condition is changed its condition bit is changed from 0 to 1 or from 1 to 0 The event register s bits correspond to the condition register s bits A transition lter reports an event to the event register when a condition register bit changes from 1 to 0 for all bits except for bit no 8 and 9 For bit no s 8 and...

Page 192: ...nals it controls to stabilize enough to begin a measurement 0 1 Calibrating This bit is set when the 4339B is currently performing a calibration Table 5 5 Operation Status Event Register Assignments Bit No Bit Weight Description 9 15 Always 0 zero 8 256 This bit is set when DBUF has become full 7 128 This bit is set when the correction data measurement has completed 6 64 This bit is set when the 4...

Page 193: ...GPIB trigger command or input pulse on Ext Trigger terminal The trigger system also allows you to specify the number of times to repeat a measurement and the delays between measurements Figure 5 6 Trigger System Con guration Figure 5 6 shows the con guration of the 4339B trigger system Each block is a trigger state The 4339B moves between adjacent states depending on its conditions The power ON st...

Page 194: ...ONTinuous OFF then it exits upward to the Idle state ARM Event Detection State Figure 5 7 Inside an ARM Event Detection State SOURce The ARM SEQuence1 LAYer SOURce command selects an ARM event source When the SOURce is set to BUS EXTernal or MANual the 4339B waits for the ARM event detection and moves its state downward through Voltage ON and Wait state When the SOURce is set to IMMediate the 4339...

Page 195: ...command sets DELay to zero IMMediate The TRIGger SEQuence1 IMMediate command bypasses the event detection DELay quali cations one time COUNt The TRIGger SEQuence1 COUNt command controls the trigger system on an upward path through an TRIG Event Detection state COUNt speci es how many downward exits must occur before an upward exit is allowed Sending RST sets COUNt to 1 Sequence Operation State The...

Page 196: ...nteger NR2 xed point or NR3 oating point formats as appropriate The numbers are separated by commas as speci ed in IEEE 488 2 Figure 5 9 NR1 Format Figure 5 10 NR2 Format Figure 5 11 NR3 Format For example expressions for 1000 are 1000 NR1 format 1000 0 NR2 format 1 00000E 03 NR3 format 5 48 GPIB Reference ...

Page 197: ...t byte sent S E10 E9 E8 E7 E6 E5 E4 Second byte sent E3 E2 E1 E0 F51 F50 F49 F48 Eighth last byte sent F7 F6 F5 F4 F3 F2 F1 F0 Where S Value of sign part binary En Value of exponential part binary Fn Value of fractional part binary EXP Decimal expression of exponential part f Decimal expression of fractional part The real number RN represented in oating point format is provided by the following fo...

Page 198: ...y numeric value MSjS SOURce fBUSjEXTernaljMANualjIMMediateg CALCulate1 FORMat fREALjSRESistivityjVRESistivityg LIMit BEEPer CONDition fFAILjPASSg STATe Boolean CLEar no query FAIL query only LOWer DATA numeric value STATe Boolean STATe Boolean UPPer DATA numeric value STATe Boolean MATH EXPRession CATalog query only NAME fDEVjPCNTg STATe Boolean PATH query only RESistivity EARea numeric value EPER...

Page 199: ...ry OUTPut STATe Boolean SENSe AVERage COUNt numeric value STATe Boolean CORRection COLLect ACQuire OFFSet no query DATA fOFFSetjSCAPacitanceg no query STATe Boolean CURRent APERture numeric value MSjS RANGe AUTO Boolean UPPer numeric value PAjNAjUAjA FUNCtion sensor function CONTact DATA query only LIM query only OFFSet numeric value PFjF VERify Boolean SOURce CURRent LIMit AMPLitude numeric value...

Page 200: ...e SYSTem BEEPer IMMediate STATe Boolean ERRor query only KLOCk Boolean LFRequency numeric value PRESet VERSion query only TRIGger SEQuence1 COUNt numeric value DELay numeric value MSjS IMMediate SOURce fBUSjEXTernaljMANualjINTernaljTIMerg TIMer numeric value MSjS 5 52 GPIB Reference ...

Page 201: ...al measurement examples for various types of devices The measurement examples are Measuring Insulation Resistance of Capacitors Measuring Resistivity of Insulation Materials Measuring Insulation Resistance of Electro Mechanical Components Application Measurement 6 1 ...

Page 202: ...y turn OFF the test voltage pressing and con rm that the High Voltage indicator is OFF 1 Connect the shunt connector and the 16339A to the 4339B For the 16339A use the Chip Component Module Con guration as shown in the 16339A Operation and Service Manual Figure 6 1 Measurement Con guration 2 Set the SMD module to the 16339A and connect the High terminals and the Low terminals respectively using th...

Page 203: ...g or and press d Apply the source voltage by pressing e Wait until the current has stabilized to within 0 5 pA Displayed I values do not change by more than 0 5 pA f Press to display the OPEN correction menu g Select OpenMeas using or and press h After the OPEN correction is nished press to turn the source voltage OFF 7 Clip the capacitor to the 16339A see Figure 6 2 and close the top cover Figure...

Page 204: ...easurement sequence Press The Seq Running annunciator 9 is turned ON and the 4339B applies the test voltage across the capacitor for 60 seconds Note If you want to abort the measurement sequence press When the sequence measurement is nished the annunciator is turned OFF and the measurement result is displayed 12 To exit the measurement sequence Press Select Off using or and press 13 Wait until the...

Page 205: ...ge indicator is OFF Note The thickness of the DUT should be measured accurately because thickness data is used to calculate volume resistivity see Electrode Size Key in Chapter 3 To reduce the reading error when you measure a thickness using a micrometer you should average the thickness values measured at several points in the measurement area and then use this average value to obtain the dielectr...

Page 206: ...ment parameter selection menu Select I using or and press d Apply the source voltage by pressing e Wait until the current has stabled to within 0 5 pA Displayed I value do not change by more than 0 5 pA f Press to display the OPEN correction menu g Select OpenMeas using or and press h After the OPEN correction is nished press to turn the source voltage OFF 6 Place the DUT on the electrode of resis...

Page 207: ...s 8 Set the resistivity cell parameter a Press b Enter DUT thickness Select Thickenss using or and press Enter the thickness value for example 0 13 mm and press c Select the resistivity cell size Select ResCell using or and press Select 50 mm using or and press twice d Select Exit and press to exit 9 Set the measurement sequence con guration Press Select Charge and press Enter the charge time for ...

Page 208: ... the measurement sequence press 12 Measuring surface resistivity a Turn the Volume Surface selector to Surface The 4339B id automatically set to Rs measurement mode b Press This starts the surface resistivity measurement sequence Measured surface resistivity value will be displayed after 60 seconds charge time Note If you want to abort the measurement sequence press 13 To exit the measurement sequ...

Page 209: ...time of 60 seconds Warning Do NOT touch the UNKNOWN terminals or the electrodes of the accessory when the High Voltage indicator is ON the 4339B outputs dangerous voltage levels up to 1000 Vdc Before handling the 4339B or the accessory turn OFF the test voltage pressing and con rm that the High Voltage indicator is OFF 1 Connect the shunt connector and the 16339A to the 4339B and connect the print...

Page 210: ...tage by pressing e Wait until the current has stabled to within 0 5 pA Displayed I value do not change by more than 0 5 pA f Press to display the OPEN correction menu g Select OpenMeas using or and press h After the OPEN correction is nished press to turn the source voltage OFF 7 Connect the electrodes of the opened switch DUT with alligator clips as shown below Close the cover of the 16339A Figur...

Page 211: ... c Select the continuous mode as the measurement sequence mode Press Select Continuous using or and press 10 Set the 4339B to Talk Only mode Press and enter 31 Press 11 Start the measurement sequence Press The printer begins printing data d a 0 6 51404E 10 0 0 6 63321E 10 0 0 6 45753E 10 0 Figure 6 7 Printed Results Note If you want to abort the measurement sequence press 12 When the measurement s...

Page 212: ......

Page 213: ... Basics Introduction This chapter provides information that will help you to work with your 4339B more e ectively Insulation Resistance Measurement Resistivity High capacitance DUT Measurement Measurement Basics 7 1 ...

Page 214: ...urement voltage the resistance value of most insulation materials will increase as the measurement voltage increases The resistance of an insulation material depends on its temperature To measure accurately place the DUT into an environmental test chamber to keep the DUT s temperature at a constant known level when making a measurement Record the measurement voltage and temperature when making a m...

Page 215: ...vity Cell is used the above equation becomes v 2 D1 B D20D1 2 2 4t 2Rv 2 1 10 Where D1 Main electrode diameter mm D2 Guard electrode diameter mm B E ective area coe cient B is the fraction of the gap width to be added to the diameter of the circular electrodes or to the dimensions of rectangular or cylindrical electrodes The value is usually speci ed by the standard that you use For example 1 for ...

Page 216: ...e side length is 1 m one square meter Surface resistivity is given as s Perimeter Gap Rs where s Surface resistivity Perimeter E ective perimeter mm Gap Gap between main and guard electrodes mm Rs Measured surface resistance When the 16008B Resistivity Cell is used the equations above become s D1 D2 D2 0D1 Rs D1 Main electrode diameter mm D2 Guard electrode diameter mm Figure 7 2 Surface Resistivi...

Page 217: ... nF 10 nF 1 nA 1 nF 10 nF 100 nF 10 nA 10 nF 100 nF 1 F 100 nA 100 nF 1 F 10 F 1 A 1 F 10 F 100 F 10 A 10 F 100 F 1 mF 100 A 100 F To measure a DUT with even higher capacitance connect a resistor in series with DUT to reduce the measurement icker The 16339A Component Test Fixture with its exchangeable output resistors is an ideal solution for this application The 16339A has four output resistor 10...

Page 218: ...n 10 pA in 100 pA range 2 Using 100 k resistor is recommended but the response will become slow 3 4339B s internal input and output resistance are su cient so an extra resistor in series is not necessary in this range and mode Note Using a high resistance in series with the DUT causes the charging time constant to increase thereby increasing the necessary measurement time Warning Do NOT touch the ...

Page 219: ...y led by following equation tc 0 2 ln X 100 2 Rs Ri Ro Rx Where tc Charge time s X Measurement Error Cx 2 Rs Ri Ro Generally when measuring these types of DUT s as described in this section you should expect a charging time of more than 10 or 20 times Note The charge time of an ideal capacitor is shown in this section Generally you should consider characteristics of a dielectric for the estimation...

Page 220: ......

Page 221: ...cations When shipped from the factory the 4339B meets the speci cations listed in this chapter This chapter also includes supplemental characteristics These characteristics are not speci cations but are typical characteristics included as supplemental information for the operator Speci cations 8 1 ...

Page 222: ...ity v volume resistivity Measurement Conditions DC Test Voltage Vs Range 0 to 1000 V 0 1 V steps for Vs 200 V or 1 0 V steps for Vs 200 V Accuracy 6 0 16 100 mV for Vs 200 V 6 0 16 500 mV for Vs 200 V Maximum Current 10 mA for Vs 100 V 5 mA for Vs 250 V 2 mA for Vs 500 V 1 mA for Vs 500 V Current Compliance Setting 0 5 mA 1 mA 2 mA 5 mA 10 mA Ammeter Input Resistance 1 k 6 5 Input O set Voltage 65...

Page 223: ...4339B Speci cations Trigger Mode Internal Manual External and Bus Trigger Delay Time 0 to 9 999 seconds in 0 001 seconds steps Measurement Range R 12103 to 1 621016 I 60 fA to 100 A Speci cations 8 3 ...

Page 224: ... resistance value Vs Voltage setting V Vo 0 1 V Vs 200 V or 0 5 V Vs 200 V 2 When the temperature T range is 2065 C Multiply both the rst term and the second term the value in parenthesis by the following error factors when the measurement time mode is set to SHORT or MEDIUM or multiply only the rst term by one of the following error factors when the measurement time mode is set to LONG 8 T 18 C o...

Page 225: ...nA Short 0 8 100Vo 1321009Rm Vs 0 62 1321009 Im Medium 0 8 100Vo 6 521009Rm Vs 0 5 6 521009 Im Long 0 8 100Vo 2 521009Rm Vs 7 0 5 2 521009 Im 7 1 A Short 0 77 100Vo 1321008Rm Vs 0 61 1321008 Im Medium 0 65 100Vo 6 521008Rm Vs 0 49 6 521008 Im Long 0 6 100Vo 2 521008Rm Vs 7 0 4 2 521008 Im 7 10 A Short 0 7 100Vo 1321007Rm Vs 0 54 1321007 Im Medium 0 58 100Vo 6 521007Rm Vs 0 42 6 521007 Im Long 0 5 ...

Page 226: ...an be programmed Mathematical Functions The deviation and the percent deviation of measurement values from a programmable reference value can be displayed Comparator HIGH IN LOW for the measurement parameter Contact Check Contact failure between the test xture and device can be detected Available DUT type Capacitive DUT only GPIB Interface All control settings measurement values self test results ...

Page 227: ...5 RH 40 C 0 to 4572 meters Condensation must be avoided EMC Complies with CISPR 11 1990 EN 55011 1991 Group 1 Class A Complies with EN 61000 3 3 1995 IEC 1000 3 3 1994 Complies with EN 50082 1 1992 IEC 801 2 1991 4 kV CD 8 kV AD Complies with EN 50082 1 1992 IEC 801 3 1984 3 V m Complies with EN 50082 1 1992 IEC 801 4 1988 0 5 kV Signal Lines 1 kV Power Lines This ISM device complies with Canadian...

Page 228: ...m Vs 0 4 2 5210010 Im 100 nA 0 53 100Vo 2 521009Rm Vs 0 37 2 521009 Im 1 A 0 53 100Vo 2 521008Rm Vs 0 37 2 521008 Im 1 Rm Measured resistance value Vs Voltage setting V Vo 0 1 V Vs 200 V or 0 5 V Vs 200 V 2 Im Measured current value A Measurement Time The following table lists some typical measurement times Measurement Time Mode Analog Measurement1 ms Digital Computation ms Total1 2 ms Short 8 5 1...

Page 229: ...st Voltage Settling Slew rate until the output voltage reaches 90 of the set voltage Set V is V t 10 V ms Where V and t is shown in the following gure DC Test Voltage Output Resistance 1 k 6 10 Continuous Memory Duration 72 hours 2365 C Speci cations 8 9 ...

Page 230: ......

Page 231: ...d Equipment Equipment Requirements Recommended Model Qty Use1 DC Voltmeter Voltage Range 0 V to 1000 V Accuracy 0 04 3458A 1 P RC Box No substitute 16340A 1 P F RC Box Adapter No substitute PN 04339 65005 1 P F V Measurement Adapter No Substitute PN 04339 65006 1 P Cable Banana Banana Jumper 11058A 1 P Cable Dual Banana BNC m Cable PN 11001 60001 1 P Handler Interface Tester No Substitute PN 04339...

Page 232: ...escribed in this section Use only calibrated test instruments when performance testing the 4339B Equipment which equals or surpasses the key required speci cations of the recommended equipment may be used as a substitute Calculation Sheet The calculation sheet is used as an aid for recording raw measurement data and for calculating the performance test results The performance test procedure gives ...

Page 233: ...ommended test equipment Test results recorded during incoming inspection can be used for comparison purposes during periodic maintenance troubleshooting and after repair or adjustment Calibration Cycle The 4339B requires periodic performance tests The frequency of performance testing depends on the operating and environmental conditions under which the 4339B is used Verify the 4339B s performance ...

Page 234: ...ded Model Multimeter 3458A V Measurement Adapter PN 04339 65006 Banana Banana Jumper 11508A Procedure Warning When the High Voltage indicator is lit the 4339B outputs high voltages of up to 1000 Vdc maximum 1 Reset the 4339B using the following procedure a Press to display the system reset menu b Select Yes using or and press 2 Set up the equipment as shown in Figure 9 1 Figure 9 1 Source Voltage ...

Page 235: ...ltage OFF V Output indicator turns OFF 8 Calculate the test result according to the calculation sheet and record the result into the performance test record 9 Perform this test for all the voltage settings listed in Table 9 2 The source voltage must be turned OFF after each test The source voltage can be changed using the following procedure a Press to display the source voltage setup menu b Use t...

Page 236: ...er 3458A RC Box Adapter PN 04339 65005 Dual Banana BNC m Cable PN 11001 60001 Procedure Ammeter O set Voltage Test 1 Reset the 4339B using the following procedure a Press to display the system reset menu b Select Yes using or and press 2 Set up the equipment as shown in Figure 9 2 Figure 9 2 Ammeter O set Voltage Test Setup 3 Set the RC Box Adapter switch to the F position 4 Press the 3458A Multim...

Page 237: ...ammeter o set voltage test result on the calculation sheet 10 Connect the RC Box to the RC Box adapter as shown in Figure 9 3 Figure 9 3 RC Box Connection 11 Set the RC Box resistor to 104 12 Set the source voltage to 1 V using the following procedure a Press to display the source voltage setup menu b Press to set the source voltage to 1 V c Con rm that 1 V is displayed on the right side of the LC...

Page 238: ...timeter 3458A RC Box 16340A RC Box Adapter PN 04339 65005 Dual Banana BNC m Cable PN 11001 60001 Procedure 1 Record the 16340A RC Box calibration values on the calculation sheet 2 Reset the 4339B using the following procedure a Press to display the system reset menu b Select Yes using or and press 3 Set the O set error Canceling to ON using the following procedure a Press to display the con gurati...

Page 239: ... voltage to 10 V using the following procedure a Press to display the source voltage setup menu b Press to set the source voltage to 10 V c Con rm that 10 V is displayed on the right side of the LCD 9 Press to turn the source voltage ON V Output indicator turns ON 10 Press Select OpenMeas and press to perform the OPEN correction 11 Press to turn the source voltage OFF V Output indicator turns OFF ...

Page 240: ...urce voltage setup menu b Press to set the source voltage to 1 V c Con rm that 1 V is displayed on the right side of the LCD 18 Press to turn the source voltage ON V Output indicator turns ON 19 Press to measure 20 Record the multimeter reading on the calculation sheet on the Multimeter Reading line 21 Record the 4339B reading on the calculation sheet on the 4339B Reading line 22 Press to turn the...

Page 241: ...asurement Accuracy Test Settings Test Current Resistor Setting Voltage Setting Measurement Time 100 pA 1010 1 V LONG 1 nA 109 1 V LONG 10 nA 108 1 V LONG 100 nA 107 1 V LONG 1 A 106 1 V LONG 10 A 105 1 V LONG 100 A 105 10 V SHORT Maintenance 9 11 ...

Page 242: ...icator is lit the 4339B outputs high voltages of up to 1000 Vdc maximum Resistance Measurement Accuracy Test Floating Device 1 Record the 16340A RC Box calibration values into the Calculation Sheet 2 Reset the 4339B using the following procedure a Press to display the system reset menu b Select Yes using or and press 3 Set the O set error Canceling to ON using the following procedure a Press to di...

Page 243: ...ng procedure a Press to display the source voltage setup menu b Press to set the source voltage to 100 V c Con rm that 100 V is displayed on the right side of the LCD 8 Press to turn the source voltage ON V Output indicator turns ON 9 Press Select OpenMeas and press to perform the OPEN correction 10 Press to turn the source voltage OFF V Output indicator turns OFF 11 Connect the RC Box to the RC B...

Page 244: ...ights 16 Press to measure 17 Record the 4339B reading on the calculation sheet 18 Press to turn the source voltage OFF V Output indicator turns OFF 19 Calculate the test result according to the calculation sheet and record the result into the performance test record 20 Perform the test for all settings listed in Table 9 4 The source voltage must be turned OFF after each test In the test for the 10...

Page 245: ...Long Resistance Measurement Accuracy Test Grounded Device 21 Set up the equipment as shown in Figure 9 9 Figure 9 9 Resistance Measurement Accuracy Test Setup Grounded 22 Set the RC Box Adapter switch to the G position 23 Set the source voltage to 100 V using the following procedure a Press to display the source voltage setting b Press to set the source voltage to 100 V c Con rm that 100 V is disp...

Page 246: ...Press to turn the source voltage ON V Output indicator turns ON 30 Press to measure 31 Record the 4339B reading on the calculation sheet 32 Press to turn the source voltage OFF V Output indicator turns OFF 33 Calculate the test result according to the calculation sheet and record the result into the performance test record 34 Perform this test for all settings listed in Table 9 5 The source voltag...

Page 247: ...a 0 500 00 V 1000 V V a 0 1000 0 V Ammeter Input Resistance Test 104 Calibration Value a O set Voltage b L Voltage c H Voltage d Test Result Equation 2 104 mV mV mV 1 k 0a2 c0b 4 d0c RC Box Calibration Values This table is used in the Current Measurement Accuracy Test and the Resistance Measurement Accuracy Test Resistor Setting Resistor Calibration Value Reference Designation 1011 2 1011 cv1 1010...

Page 248: ...esistance of the 4339B s ammeter Resistance Measurement Accuracy Test Resistance Measurement Accuracy Test Floating Device Resistor Setting Voltage Setting Measurement Time 4339B Reading a Test Result Equation 106 100 V Short 2 106 a 0 cv6 107 100 V Long 2 107 a 0 cv5 108 100 V Long 2 108 a 0 cv4 109 100 V Long 2 109 a 0 cv3 1010 100 V Long 2 1010 a 0 cv2 1011 100 V Long 2 1011 a 0 cv1 1011 100 V ...

Page 249: ...8 V V 6 0 00073 V 100 V 60 26 V V 6 0 0022 V 200 V 60 42 V V 6 0 0043 V 201 V 60 82 V V 6 0 0043 V 250 V 60 90 V V 6 0 0028 V 500 V 61 3 V V 6 0 0086 V 1000 V 62 1 V V 6 0 011 V 1 Test Result Measured Value 0 Setting Value Ammeter O set Voltage and Input Resistance Test Ammeter O set Voltage Test Test Limits Test Result Measurement Uncertainty 60 5 mV mV 60 0015 mV Ammeter Input Resistance Test Te...

Page 250: ...sult1 Measurement Uncertainty 106 100 V Short 60 0086 2 106 2 106 60 0010 2 106 107 100 V Long 60 0063 2 107 2 107 60 0010 2 107 108 100 V Long 60 0073 2 108 2 108 60 0011 2 108 109 100 V Long 60 0093 2 109 2 109 60 0016 2 109 1010 100 V Long 60 0273 2 1010 2 1010 60 0056 2 1010 1011 100 V Long 60 0453 2 1011 2 1011 60 010 2 1011 1011 100 V Short 60 0550 2 1011 2 1011 60 010 2 1011 1011 10 V Long ...

Page 251: ...orms its designed functions The functional tests can be used for post repair function veri cation Test Equipment Table 9 1 lists the test equipment required to perform the tests described in this section Equipment which equals or surpasses the key required speci cations of the recommended equipment may be used Maintenance 9 21 ...

Page 252: ... 3 Set up the equipment as shown in Figure 9 11 Figure 9 11 Handler Interface Functional Test Setup 4 Turn the 4339B ON 5 Reset the 4339B using the following procedure a Press to display the system reset menu b Select Yes using or and press Key Lock Function Test 6 Set the IN4 switch on the Handler Interface Tester to 1 7 Con rm that the all keys on the 4339B s front panel are locked out 8 Set the...

Page 253: ...NDL using or and press 13 Set the LED PW switch on the Handler Interface Tester to ON Caution Do not set the LED PW switch to ON except when doing the handler interface output test The LEDs may cause the 4339B to shut down during normal operation 14 Con rm that the LEDs on the Handler Interface Tester light in the order shown in Figure 9 12 in accordance with the 4339B display Figure 9 12 Handler ...

Page 254: ...ss to display the system reset menu b Select Yes using or and press 2 Set up the equipment as shown in Figure 9 13 Figure 9 13 Contact Check Functional Test Setup 3 Set the RC Box Adapter switch to the G position 4 Set the measurement range to 10 A using the following procedure a Press to display the measurement range setup menu b Press until 10 A appears and press 5 Press Select OpenMeas and pres...

Page 255: ...at the 4339B displays N C No Contact 8 Set the 16340A RC Box resistor to 104 9 Connect the RC Box to the RC Box Adapter as shown in Figure 9 14 Figure 9 14 Contact Check Functional Test Setup 10 Con rm that the N C disappears and the 4339B displays the resistance measurement value Maintenance 9 25 ...

Page 256: ......

Page 257: ...t If your instrument s serial number or ROM version is not listed on the title page of this manual in Table A 1 or Table A 2 make changes according to the yellow MANUAL CHANGES supplement In additions to information on changes the supplement may contain information for correcting errors Errata in the manual To keep this manual as current and accurate as possible Agilent Technologies recommends tha...

Page 258: ...two part ten character serial number that is stamped on the serial number plate see Figure A 1 attached to the rear panel The rst ve characters are the serial pre x and the last ve digits are the su x Figure A 1 Serial Number Plate A 2 Manual Changes ...

Page 259: ... 3 4 LO stat 2 4 Reduce the source voltage Over Current OV CURR LOW data 9 9E37 Check whether a short circuit is occurred NOT READY comp 3 4 stat 2 2 Cancel the bad contact between DUT and N C N C N C NO CONTACT data 9 9E37 contact pin No Contact comp 3 8 OVLD stat 2 3 Select an appropriate measurement range N C N C LO data 9 9E37 Cancel the bad contact between DUT and N C comp 3 4 contact pin OVL...

Page 260: ...e bad contact between DUT and N C N C N C NO CONTACT data 9 9E37 contact pin No Contact comp 3 8 OVLD stat 2 3 Select an appropriate measurement range N C N C HI data 9 9E37 Cancel the bad contact between DUT and N C comp 3 2 contact pin OVLD HI stat 2 5 Select an appropriate measurement range OV CURR HIGH data 9 9E37 Reduce the source voltage Over Current NOT READY comp 3 2 Check whether a short ...

Page 261: ...ed into two groups to be able to separate power supplies refer to Table B 1 A simpli ed diagrams of the output signals is shown in Figure B 1 for comparison signals and Figure B 2 for control signals Table B 1 Handler Output Electrical Characteristics Output Signals Voltage Output Rating Maximum Current External Voltage Circuit Common Low High Comparison Signals HI IN LO NO CONTACT 0 5 V 5 to 24 V...

Page 262: ...4339B Figure B 1 Handler Interface Comparison Output Signals Diagram B 2 Handler Interface Installation ...

Page 263: ...4339B Figure B 2 Handler Interface Control Output Signals Diagram Handler Interface Installation B 3 ...

Page 264: ...stricted by using a switch on the main board The electrical characteristics of the input signals are listed in Table B 2 A diagram for the input signals is shown in Figure B 3 Table B 2 Handler Input Electrical Characteristics Signal Input Voltage Input Current Low Pull up Voltage Circuit Common Low High 5 V 12 V 15 V EXT TRIG 1 V 5 to 15 V 11 1 mA 10 5 mA 13 5 mA COM2 KEY LOCK 1 V 5 to 15 V 5 2 m...

Page 265: ...fasteners in the 4339B may appear to be Phillips type but they are Pozidrive type fasteners To avoid damaging them use only Pozidrive screwdrivers to remove or tighten pozidrive type fasteners Procedure 1 Disconnect the power cable from the 4339B and allow enough time 10 minutes for the internal capacitors to discharge Warning Dangerous energy and voltage levels exist within the 4339B when it is i...

Page 266: ...with Cover Removed 4 Remove the A2 CPU bard assembly a Disconnect the four atcable assemblies from the A2 board b Remove the four screws that secure the A1 board to the stud c Remove the A2 board form the chassis B 6 Handler Interface Installation ...

Page 267: ... replacing either the A1 board or the A3 board d Remove the cable clamp on the shield case that surrounds the A3 board e Remove the nut that fastens the Ext Trigger connector on the rear panel f Remove the screw that secures the A1 board to the chassis side g Remove the four studs that secure the A1 assembly to the chassis by rotating the studs with a at bladed screwdriver h Remove the three screw...

Page 268: ...Procedure 4339B Figure B 5 A1 Main Board B 8 Handler Interface Installation ...

Page 269: ...s the pull up voltage The typical pull up resistor values are Pull up Voltage Pull up Resistor Agilent Part Number 5 V 0757 0278 1 78 k 12 V 0757 0279 3 16 k 24 V 0757 0441 8 25 k 7 Mount the pull up resistors for the control output signals Refer to Figure B 5 and Table B 3 for the location of the pull up resistors for the control output signals Use the following equation to determine the value of...

Page 270: ...RIG KEY LOCK HV OFF SW1 1 SW1 2 SW1 3 SW1 4 5 to 6 V Close Close Close Close 6 to 9 V Close Open Close Close 9 to 15 V Open Close Open Open 9 Reinstall the A1 main board the A2 board and the cover B 10 Handler Interface Installation ...

Page 271: ...7 contact pin No Contact comp 3 8 OVLD LO stat 2 3 Select an appropriate measurement range OVLD LOW data 9 9E37 Cancel the bad contact between DUT and N C NO CONTACT comp 3 12 contact pin OVLD LO stat 2 5 Select an appropriate measurement range OV CURR LOW data 9 9E37 Reduce the source voltage Over Current NOT READY comp 3 4 Check whether a short circuit is occurred 1 Refer to FETCh in Chapter 5 2...

Page 272: ...ether a short circuit is occurred NOT READY comp 3 2 stat 2 2 Cancel the bad contact between DUT and N C N C N C NO CONTACT data 9 9E37 contact pin No Contact comp 3 8 OVLD HI stat 2 3 Select an appropriate measurement range OVLD HIGH data 9 9E37 Cancel the bad contact between DUT and N C NO CONTACT comp 3 10 contact pin OVLD HI stat 2 5 Select an appropriate measurement range OV CURR HIGH data 9 ...

Page 273: ...Error Messages This section lists the messages that are displayed on the 4339B s LCD display or transmitted by the instrument over GPIB in numerical order Messages 1 ...

Page 274: ...wer on test the 4339B stops operation and asserts the ALARM signal on the handler interface When this error occurs during self test the 4339B continues operation and asserts the ALARM signal Contact your nearest Agilent Technologies o ce 13 RAM TEST FAILED The RAM failed The 4339B stops operation and asserts the ALARM signal on the handler interface Contact your nearest Agilent Technologies o ce 1...

Page 275: ...rument Check that the printer is set to Listen Always The 4339B continues operation and does not assert the ALARM signal on the handler interface 20 A1 BD TEST FAILED The A1 board failed When this error occurs during power on test the 4339B stops operation and asserts the ALARM signal on the handler interface When this error occurs during self test the 4339B continues operation and asserts the ALA...

Page 276: ...x element contains a character which is invalid for that type for example a header containing an ampersand SENSE 102 Syntax error An unrecognized command or data type was encountered for example a string was received when the 4339B was not expecting to receive a string 103 Invalid separator The syntax analyzer was expecting a separator and encountered an illegal character for example the semicolon...

Page 277: ...a decimal numeric data element contains more than 255 digits excluding leading zeros see IEEE 488 2 7 7 2 4 1 128 Numeric data not allowed Legal numeric data element was received but the 4339B does not accept it in this position for a header 131 Invalid su x The su x does not follow the syntax described in IEEE 488 2 7 7 3 2 or the su x is inappropriate for the 4339B 138 Su x not allowed A su x wa...

Page 278: ...more speci c error 161 Invalid block data A block data element was expected but was invalid for some reason see IEEE 488 2 7 7 6 2 for example an END message was received before the length was satis ed 168 Block data not allowed A legal block data element was encountered but was not allowed by the 4339B at this point in the syntax analysis process 170 Expression error This error as well as errors ...

Page 279: ...han the 4339B could handle due to memory or related device speci c requirements 230 Data corrupt or stale Possibly invalid data new reading started but not completed since last access 241 Hardware missing A legal program command or query could not be executed because of missing 4339B hardware for example an option was not installed 310 System error Some error termed system error by the 4339B has o...

Page 280: ... sent 420 Query UNTERMINATED A condition causing an unterminated query error occurred see IEEE 488 2 6 3 2 2 for example the 4339B was addressed to talk and an incomplete program message was received by the controller 430 Query DEADLOCKED A condition causing an deadlocked query error occurred see IEEE 488 2 6 3 1 7 for example both input bu er and output bu er are full and the 4339B cannot continu...

Page 281: ... key 3 13 BLUE shift key 3 13 Boolean 5 4 bus trigger mode 3 12 C CALCulate FORMat 4 5 CALCulate LIMit BEEPer CONDition 4 8 CALCulate LIMit BEEPer STATe 4 8 CALCulate LIMit CLEar 4 9 CALCulate LIMit FAIL 4 9 CALCulate LIMit LOWer DATA 4 9 CALCulate LIMit LOWer STATe 4 9 CALCulate LIMit STATe 4 9 CALCulate LIMit UPPer DATA 4 9 CALCulate LIMit UPPer STATe 4 9 CALCulate MATH EXPRession CATalog 4 9 CA...

Page 282: ...r SENSe 5 27 D DATA DATA 5 17 DATA DATA 5 17 5 18 data bu er 4 24 DATA DATA 4 9 DATA DATA 4 24 DATA FEED 4 24 DATA FEED CONTrol 4 24 data handle 5 4 DATA POINts 4 24 DATA subsystem 5 17 data transfer format 5 48 ASCII 5 48 REAL 5 49 DBUF 5 17 DELay ARM 5 9 TRIGger SEQuence1 5 34 Delay key 3 12 deviation measurement 4 9 GPIB command 5 13 how to display 2 7 2 8 Device Dependent Error Bit 5 42 DIGit ...

Page 283: ... STATe CALCulate1 5 11 LIMit CLEar CALCulate1 5 11 LIMit FAIL CALCulate1 5 12 Limit key 3 12 LIMit LOWer DATA CALCulate1 5 12 LIMit LOWer STATe CALCulate1 5 12 LIMit STATe CALCulate1 5 12 LIMit UPPer DATA CALCulate1 5 12 LIMit UPPer STATe CALCulate1 5 12 LINE frequency 3 19 GPIB command 5 32 how to set 1 13 4 5 LINE Fuse Holder 3 21 LINE Input Receptacle 3 21 LINE switch 3 3 LINE voltage selector ...

Page 284: ... Program key 3 7 Q Query 5 5 Query Error Bit 5 42 questionable status register 5 44 R RANGe SENSe CURRent 5 27 Range Setup key 3 10 RANGe UPPer SENSe CURRent 5 27 RCL 4 10 5 38 Rcl key 3 12 REAL 5 22 5 49 recall 3 12 instrument settings 2 18 reference value how to set 2 7 reset 3 17 how to 1 20 4 5 Reset key 3 17 resistance measurement accuracy test 9 12 resistivity 7 3 RESistivity EARea CALCulate...

Page 285: ... 4 26 5 30 STATus PRESet 4 26 5 30 STATus QUEStionable CONDition 4 26 5 30 STATus QUEStionable ENABle 4 26 5 31 STATus QUEStionable EVENt 4 26 5 31 STATus subsystem 5 30 STB 4 26 5 38 STHickness CALCulate1 RESistivity 5 14 supplemental performance characteristics 8 8 surface resistivity 7 4 SYSTem BEEPer IMMediate 4 8 SYSTem BEEPer STATe 4 8 SYSTem KLOCk 4 8 SYSTem LFRequency 4 5 SYSTem PRESet 4 5...

Page 286: ... TST 4 26 5 39 U UNKNOWN terminals 3 4 UPPer CALCulate1 LIMit 5 12 V VERSion SYSTem 5 33 VOLTage SOURce 5 29 volume resistivity 7 3 V Output indicator 3 5 V Output key 3 4 W WAI 5 39 Index 6 ...

Page 287: ...rope Agilent Technologies Test Measurement European Marketing Organization P O Box 999 1180 AZ Amstelveen The Netherlands tel 31 20 547 9999 Japan Agilent Technologies Japan Ltd Call Center 9 1 Takakura Cho Hachioji Shi Tokyo 192 8510 Japan tel 81 426 56 7832 fax 81 426 56 7840 Latin America Agilent Technologies Latin American Region Headquarters 5200 Blue Lagoon Drive Suite 950 Miami Florida 3312...

Reviews: