background image

Agilent

4352B

Revision

01.02

Firmware

Installation

Kit

(04352-65402

)

Installation

Manual

Agilent

P

art

No

.

04352-90402

Printed

in

JAP

AN

July

2000

Summary of Contents for 4352B

Page 1: ...Agilent 4352B Revision 01 02 Firmware Installation Kit 04352 65402 Installation Manual Agilent Part No 04352 90402 Printed in JAP AN July 2000 ...

Page 2: ...d by copyright All rights are reserved No part of this document may be photocopied reproduced or translated to another language without the prior written consent of the Agilent Technologies Agilent Technologies Japan Ltd Component Test PGU Kobe 1 3 2 Murotani Nishi ku Kobe shi Hyogo 651 2241 Japan c Copyright Agilent Technologies Japan Ltd 1998 2000 ...

Page 3: ...NNNNNNNNNNNNNNN SOFTKEYS Softkeys located to the right of the LCD are enclosed in NNNNN Safety Symbols General de nitions of safety symbols used on equipment or in manuals Note denotes important information It calls attention to a procedure practice condition or the like which is essential to highlight iii ...

Page 4: ......

Page 5: ...pgrades and for rmware installation after repairing the A1 CPU board Contents of the Firmware Installation Kit See Table 1 1 for the kit contents If anything is missing contact the nearest Agilent Technologies o ce Table 1 1 Contents of the Kit Part Number Description Qty 04352 18402 Flexible Disk Rev 01 02 1 5080 3949 Label Firmware Rev 01 02 1 04352 90402 Installation Manual This manual 1 Genera...

Page 6: ......

Page 7: ...stall the rmware into the 4352B 1 While pressing 4Preset5 key turn on the 4352B The bootloader screen as shown in Figure 2 1 will be displayed Figure 2 1 Bootloader Menu Screen 2 Insert the furnished exible disk into the disk drive 3 Press NNNNNNNNNNNNNNNNNNNNNNNNNNNNNNNNNNNNNN PREVIEW DISK The update disk revision will be displayed Installation 2 1 ...

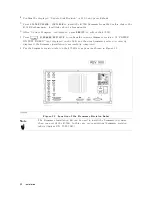
Page 8: ...System5 NNNNNNNNNNNNNNNNNNNNNNNNNNNNNNNNNNNNNNNNNNNNNNNNNNNNN FIRMWARE REVISION to con rm the current rmware revision If POWER ON TEST FAILED isn t displayed on the LCD and the new rmware revison is correctly displayed the rmware installation is successfully completed 8 Put the rmware revision label on the 4352B s rear panel as shown in Figure 2 2 Figure 2 2 Location of the Firmware Revision Label...

Reviews: