background image


Output Connections and Operating Information


46

 Operating Quadrants


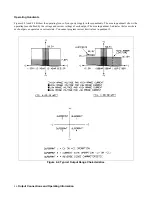
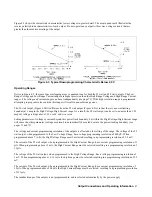
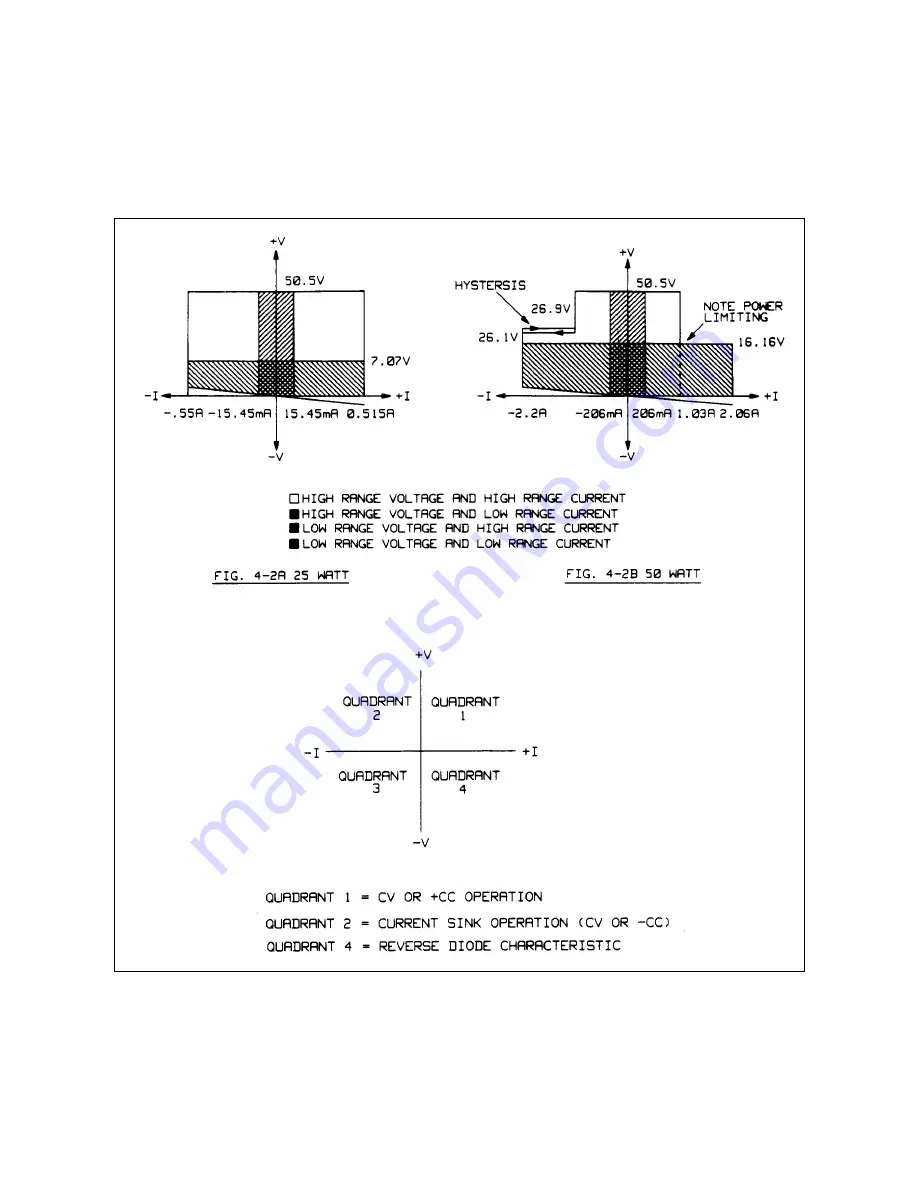
Figures 4-2A and 4-2B show the operating locus of your power supply in three quadrants. The area in quadrant 1 shows the
operating locus defined by the voltage and current settings of each output. The area in quadrant 2 indicates the locus where
each output can operate as a current sink. You cannot program current limit values in quadrant 2.


 Figure 4-2. Typical Output Range Characteristics

Summary of Contents for 6625A

Page 1: ...OPERATING MANUAL MULTIPLE OUTPUT LINEAR SYSTEM DC POWER SUPPLY AGILENT MODELS 6625A 6626A 6628A and 6629A Agilent Part No 06626 90001 Microfiche Part No 06626 90002 Printed in Malaysia September 2004 ...

Page 2: ...nt shall pay for return of products to Customer Warranty services outside the country of initial purchase are included in Agilent s product price only if Customer pays Agilent international prices defined as destination local currency price or U S or Geneva Export price If Agilent is unable within a reasonable time to repair or replace any product to condition as warranted the Customer shall be en...

Page 3: ...ent and internal adjustments must be made by qualified service personnel Do not replace components with power cable connected Under certain conditions dangerous voltages may exist even with the power cable removed To avoid injuries always disconnect power discharge circuits and remove external voltage sources before touching components DO NOT SERVICE OR ADJUST ALONE Do not attempt internal service...

Page 4: ... push control Frame or chassis terminal On supply Terminal for Neutral conductor on permanently installed equipment Off supply Terminal is at earth potential Used for measurement and control circuits designed to be operated with one terminal at earth potential Standby supply Units with this symbol are not completely disconnected from ac mains when this switch is off To completely disconnect the un...

Page 5: ...stomized products based on the above products Complies with the essential requirements of the Low Voltage Directive 73 23 EEC and the EMC Directive 89 336 EEC including 93 68 EEC and carries the CE Marking accordingly EMC Information ISM Group 1 Class A Emissions As detailed in Electromagnetic Compatibility EMC Certificate of Conformance Number CC TCF 00 076 based on Technical Construction File TC...

Page 6: ...ing connections to the supply s output terminals General operating information is also provided Chapter 5 Remote Operation Chapter 5 contains all of the information required to operate the supply remotely via a GP IB computer All of the commands that can be used to program the supplies are described Chapter 6 Local Operation Chapter 6 contains instructions on using all of the front panel controls ...

Page 7: ...Front Panel Controls and Indicators 31 Turning On Your Supply 36 Normal Self Test Indications 36 Self Test Errors 37 Checking Out Your Supply Using Local Control 37 Voltage Test 38 Overvoltage Test 38 Current Test 38 Changing Resolution Range 39 Introduction To Remote Operation 39 Enter Output Statements 40 Reading the GP IB Address 40 Changing the GP IB Address 40 Sending a Remote Command 41 Gett...

Page 8: ...Operation 59 CC Operation 60 Remote Sensing 60 Specifications for Series Operation 60 Bi Polar Operation 61 5 Remote Operation Introduction 63 GP IB Operation 63 Interface Functions 63 GP IB Address Selection 64 Power On Service Request PON 65 Programming Syntax 65 Numeric Data 67 Order of Execution 70 Terminators 70 Initial Conditions 71 Power Supply Commands 71 Voltage Programming 71 Current Pro...

Page 9: ... 89 A Alignment Procedures Introduction 91 Test Equipment and Setup Required 91 Calibration Program 91 Alignment Program 95 B Programming With a Series 200 300 Computer Introduction 103 I O Path Names 103 Voltage and Current Programming 103 Voltage and Current Programming With Variables 104 Voltage and Current Readback 104 Programming Power Supply Registers 105 Present Status 105 Service Request a...

Page 10: ......

Page 11: ...A 00101 The first part of the serial number the prefix is a number letter combination that denotes either the date of manufacture or the date of a significant design change It also indicates the country of origin Starting at 1960 26 1986 01 the first week of the year A U S A The second part of the serial number is a different sequential number assigned to each instrument starting with 00101 Option...

Page 12: ... Model Output 1 Output 2 Output 3 Output 4 Agilent 6625A 25 W 50 W Agilent 6626A 25 W 25 W 50 W 50 W Agilent 6628A 50 W 50 W Agilent 6629A 50 W 50 W 50 W 50W Figure 1 1 Output Operating Range Output 2 of the Agilent 6625A and outputs 3 and 4 of the Agilent 6626A and all outputs of the Agilent 6628A and Agilent 6629A have an L shaped characteristic The L shaped characteristic allows you to use the ...

Page 13: ...P IB The following functions are implemented via the GP IB Voltage and current programming Programmable resolution range Voltage and current measurement and readback Present and accumulated status readback Programmable service request mask Programmable overvoltage and overcurrent protection Voltage and current range programming Storage and recall of programmed voltage and current values for all ou...

Page 14: ...output that it provides GP IB Board The GP IB board provides the interface between the user and the multiple outputs of the power supply Each output board is actually an output channel that can be individually selected and controlled over the GP IB or from the supply s front panel Circuits on the GP IB board interpret commands from the GP IB or from the front panel to control the selected output T...

Page 15: ... 662xA power supplies Performance specifications describe the instrument s warranted performance The service manual Option 9l0 contains procedures for verifying the performance specifications Table 1 3 lists the supplemental characteristics for the Agilent 662xA supplies Supplemental characteristics are type tested or typical values which are based on a product sample and while representative are ...

Page 16: ...Maximum change of regulated output voltage or current within 30 minutes after a line and or load change Expressed as a percentage of the setting plus a constant Output Noise PARD PARD replaces the former term ripple and noise PARD is the periodic and random deviation of dc output voltage or current from its average value over a specified bandwidth and with all influence and control quantities main...

Page 17: ...hange from 0 1 A to 100 of the maximum rated current Maximum Output Noise PARD 20 Hz 20 MHz CV pk to pk 3 mV 3 mV 3 mV 3 mV CV rms 0 5 mV 0 5 mV 0 5 mV 0 5 mV CC rms 0 1 mA 0 1 mA 0 1 mA 0 1 mA AC Input Voltage and Frequency Nominal Line l00 120 220 or 240 Vac Amplitude 6 to 13 of nominal line voltage Frequency 47 to 66 Hz Note at low line the supply will operate with up to 3 4 ohm line resistance...

Page 18: ...0 minutes after a line and or load change Voltage 0 002 0 5 mV 0 002 1 mV 0 002 0 5 mV 0 002 1 mV Current 0 01 2 µA 0 01 20 µA 0 01 25 µA 0 01 60 µA DC Floating Voltage No output terminal may be more that 240 Vdc from any other terminal or from chassis ground Also no overvoltage terminal may be more than 240 Vdc from any other terminal or chassis ground Remote Sense Capability see pages 50 52 Outp...

Page 19: ...n about 10 mS with front panel disabled Maximum Output Programming Response Time 6 mS 6 mS 6 mS 6 mS Settling Band 50 mV 50 mV 50 mV 50 mV Maximum Time Constant 750 µS 750 µS 750 µS 750 µS Series and Parallel operation Two outputs can be operated directly in parallel or can be connected for straight series operation Refer to Chapter 4 for more information Reactive Load Capability All outputs have ...

Page 20: ...Characteristics continued Weight Agilent 6625A 6628A Agilent 6626A 6629A Net 15 5 kg 34 lbs 17 7 kg 39 lbs Shipping 20 8 kg 46 lbs 23 kg 51 lbs Load Cross Regulation Voltage 0 25 mV 0 25 mV 0 25 mV 0 25 mV Current 0 005 mA 0 005 mA 0 01 mA 0 01 mA ...

Page 21: ...General Information 21 Figure 1 4 CV Operation with Capacitive Load Stability Graph for all Outputs ...

Page 22: ...General Information 22 Figure 1 5 Output Noise Typical CC Mode Figure 1 6 Output Noise Typical CV Mode ...

Page 23: ...General Information 23 Figure 1 7 Output Impedance Typical Graph See Supplemental Characteristics ...

Page 24: ......

Page 25: ...ction if there was damage or in case any equipment has to be returned to Agilent Technologies Warranty information is printed on the inside cover of this manual Remember to send a detailed description of the failure and symptoms when returning the power supply for service Your Agilent Technologies Sales and Service office will furnish the address of the nearest service office to which the instrume...

Page 26: ...etting for which your supply is set If necessary you can convert the supply from one line voltage setting to another by following the instructions under LINE VOLTAGE CONVERSION see page 29 Table 2 1 Input Power Nominal Voltage Line Voltage Range Maximum Input Current rms High Line Inrush Current PK Fuse 100 V 6 3 A 85 A 8 AM 120 V Nominal 5 7 A 85 A 8 AM 220 V 13 6 3 0 A 50 A 4 AM 240 V 3 0 A 50 A...

Page 27: ...Panel Detail Agilent 6626A Shown Table 2 2 Line Fuses Line Voltage Fuse Needed Agilent Part Number for X 1 in fuses only 100 120 V 8AM 2110 0342 220 240 V 4AM 2110 0055 Note All fuses are rated for 250 V Figure 2 3 Line Module Detail ...

Page 28: ... is encountered it must be replaced with a properly grounded three contact receptacle in accordance with the National Electrical Code local codes and ordinances The work should be done by a qualified electrician Line Voltage Conversion You can change the supply to accept 100 V 120 V 220 V and 240 V ac input by adjusting the voltage selector card located inside of the line module see Figure 2 3 Aft...

Page 29: ...essories that are available from Agilent Technologies An GP IB system can be connected together in any configuration star linear or both as long as the following rules are observed 1 The total number of devices including the computer is no more than 15 2 The total length of all the cables used is no more than two meters times the number of devices connected together up to a maximum of 20 meters No...

Page 30: ......

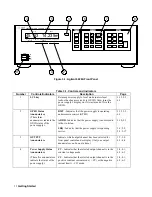
Page 31: ... your supply these simple step by step checkout procedures will help the first time user become familiar with operating the supply from the front panel When you have completed the checkout procedures you are then introduced to the fundamentals of operating the supply remotely from a computer You will learn how to send a command to the supply from the computer and how to get data back to the comput...

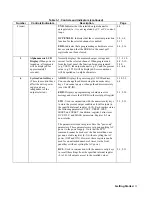
Page 32: ...esting service 5 1 5 2 5 3 5 17 3 OUTPUT Annunciators Indicate which output channel has been selected for front panel control and or display Only one output annunciator can be on at a time 3 7 3 8 6 1 6 4 4 Power Supply Status Annunciators CV Indicates that the selected output channel is in the constant voltage mode 3 8 4 1 6 2 6 3 These five annunciators indicate the status of the power supply CC...

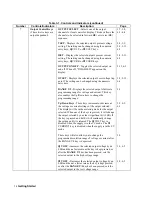
Page 33: ...nt of the ADDR Displays the power supply s GP IB address You can change the address using the numeric entry keys You cannot query or change the address remotely over the GP IB 3 10 5 2 6 4 output selected ERR Displays a programming or hardware error message and clears the ERR bit in the serial poll register 5 1 5 20 STO Used in conjunction with the numeric entry keys to store the present output co...

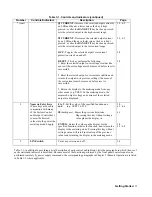
Page 34: ...nge for voltage and current This key also enables the Up Down keys to change the programming range 3 9 Up Down Keys These keys increment or decrement the voltage or current settings of the output selected The display will be in the metering mode for the output selected When one of the keys is pressed it will change the output selected by one least significant bit LSB If the key is pressed and held...

Page 35: ...r mode e g VSET In the metering mode the measured output voltage and current of the selected output are displayed 3 8 8 Numeric Entry Keys These keys are used in conjunction with many of the System Control and Output Control keys to enter the desired values into the power the metering mode Supply 0 to 9 Set the value of the specified function and and e g VSET 1 6 550 Ï backspace Erases the previou...

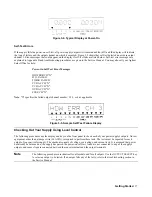
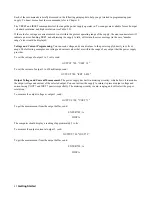
Page 36: ...ns If the supply passes the self test the display will first show all segments of the LCD display with annunciators on as illustrated in Figure 3 2 Figure 3 2 Test Pattern of all Display Segments at Power on After all segments are displayed the supply s GP IB address will appear for approximately 2 seconds as shown in Figure 3 3 As shipped from the factory the power supply s address is set to 5 Yo...

Page 37: ...utput channel number 1 2 3 or 4 as applicable Figure 3 5 Sample Self Test Failure Display Checking Out Your Supply Using Local Control The following procedures use the display and keys on the front panel to check each of your power supply s outputs No test equipment other than a jumper wire 14 AWG is required to perform these tests The tests must be repeated for each output of your particular supp...

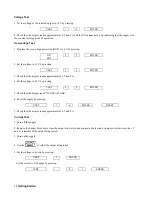
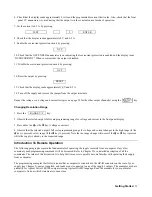
Page 38: ...that the display reads approximately 16 V and 0 A 4 Set the voltage to 20 V by pressing VSET 2 0 ENTER 5 Check that the display reads OVERVOLTAGE 6 Reset the supply by pressing VSET 1 6 ENTER RESET 7 Check that the display reads approximately 16 V and 0 A Current Test 1 Turn off the supply 2 Remove the barrier block cover from the output to be tested and connect a short circuit jumper wire between...

Page 39: ...l scale programming range for voltage and current in the front panel display 3 Press either the Ñ or the Ò key voltage or current 4 Observe that the selected output s full scale programming range for voltage and current changes to the high range if the Ñ key is pressed or low range if the Ò key is pressed Note that no range change will occur if the Ñ or Ò key is pressed while the supply is already...

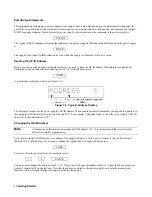
Page 40: ... shown in Figure 3 6 Figure 3 6 Typical Address Display The displayed response is the power supply s GP IB address When sending a remote command you append this address to the computer s GP IB interface select code normally 7 For example if the select code is 7 and the power supply s GP IB address is 5 the combination is 705 Changing the GP IB Address Note All examples in this discussion assume a ...

Page 41: ...buffer is a register that holds information until it is read by the computer or is replaced with new information Note On an Agilent Series 200 300 Computer the A variable must be declared before you do the following steps Refer to your computer s operating manual for more information Use your computer s enter statement to get the response from the output buffer For example execute ENTER 705 A Foll...

Page 42: ...following examples use voltage and current values that are within the range of any output that the power supply provides To set the voltage of output 1 to 5 volts send OUTPUT 705 VSET 1 5 To set the current of output 2 to 450 milliamps send OUTPUT 705 ISET 2 450 Output Voltage and Current Measurement The power supply has built in metering circuitry which allows it to monitor the output voltage and...

Page 43: ...le the overcurrent protection mode for output 2 send OUTPUT 705 OCP 2 1 To disable the overcurrent protection mode for output 2 send OUTPUT 705 OCP 2 0 When overcurrent protection is disabled and the output is in CC mode the output current will be limited to and will stay at the ISET value Returning the Supply to Local Mode In the remote mode RMT annunciator on the front panel keys have no effect ...

Page 44: ......

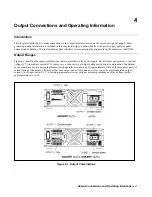
Page 45: ... IB Output Ranges Figure 4 1 identifies the output combinations that are available on the power supply Each output can operate as a constant voltage CV or constant current CC source over a wide variety of output voltage and current combinations In addition each output has an active downprogrammer which operates at currents up to approximately 110 of the maximum positive current rating of the outpu...

Page 46: ...r supply in three quadrants The area in quadrant 1 shows the operating locus defined by the voltage and current settings of each output The area in quadrant 2 indicates the locus where each output can operate as a current sink You cannot program current limit values in quadrant 2 Figure 4 2 Typical Output Range Characteristics ...

Page 47: ...urrent beyond this power limit boundary but within the High Voltage High Current range will cause the other parameter voltage or current to automatically be scaled down to the power limiting boundary see pages 71 and 73 The voltage and current programming resolution of the outputs is affected by the setting of the range The voltage of the 25 watt output when programmed to the Low Voltage Range has...

Page 48: ...the output by firing an SCR crowbar and sets zero volts and minimal current on an output if any of the following conditions are present 1 The output voltage exceeds the programmed overvoltage trip point or 2 The sum of the voltage from the V output terminal to the S terminal plus the voltage from the S terminal to the V output terminal exceeds 10 0 V applies to remote sensing only or 3 A trip sign...

Page 49: ...wdriver into this rectangular slot and move the locking tab to the left When the locking tab releases gently pull the terminal block cover away from the terminal block To reinstall the cover align it over the terminal block and gently press it into position until the locking tab engages SHOCK HAZARD Turn off ac power before making rear panel connections All wires and straps must be properly connec...

Page 50: ...itive loads Note The OVP circuit senses at the main output terminals and not on the sense leads Thus the voltage sensed by the OVP circuit could be as much as 10 V higher than the voltage being regulated at the load Program the OVP trip voltage accordingly when using remote sensing In addition if the total voltage drop in both leads exceeds 10 V a protective circuit will fire the OVP circuit regar...

Page 51: ...d Remote Voltage Sensing The power supplies will allow up to a total load lead drop of 10 V Because of the unavoidable voltage drop developed in the load leads the as shipped terminal block strapping pattern shown in Figure 4 4 does not provide the best possible voltage regulation at the load The remote sensing connections shown in Figure 4 5 improve the voltage regulation at the load by monitorin...

Page 52: ...the power supply before making or changing any connections on the rear panel terminal blocks Connect the unit for remote sensing by first disconnecting the straps between sense and load terminals Then make your connections as shown in Figure 4 5 Connect the sense leads as close to the load as possible See wire size selection pages 49 50 for information on selection of load lead wire gauge Best res...

Page 53: ...sing However voltage transients may be produced at the load by noise induced in the leads or by load current transients acting on the inductance and resistance of the load lead If it is desirable to keep voltage transient levels to a minimum place an aluminum or a tantalum capacitor with an approximate value of 10 µF per foot 30 5 cm of load lead right across the load see Figure 4 5 Refer to Figur...

Page 54: ...programming You can also externally fire the overvoltage circuit of one or more outputs by applying a 5 volt pulse of at least 50µs to any pair of OV terminals see Figure 4 8 As long as all OV terminals are wired together the outputs will be crowbarred simultaneously External Trigger Circuit Figure 4 8 illustrates a recommended external circuit that can be used to provide an OV trip signal to the ...

Page 55: ...dded to prevent damage to the supply during an overvoltage shutdown Remember that each output has an overvoltage protection circuit that fires a crowbar to disable the output for any of the OVERVOLTAGE conditions described on page 48 Figure 4 10 illustrates the recommended connections and protection circuit for a battery charging application The diode will prevent damage to your supply that can re...

Page 56: ...ical output you can parallel no more than two outputs These outputs must have equivalent voltage and current capability For example on the Agilent 6626A power supply only outputs 1 and 2 or 3 and 4 may be connected together On the Agilent 6625A supply none of the outputs may be connected together If you are mixing different model supplies i e an Agilent 6625A and an Agilent 6626A be sure to connec...

Page 57: ...o the desired operating voltage The lower voltage setting of output 1 will determine the voltage that appears across the load The current limit point of the paralleled outputs is the sum of both individual current limit points The output current of the parallel combination is the algebraic sum of the individual current readbacks The OV and OV terminals of output 1 should be wired to the OV and OV ...

Page 58: ...s are expressed as a constant or as a percentage or ppm plus a constant For parallel operation the percentage portion remains unchanged while constant portions or any constants are changed as indicated below Current All parallel specifications referring to current are twice the single output specification except for programming resolution which is the same for both single output and parallel outpu...

Page 59: ...ld potentially damage the lower rated output by forcing excessive current through it under certain load conditions Figure 4 13 shows an example of how to connect two outputs in series to a single load with local sensing This configuration applies to both CV and CC operating modes Connecting the load lead of output 2 directly to the V terminal of output 1 completes the series connection between the...

Page 60: ...ucting through its reverse voltage protection diode the output will have a reverse voltage across its output terminals with the V terminal more positive than the V terminal This voltage will be maximum at the rated current of the output See Figure 4 2 for reverse diode characteristic Note that when an output conducts through this diode it will indicate CC mode even though it is not regulating the ...

Page 61: ...ration to test power FET s PFET Great flexibility is achieved with this setup The outputs of the power supply can be programmed as voltage or current sources providing positive or negative voltages or currents By taking measurements via internal readback circuitry in the power supply the outputs can be used as voltmeters or ammeters In order to properly measure the parameters of the PFET it is des...

Page 62: ......

Page 63: ... be incorporated in your controller commands If you are not familiar with the operation of the power supply you are advised to read through Chapters 2 through 4 first GP IB Operation Interface Functions Remote control is implemented by the GP IB It enables instructions to be sent from an external computer equipped with a GP IB interface The power supply implements the following IEEE 488 Interface ...

Page 64: ...uch as Agilent Technologies power supplies indicate the state of their RQS bit but the operator should not assume that all instruments on the bus respond to parallel poll with their RQS bit Unless remotely configured the power supply will respond with a 1 on one of the GP IB data lines if it is requesting service and its address is between 0 and 7 Addresses 0 through 7 define which data line 1 thr...

Page 65: ...amming language specific Figure 5 1 shows the structure of a typical programming statement for an Agilent Series 200 300 computer If you are using a different computer or programming language refer to your computer programming manual to determine the correct syntax for this portion of the program statement This section of the manual is only concerned with the device command portion the part inside...

Page 66: ...ble 5 4 Q2 Set current of an output ISET 1 2 3 4 See Table 5 4 C4 Query current of an output ISET 1 2 3 4 See Table 5 4 Q2 Increase or decrease output current by value ISTEP 1 2 3 4 See Table 5 4 C4 Select which output will be metered METER 1 4 C2 Query which output is being metered METER Q1 Send data to calibrate I readback NIDAT 1 2 3 4 See Table 5 4 C5 Enable overcurrent protection OCP 1 2 3 4 ...

Page 67: ...d in Appendix A are also included The oblong shape at the left of the syntax forms contains the command header which must be entered as shown in Tables 5 1 and 5 2 Commands are accepted in either uppercase or lowercase letters ASCII characters Circles contain characters that must be entered exactly as shown Characters such as a space SP or a comma are used to separate elements in the command strin...

Page 68: ...Remote Operation 68 Figure 5 2 Sheet 1 of 2 Syntax Forms For Power Supply Commands ...

Page 69: ...Remote Operation 69 Figure 5 2 Sheet 2 of 2 Syntax Forms For Power Supply Commands ...

Page 70: ...tput channels 3 and 4 are not used in all modes See Table 5 4 2 Current is SZD DDDDD 0 5 A SZD DDDDDD 15 mA SZD DDDD 2 A SZD DDDDD 0 2 A 3 Voltage can be SZD DDDD on 7 VR 4 X depends upon model 5 A space is returned for a sign 6 All responses are followed by a CR and LF EOI asserted with LF 7 Spaces are allowed between the header and the question mark 8 Unit powers up with values in state register...

Page 71: ...pply Commands This section discusses the commands which you will use to program the supply s voltage and current protection circuits and enhanced features like storage and recall registers and reprogramming delay When programming you should be aware that the current voltage and overvoltage ranges for each output of your supply may differ Table 5 1 shows these values for the power supply If you sen...

Page 72: ... Low 0 7 V 0 15 mA 0 460 mV 1 µA 1 1 2 High 0 50 V 0 0 5 A 3 2 mV 33 µA OUTPUT OUTPUTS Low 0 16 V 0 2 A 1 0 mV 13 µA 2 3 4 High 0 50 V 0 2 A 1 2 6628A 1 2 3 4 6629A 3 2 mV 131 µA The maximum programmable voltage values for each range are 1 higher than the rated voltage and the maximum programmable current values for each range are 3 higher than the rated current Each channel wakes up to values sto...

Page 73: ... 1 send the query and addressing the supply to talk ISET You can also instruct the supply to measure the actual output current at output channel 1 by sending the following query and address the supply to talk IOUT 1 The results are placed on the GP IB and read into the controller Range Programming The range can be set by using the VRSET or IRSET commands The power supply will automatically pick th...

Page 74: ... against excessive voltage When the actual voltage exceeds the programmed overvoltage setting for a given output channel the OV is tripped The OV circuit will fire the SCR crowbar which shorts across the output and the output assumes a low impedance state For example to program the OV of output channel 1 to 9 5 V send the following command OVSET 1 9 5 To find out the OV setting for output channel ...

Page 75: ...ent settings of all the outputs By storing voltage voltage range current current range and OV settings for all outputs and recalling them later you can have significant savings in programming time See Supplemental Characteristics in Table 1 2 Upon shipment from the factory registers 1 10 contain values of 0 volts and 0 current see Table 5 4 Registers 0 3 are non volatile They are limited to one ST...

Page 76: ... 5 3 shows a conceptual model of the operation of these registers Figure 5 3 Functional Relationship of Status Registers The supply has one serial poll register which services all outputs and provides the user with other power supply status related information as discussed in page 78 Status Register Each output channel of the power supply maintains its present status in an eight bit register This ...

Page 77: ...l is presently operating in constant voltage mode the reading you will get when you query the register will be 9 To decode this we use Table 5 5 9 8 1 OV CV For example to query the astatus register of output 2 send the following query and address the supply to talk ASTS 2 The Mask and Fault Register The fault register works in conjunction with the mask register These are two eight bit registers w...

Page 78: ...ial poll register will also be set and a service request may be generated see page 79 To read the fault register of output 2 and find out which bits are set send the following query and address the supply to talk FAULT 2 The power supply responds with a number which can be decoded from Table 5 5 For example the number 9 8 1 indicates that the OV and the CV bits in the fault register are set Note I...

Page 79: ...ust do a serial poll This will isolate the output that generated the request by checking which of the FAU bits are set in the case of a fault or checking to see if the error bit is set in the case of an error If the SRQ on faults was set then send the fault query FAULT 2 using output 2 as an example and address the supply to talk if you want to find out which of the conditions you unmasked in Figu...

Page 80: ... or disabled send the following query PON and address the supply to talk The supply will respond with a 1 or 0 as discussed above Note The power on PON SRQ mode is stored in the non volatile memory of the supply so that although the supply may be switched off it will remember the status of the last PON command at power on and respond accordingly Table 5 7 summarizes all the conditions under which ...

Page 81: ... setting will also depend on load capacitance load resistance and current limit setting See page 53 for output capacitor considerations To query the reprogramming delay setting of a particular output channel send the following query DLY 2 using output 2 as an example and address the supply to talk The response will be a numeric value between 0 and 32 Display On Off When the display is on the comma...

Page 82: ...o the test query are described in Table 5 9 This test cannot be done from the front panel To instruct the power supply to carry out a self test send the following query and address the supply to talk TEST Calibration Mode Query To be able to calibrate your power supply the calibration mode CMODE must be turned on See Appendix A for a detailed description of the calibration procedure To find out if...

Page 83: ...t without delimiters or the number representation is incorrect Follow the Syntax Diagram in Figure 5 2 Check spaces and delimiters NUMBER RANGE 5 An out of range number was sent Send a new number within the legal range NO QUERY 6 Computer addressed the supply to talk but it did not first request data Send query first then address supply to talk DISP LENGTH 7 Quoted string exceeds the display lengt...

Page 84: ... has a hardware failure CAL LOCKED 18 Calibration was attempted with the Calibration Jumper on the GP IB board in the lockout position Reposition jumper if desired See Service Manual SKIP SELF TST 22 The self test jumper on the GP IB board is in the Skip Self Test position No self test was done This is for diagnostics only See Service Manual Table 5 9 TEST Responses Code Explanation 0 This is the ...

Page 85: ...supply s display back on if it was turned off with a DSP command during remote operation see page 81 A change between the local and remote modes will not result in a change in the power supply s outputs Local Control Of Output Functions The Output Function keys see Figure 6 1 allow you to control the selected output Figure 6 1 shows the annunciator arrow over OUTPUT 2 indicating that output channe...

Page 86: ... the step keys to change the setting the VSET or ISET key must be pressed first The step keys can then be used to adjust the setting Press the ENTER key to change the actual setting 3 To use the step keys to change the voltage or current ranges first press the RANGE V I key The step keys change the range as long as the RANGE display is in effect Note The step keys change the voltage or current by ...

Page 87: ...nimum programmable current without causing a programming error See Table 5 4 The current step keys can also be used to change the current setting ISET ÑCURR or ÒCURR then ENTER The current can be set in the immediate execute mode This mode is in effect when background metering is in effect Pressing ÑCURR or ÒCURR will change the setting and the effect on the voltage and current can be observed on ...

Page 88: ...T appears on the front panel display The selected output s overcurrent protection feature can be turned on and off from the front panel The OCP key toggles the selected output s overcurrent protection circuit on and off When it is on enabled the OCP ENBLD annunciator will be on Resetting Overcurrent Protection The condition that activated the OCP circuit must first be cleared and then the output c...

Page 89: ...r supply has 11 internal registers for storing voltage and current settings of all outputs At power on each location contains zero volts and the minimum current limit see initial conditions on page 71 The STO and RCL keys allow you to store and recall voltage and current settings for all your output channels from any of the 11 internal registers numbered 0 through 10 For example you can store the ...

Page 90: ......

Page 91: ...r For example an error will be created if the DMM is connected to measure a current when a voltage measurement is anticipated by the program Note The memory used to store correction constants will accept and store data about 10 000 times which is more than sufficient for normal calibrations over the life of the instrument However do not put the unit in a calibration loop that repeatedly turns the ...

Page 92: ... line 260 It will now place the power supply in calibration mode line 300 The program is now ready to perform the calibrations on the power supply The program will first perform a subprogram called at line 360 and performed in lines 3420 3630 which will set up the output parameters of the output under test The program will then calibrate its voltage programming and readback circuitry the subprogra...

Page 93: ...rogram is called in line 850 and performed in lines 3670 3780 If an error has occurred a message will be sent to the output device CRT After all outputs are tested without errors the CAL MODE will be turned off and the calibration constants stored Figure A 1 Figure A 2 Figure A 3 Figure A 4 Figure A 1 Figure A 5 Figure A 2 ...

Page 94: ...Alignment Procedures 94 Figure A 3 Figure A 4 Figure A 5 ...

Page 95: ...sample 270 280 290 300 OUTPUT Ps CMODE 1 Turn on Supply CAL mode 310 320 IF Model Agilent6625A OR Model Agilent6628A THEN No_of_outputs 2 330 IF Model Agilent6626A OR Model Agilent6629A THEN No_of_outputs 4 340 350 FOR Chan 1 TO No_of_outputs Loop to test all outputs 360 Get_data Call program with range data 370 Cal_voltage Vrng_lo Call program to cal low range voltage 380 Cal_voltage Vrng_hi Call...

Page 96: ...al low range sink 710 720 Chan 4 Select channel to cal sink CC 730 Other_chan 3 Select current source channel 740 Cal_sink Irng_lo 1 Call program to cal low range sink 750 760 Chan 3 Select channel to cal sink CC 770 Other_chan 4 Select current source channel 780 Cal_sink Irng_hi 1 Call program to cal high range sink 790 800 Chan 4 Select channel to cal sink CC 810 Other_chan 3 Select current sour...

Page 97: ... 1 2 1270 IF No_of_outputs 4 THEN OUTPUT Ps OUT 3 1 OUT 4 1 1280 Turn on outputs 3 4 1290 SUBEND 1300 1310 1320 1330 SUB Output_off Subprogram to turn OFF outputs 1340 COM Ps Chan Other_chan Ps Mode1 7 1350 COM Outputs No_of_outputs 1360 OUTPUT Ps OUT 1 0 OUT 2 0 Turn off outputs 1 2 1370 IF No_of_outputs 4 THEN OUTPUT Ps OUT 3 0 OUT 4 0 1380 Turn off outputs 3 4 1390 SUBEND 1400 1410 1420 1430 Ca...

Page 98: ...00 OUTPUT Ps VRLO Chan Set low readback voltage 1810 REPEAT Wait for supply to finish 1820 UNTIL BIT SPOLL Ps 4 Finished when Bit 4 goes true 1830 Vrlo FNDcv Read low output voltage 1840 1850 OUTPUT Ps VRHI Chan Set high readback voltage 1860 REPEAT Wait for supply to finish 1870 UNTIL BIT SPOLL Ps 4 Finished when Bit 4 goes true 1880 Vrhi FNDcv Read high output voltage 1890 1900 OUTPUT Ps VRDAT C...

Page 99: ...RINT 3458A input is connected to CURRENT terminals 2320 PRINT 2330 PRINT The current shunt is NOT used 2340 END IF 2350 PRINT 2360 PRINT Press CONTINUE when ready 2370 PAUSE 2380 Output_on 2390 2400 Cal_i 2410 Clear_screen 2420 PRINT Calibrating the I_range A current programming 2430 2440 OUTPUT Ps IRSET Chan I_range Set current range 2450 OUTPUT Ps ILO Chan Set output current low 2460 WAIT 1 Wait...

Page 100: ...han 2 OR Chan 4 THEN GOTO Sink_rb Skip setup instructions 2820 2830 Output_off 2840 Clear_screen 2850 PRINT Set up output Chan for I_range A current SINK cal 2860 PRINT 2870 PRINT Connect outputs Chan and Other_chan together as in 2880 2890 IF I range 2 THEN If it is 2A output use setup 5 2900 PRINT Fig A 5 of the Operating Manual 2910 PRINT 2920 PRINT 3458A input is connected to VOLTAGE terminals...

Page 101: ... I_range Polarity Read high sink current 3350 3360 OUTPUT Ps NIDAT chan Ilo Ihi Send current sink data 3370 3380 SUBEND 3390 3400 3410 3420 Get_data SUB Get_data Subprogram with range data 3430 COM Specs Vrng_lo Vrng_hi Irng_lo Irng_hi 3440 COM Ps Chan Other_chan Ps Model 7 3450 3460 IF Model Agilent6625A AND Chan 1 THEN RESTORE Type_1_data 3470 IF Model Agilent6625A AND Chan 2 THEN RESTORE Type_2...

Page 102: ... THEN If an error then print msg 3740 PRINT Error Err occurred Supply may not be calibrated 3750 PRINT The alignment program is stopped 3760 STOP 3770 END IF 3780 SUBEND 3790 3800 3810 3820 Cal_mode_off SUB Cal_mode_off Subprogram to turn off cal mod 3830 COM Ps Chan Other_chan Ps Model 7 3840 Clear_screen 3850 PRINT wait while calibration constants are stored 3860 OUTPUT Ps CMODE 0 Turn cal mode ...

Page 103: ... as well The I O path name can be carried in a common block and changed by a single assign statement In the programming examples in this appendix the I O path name Ps is used for the power supply The ASSIGN statement that defines the I O path must precede any statements that use the I O path name Therefore instead of using the statement OUTPUT 705 VSET1 5 in the following programs the equivalent O...

Page 104: ... statements to program the power supply The following program uses input statements to program the voltage and current settings of output 1 and output 2 10 ASSIGN Ps TO 705 20 INPUT ENTER A VOLTAGE FOR OUTPUT 1 V1 30 INPUT ENTER A CURRENT LIMIT FOR OUTPUT 1 I1 40 INPUT ENTER A VOLTAGE FOR OUTPUT 2 V2 50 INPUT ENTER A CURRENT LIMIT FOR OUTPUT 2 I2 60 OUTPUT Ps VSET1 V1 ISET1 I1 VSET2 V2 ISET2 I2 70...

Page 105: ... The following example shows how to query bit position 0 of output 1 s status register to see if output 1 is in CV mode In this example the program references the function as a variable in a conditional execution statement Note that instead of printing a message line 30 could be used to branch to another part of the program in the event that the supply is in CV mode 10 ASSIGN Ps TO 705 20 COM Ps P...

Page 106: ...ULT 1 FAULT 2 240 SUBEND LINE 10 Assigns the I O pathname to the power supply LINE 20 Declares a common block for the I O pathname The COM statement must be used for the Ps variable to preserve its value for use in the service routine LINE 30 Returns the power supply to its power on state unmasks output 1 s and output 2 s OV status bits to generate faults and enables the service request capability...

Page 107: ...creen 10 ASSIGN Ps TO 705 20 COM Ps Ps 30 ON KEY 0 LABEL ERROR CALL Err_trap 40 Lbl GOTO Lbl 50 END 60 70 80 SUB Err _ trap 90 OFF KEY 100 COM Ps Ps 110 OUTPUT Ps ERR 120 ENTER Ps Err 130 OUTPUT 2 USING K CHR 255 CHR 75 140 IF Err THEN 150 PRINT POWER SUPPLY PROGRAMMING ERROR 160 END IF 170 SELECT Err 180 CASE 0 190 PRINT NO ERROR OCCURRED 200 SUBEXIT 210 CASE 1 220 PRINT INVALID CHARACTER 230 CAS...

Page 108: ...t settings that are in effect when the command is received The following example uses stored operating states to set up an output Using this method of setting up outputs saves processing time and facilitates repeating the same commands 10 ASSIGN Ps TO 705 20 OUTPUT Ps OUT1 0 OUT2 0 30 40 OUTPUT Ps VSET1 1 ISET1 0 01 VSET2 5 ISET2 0 01 STO1 50 OUTPUT Ps VSETl 2 ISETl 0 02 VSET2 4 ISET2 0 02 STO2 60...

Page 109: ...ecuted remotely over the GP IB Many of the commands may also be executed locally from the supply s front panel marked by single asterisks in Table C 1 Several commands will generate a response which will be indicated on the front panel of the supply These commands are indicated by double asterisks in Table C 1 Command headers are accepted in upper or lower case letters although only upper case let...

Page 110: ...egister ROM SROM ch SRQ x SRQ STO register STS ch TEST UNMASK ch sum of bit weights UNMASK ch VOUT ch VRSET ch x VRSET ch VSET ch voltage setting VSET ch VSTEP ch step vaiue Calibration Commands IDATA ch llo ihi IHI ch ILO ch IRDAT ch Ilo Ihi IRHI ch IRLO ch IRLN ch IRHN ch NIDAT ch Ilo Ihi OVCAL ch VDATA ch VLo Vhi VHI ch VLO ch VRDAT ch Vlo Vhi VRHI ch VRLO ch Servlce Commands IDAC ch x IDAC ch ...

Page 111: ...e page 81 DLY ch Queries the present reprogramming delay of the specified output ch see page 81 The response can be a real number from 0 000 to 32 seconds e g 0 450 seconds DSP on off Turns the power supply s front panel display either on or off see page 81 On off equals 1 to turn the display on or a 0 to turn it off DSP Queries the present status of the display see page 81 Response is either a 1 ...

Page 112: ...imum current readback value for the specified output ch see Appendix A IRHN ch Finds the maximum current readback value for the specified output ch see Appendix A IRSET ch x Sets the full scale current range programming for an output ch The power supply will select the lowest operating range that will contain the value x If the present operating current of the supply is greater than the full scale...

Page 113: ...f The front panel will display the message DISABLED when the selected output channel is turned off OVCAL ch Causes the specified output ch to go through the overvoltage calibration routine see Appendix A OVRST ch Attempts to reset the overvoltage crowbar circuit in the specified output ch see page 77 OVSET ch x Sets the overvoltage trip point x for the specified output ch see page 77 OVSET ch Quer...

Page 114: ...ries the present status of the specified output ch The response integer 0 255 represents the sum of the binary weights of the status register bits see page 76 TEST Causes the power supply to perform a self test of its GP IB interface The response is 0 if the test passes or an integer failure code see page 82 UNMASK ch x Sets the bits in the mask register of the specified output channel to the sett...

Page 115: ...or prograrnming an output ch The power supply will select the lowest operating range that will contain the value x If the present operating voltage of the supply is greater than the full scale range selected the present output voltage will be reduced to the full scale value of the new range If the voltage entered is larger than the highest possible range an error message will result VRSET ch Queri...

Page 116: ......

Page 117: ...read back over the GP IB in response to the ERR query The applicable error message is displayed on the supply s front panel when the ERR key is pressed Sending the ERR or pressing the ERR key clears the error Test Responses Table D 3 describes the codes that can be read back over the GP IB in response to the TEST query The TEST query initiates a self test of the supply Table D 1 Power On Self Test...

Page 118: ...vice Manual 10 HARDWARE ERR An output error has occurred on an unknown output Service is required Refer to the Troubleshooting Section in the Service Manual 11 HDW ERR CH 1 Error codes 11 through 14 refer to a specific output where an output error has occurred Service is required Refer to the Output Board Troubleshooting Section in the Service Manual 12 HDW ERR CH 2 Same as in error 11 13 HDW ERR ...

Page 119: ...rry out self test if this is desired Table D3 TEST Response Response Code TEST query Explanation 0 No errors were detected 20 The timer on the GP IB board failed self test Refer to the Troubleshooting Section in the Service Manual 21 The RAM on the GP IB Board failed self test Refer to the Troubleshooting Section in the Service Manual Note that if this failure occurred at power on it cannot be dis...

Page 120: ......

Page 121: ... the line module push against the tab on the line module in the direction of the ac input socket 3 Remove the voltage selector card from its receptacle This card is about one inch square and has a red notch in each of its four edges 4 To select a voltage insert the card into its receptacle so that after the door is closed the red notch shows through the window next to the voltage level you require...

Page 122: ...26 U S A tel 305 267 4245 fax 305 267 4286 Canada Agilent Technologies Canada Inc 5150 Spectrum Way Mississauga Ontario L4W 5G1 tel 1 877 894 4414 Australia New Zealand Agilent Technologies Australia Pty Ltd 347 Burwood Highway Forest Hill Victoria 3131 tel 1 800 629 485 Australia fax 61 3 9272 0749 tel 0 800 738 378 New Zealand fax 64 4 802 6881 Europe Agilent Technologies Test Measurement Europe...

Page 123: ...ave been made to this manual since the print revision indicated on the title page 2 01 00 All references to HP have been changed to Agilent All references to HP IB have been changed to GPIB 9 20 04 The Declaration of Conformity has been updated ...

Reviews: