2-11
Making Measurements
Cleaning Connections for Accurate Measurements
Cleaning Connections for Accurate
Measurements
Today, advances in measurement capabilities make connectors and connec-
tion techniques more important than ever. Damage to the connectors on cali-
bration and verification devices, test ports, cables, and other devices can
degrade measurement accuracy and damage instruments. Replacing a dam-
aged connector can cost thousands of dollars, not to mention lost time! This
expense can be avoided by observing the simple precautions presented in this
book. This book also contains a brief list of tips for caring for electrical connec-
tors.
Choosing the Right Connector
A critical but often overlooked factor in making a good lightwave measure-
ment is the selection of the fiber-optic connector. The differences in connec-
tor types are mainly in the mechanical assembly that holds the ferrule in
position against another identical ferrule. Connectors also vary in the polish,
curve, and concentricity of the core within the cladding. Mating one style of
cable to another requires an adapter. Agilent Technologies offers adapters for
most instruments to allow testing with many different cables.
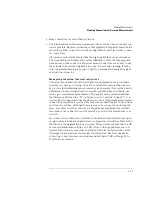
shows the basic components of a typical connectors.
The system tolerance for reflection and insertion loss must be known when
selecting a connector from the wide variety of currently available connectors.
Some items to consider when selecting a connector are:
• How much insertion loss can be allowed?
• Will the connector need to make multiple connections? Some connectors are
better than others, and some are very poor for making repeated connections.
• What is the reflection tolerance? Can the system take reflection degradation?
• Is an instrument-grade connector with a precision core alignment required?
• Is repeatability tolerance for reflection and loss important? Do your specifica-
Summary of Contents for 83437A
Page 1: ...Agilent 83438A Erbium ASE Source User s Guide ...
Page 5: ...v The Agilent 83438A At a Glance Rear view of instrument ...
Page 8: ......
Page 10: ......
Page 24: ...2 4 Making Measurements Performing Stimulus Response Measurements ...
Page 41: ...3 Specifications 3 3 Regulatory Information 3 6 Specifications and Regulatory Information ...
Page 48: ......
Page 54: ......
Page 61: ...5 7 Servicing General Information ...
Page 63: ...5 9 Servicing General Information ...
Page 79: ...5 25 Servicing Adjustment Procedure ...
Page 85: ...5 31 Servicing Replacing Instrument Assemblies Location of resistors R2 R8 and R9 ...
Page 92: ...5 38 Servicing Replaceable Parts ...
Page 94: ...5 40 Servicing Replaceable Parts ...
Page 96: ...5 42 Servicing Replaceable Parts ...
Page 98: ...5 44 Servicing Replaceable Parts ...
Page 100: ...5 46 Servicing Replaceable Parts ...
Page 106: ......

