3-30
Using the Analyzer
Measurement Techniques
Moving the Active Marker from One Trace to Another
The following procedure shows you how to move the active marker (marker 1)
from Trace A to Trace B.
This procedure assumes that you have normalized your test setup and posi-
tioned the response on the display. For more information on these processes,
refer to “Normalizing the Measurement” on page 3-11 and refer to “Status
Reporting for Laser Wavelength Zeroing” on page 3-13.
1
From the front panel, press
Markers
>
Active Trace
>
TrB
to make Trace B
the active trace.
2
Press
Active Marker
>
Mkr 1
.
Measuring the Delta between Two Traces
The following procedure shows you how to find the amplitude and wavelength
difference between the maximum peaks of two different traces.
This procedure assumes that you have normalized your test setup and posi-
tioned the response on the display. For more information on these processes,
refer to “Normalizing the Measurement” on page 3-11 and refer to “Status
Reporting for Laser Wavelength Zeroing” on page 3-13.
1
From the front panel, press
Markers
>
Active Trace
and select the first trace
to place a marker.
2
Press
Active Marker
>
Mkr 1
>
Peak Search
to place the marker on the
highest peak of the active trace.
3
Press
Active Trace
and select the second trace to place a marker.
4
Press
Active Marker
>
Mkr 2
> Peak Search to place the marker on the
highest peak of the second trace.
5
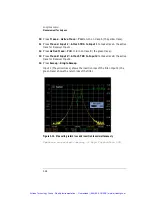
View the results of the measurement from the marker annotation at the top of
the display.
The wavelength and amplitude of each trace marker is shown, and also the
amplitude and wavelength difference of the peaks of the two traces.
Artisan Technology Group - Quality Instrumentation ... Guaranteed | (888) 88-SOURCE | www.artisantg.com


