background image

Agilent B2901/02/11/12A Precision Source/Measure Unit 


How to make a list sweep measurement 

 
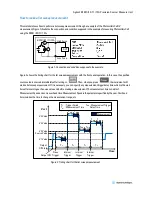
This material shows how to perform a list sweep measurement through an example of the Photovoltaic Cell IV 
measurement. Figure 1 illustrates the connection and condition supposed in the example of measuring Photovoltaic Cell 
using the B2901/02/11/12A. 


Figure 1. Connection and condition supposed in the example 

 
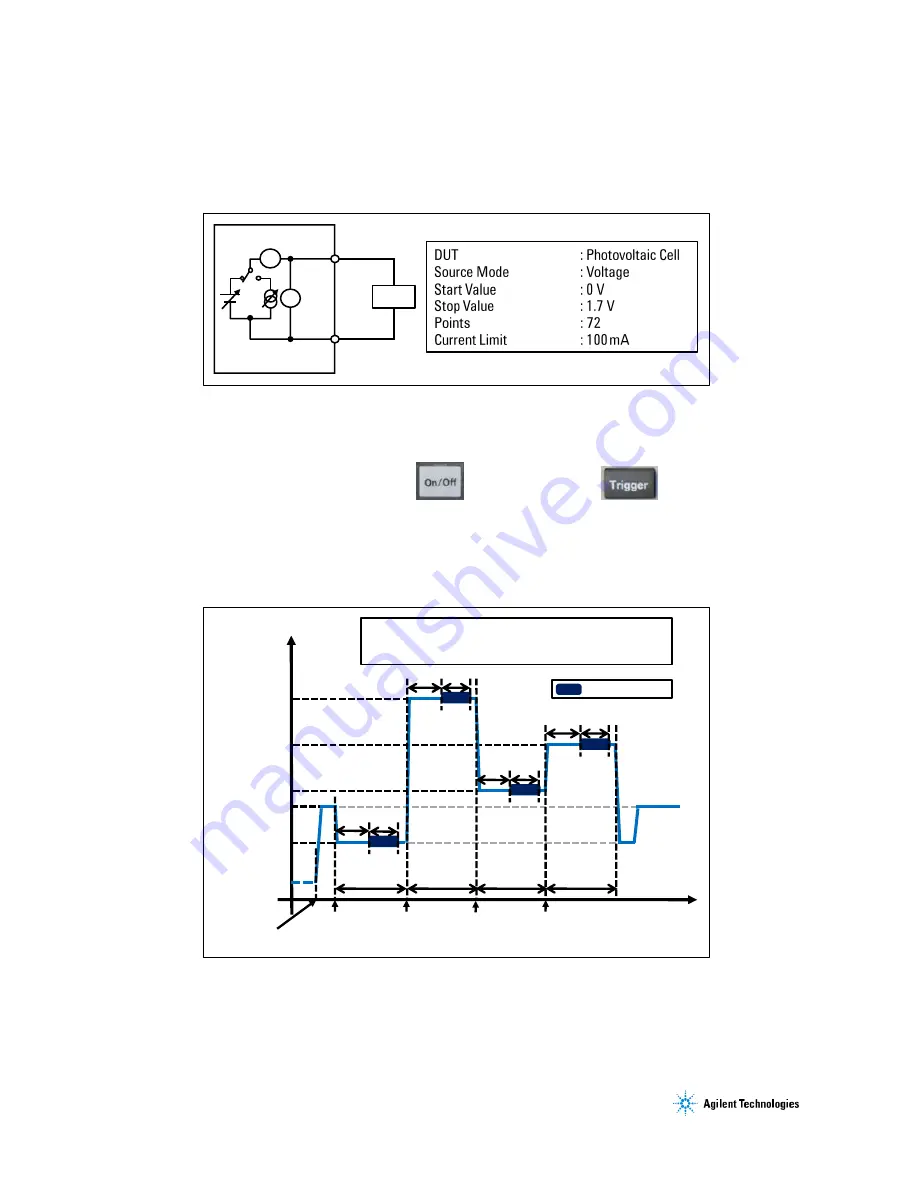
Figure 2 shows the timing chart for the list sweep measurement with the front panel operation. In this case, the specified 

source value is sourced immediately after turning on 

. Then, when you press 

, the instrument will 

make a list sweep measurement. If it is necessary, you can specify any measurement trigger delay time which is the wait 
time after sourcing each source value and before making a measurement. The measurement time consists of 
Measurement Speed and some overhead time. Measurement Speed is the parameter specified by the user. Overhead 
time includes the time to change the measurement range, etc. 


Figure 2. Timing chart for the list sweep measurement 


A

-

-

V

High Force

Low Force

B2901/02/11/12A

DUT

Output ON

Source Value

Output

Off State

:Measurement

V or I

Time

V1 Value

Press

Trigger

Internal

Trigger

Internal

Trigger

V2 Value

T

MD

T

MD

T

MD

T

M

T

M

T

M

T

P

T

P

T

P

T

MD

T

M

T

P

T

MD

: Measurement Trigger

Delay Time

T

P

T

M

: Trigger Period

: Measurement Time

V3 Value

V4 Value

Internal

Trigger

Summary of Contents for B2901

Page 1: ... press the instrument will make a list sweep measurement If it is necessary you can specify any measurement trigger delay time which is the wait time after sourcing each source value and before making a measurement The measurement time consists of Measurement Speed and some overhead time Measurement Speed is the parameter specified by the user Overhead time includes the time to change the measurem...

Page 2: ... which includes the following source list data From 0 to 0 7 with 0 1 step and from 0 71 to 1 30 with 0 01 step and from 1 4 to 1 7 with 0 1 step Step 2 Save CSV file as listdata csv to the root folder of your USB flash memory device Step 3 Attach the USB flash memory device which listdata csv file is saved to the USB port on the front panel of the B2901 02 11 12A Agilent B2900A Quick I V Measurem...

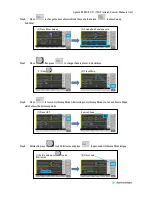
Page 3: ...ion to the voltage source Step 3 Press to edit the source value and then enter 0 V to set the source value to 0 V Step 4 Press to edit the limit value and then enter 100 mA to set the limit value to 100 mA Step 5 Press to configure the measurement parameter and then select to set the measurement parameter to the current 1 Press Mode 2 Press VOLTS V 1 Press Source 2 Enter Source Value 1 Press Limit...

Page 4: ...ys shown in Assist keys Step 8 Press to turn on List Sweep Mode After turning on List Sweep Mode you can see Source Shape which shows the list sweep mode Step 9 Rotate and press to edit Start value and press to open Load List Sweep Data dialogue 1 Press Show Sweep 2 Sweep Sub Panel appears 2 Press More 1 Press 1 Press LIST Source Shape 1 Rotate and press Start value toedit 2 Press Load ...

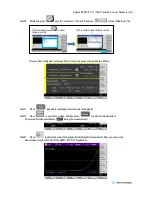
Page 5: ...11 Press repeatedly until Graph View is shown in the display Step 12 Press to source the voltage and then press to perform a measurement The status information will show during the measurement Step 13 Press to adjust the scale of the graph after finishing the measurement Now you can see the measurement result on the GUI of the B2901 02 11 12A as bellow 2 Press OK to load listdata csv file 1 Rotate...

Page 6: ...le Step 15 Rotate and press to edit the Y axis minimum value and then enter 80 mA to adjust the graph scale Now you can see the measurement result scaled on the GUI of the B2901 02 11 12A as bellow 2 Enter the scale such as 0 A 1 Rotate and press Y axismaximum value toselect 2 Enter the scale such as 80 mA 1 Rotate and press Y axisminimum value toselect ...

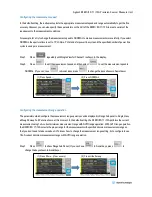
Page 7: ...et the measurement speed to NORMAL If you can t see in Assist keys press to change the keys shown in Assist keys Configuring the measurement range operation The parameters which configure the measurement range operation can be displayed in Range Sub panel in Single View although Sweep Sub Panel is shown at this moment In the default setting the B2901 02 11 12A performs the current measurement usin...

Page 8: ...t trigger delay time and the trigger period can be displayed in Trigger Sub panel in Single View although Range Sub Panel is shown at this moment In the default setting the trigger type is set to the automatic trigger type AUTO so that you don t need to specify these trigger parameters If you d like to specify the measurement trigger delay time take the following steps Step 1 Press to show Trigger...

Page 9: ...e Source and Measurement Trigger Count should be the same number as Sweep Points Now you ve configured 100 ms measurement trigger delay time Configuring the trigger period If you need to control the source and measurement period strictly the trigger period is useful to make it In order to specify the trigger period take the following steps Step 1 Rotate and press to edit the trigger type and then ...

Page 10: ...rigger period strictly The measurement range is selected by Limit value In this example 100 mA measurement range will be used If using AUTO measurement range operation is prior to controlling the trigger period strictly you may specify MANUAL trigger type with AUTO source and measurement trigger source by the following steps Step 3 Press to edit the trigger type and then select to set the trigger ...

Page 11: ... like to see the list of measurement results press then press to open Measure Result dialogue Step 3 Rotate and press to select Data Type field Step 4 Press to change the keys shown in Assist keys and then press to select Time as the data type On the top level of the Function menu In the middle level of the Function menu Any tree structure can t be seen Some tree structure can be seen 1 Press Resu...

Page 12: ...2901 02 11 12A Precision Source Measure Unit Step 5 Rotate and press to select Data field Then rotate to scroll the data list 1 Rotate and press Data field toselect 2 Rotate toscroll the list or press Assist key ...

Reviews: