256
Chapter 5
Post-Repair Procedures
Baseband I/Q Amplitude Accuracy Test
5. Preset the signal source and initialize the test equipment
.
6. Perform the following steps for each test setup listed in
a. Press
Input
,
Input Port
to configure the input port of the
instrument.
b. Press
Input
,
I/Q Setup
,
I/Q Input Z
to configure input impedance.
c. Press
Input
,
I/Q Range
to select the desired voltage range.
d. Connect the signal source to the specified I/Q input connector. For
balanced measurements (when the I/Q input Z is 600 ohms
balanced or 1 M ohm balanced) connect a 50
Ω
BNC terminator to
the complementary input. The complementary input for I is I and
for Q is Q.
e. Press
Marker
,
Search
.
f. Record the measured value in the UUT Measured Amplitude
column for 100 kHz in
g. Compare the measured and nominal values to ensure that the
measured value is within the 1dB test limit.
7. Press
SPAN
,
5
, then
MHz
to change the span of the UUT.
8. Change the signal source frequency to 5 MHz.
9. Repeat step 6 and record the measured value in the UUT Measured
Amplitude column for 5 MHz.
Table 5-7
Signal Source Initialization
Parameter
Setting
Frequency
100 kHz
Level
-16 dBm (100mVPP)
Modulation
Off
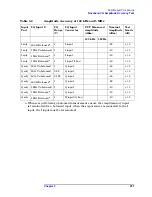
Table 5-8
Amplitude Accuracy at 100 kHz and 5 MHz
Input
Port
I/Q Input Z
I/Q
Range
(V)
I/Q Input
Connector
UUT Measured
Amplitude
(dBm)
Nominal
Amplitude
(dBm)
Test
Limits
(dB)
100 kHz
5 MHz
I only
50
Ω
Unbalanced
1
I input
−
16
± 1.0
I only
50
Ω
Unbalanced
0.25
I input
−
16
± 1.0
I only
50
Ω
Unbalanced
0.125
I input
−
16
± 1.0
Summary of Contents for E4406A VSA Series
Page 4: ...4 ...
Page 10: ...10 Contents ...
Page 11: ...11 1 Troubleshooting ...
Page 66: ...66 Chapter1 Troubleshooting How to Return Your Instrument for Service ...
Page 67: ...67 2 Block Diagrams ...
Page 119: ...Chapter 2 119 Block Diagrams Block Diagrams Block Diagrams ...
Page 120: ...120 Chapter2 Block Diagrams Block Diagrams ...
Page 122: ...122 Chapter2 Block Diagrams Block Diagrams ...
Page 124: ...124 Chapter2 Block Diagrams Block Diagrams ...
Page 125: ...125 3 Parts List ...
Page 164: ...164 Chapter3 Parts List Hardware ...
Page 165: ...165 4 Assembly Replacement ...
Page 169: ......
Page 170: ...170 Chapter4 Assembly Replacement Removal and Replacement Procedures ...
Page 227: ...Chapter 4 227 Assembly Replacement Front Frame Subassemblies Figure 4 39 Keypad Parts ...
Page 231: ...231 5 Post Repair Procedures ...
Page 262: ...262 Chapter5 Post Repair Procedures Automated Adjustments ...

