Chapter 1
41
Troubleshooting
Isolating an RF, Analog IF, Digital IF, Reference, Synthesizer, or CPU Problem
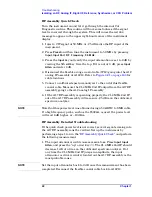
2. Toggle the Cal Switch before the 2nd Mixer by pressing
Input
,
Input
Port
,
IF Align
,
IF Align Signal
,
Signal Type
,
Comb
,
Span
,
5
,
MHz
,
Meas
Setup
,
Res BW
,
20
,
kHz
. If the Image Filter and following RF circuitry
is functioning correctly, there should be ~10 comb teeth on the
instrument display at ~
−
40 dBm. These comb tooth signals come
from the Cal Oscillator on the A12 analog IF assembly and are
separated by ~468.5 kHz. If the comb teeth signal amplitudes are
correct, but a signal injected into the RF input is displayed at the
wrong amplitude, the failure is most likely caused from the RF input
connector up to the Cal Switch on the A17 RF assembly.Toggle the
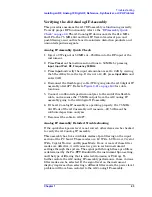
input switch by pressing
Input
,
Input Port
,
50 MHz Ref
,
Frequency
,
50
,
MHz
. The power level with the internal calibrator switched in should
read
−
25 dBm on the instrument display. If this power level is
correct and the RF input signal from the external 50 MHz source is
displayed at the wrong amplitude, the AT1 7 dB pad, the RF input
connector, or the input switch on the A17 RF assembly may be
defective.
The remaining detailed checks require the A17 RF assembly to be
placed on an extender board (p/n E4406-60042). Turn the instrument
off before removing a PC board assembly from the instrument.
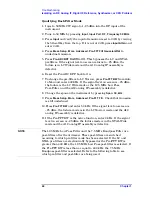
3. Turn the instrument on and wait for the CPU to boot and the Cal
Diagnostics to run.
4. Press
Preset
,
Input
,
Input Port
,
RF
,
Frequency 50 MHz
.
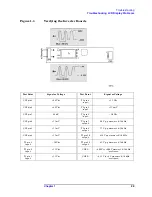
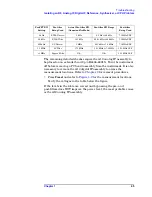
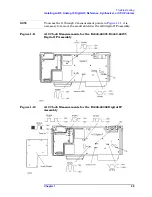
5. Refer to
for the measurement locations.
NOTE
To view the 50 MHz internal calibrator signal (location I in
)
on the calibrated spectrum analyzer, press
Input
,
Input Port
,
50 MHz Ref
.
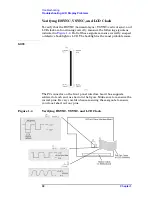
If all the signal levels in the detailed troubleshooting section are correct
and the 21.4 MHz 2nd IF output signal measured on the calibrated
spectrum analyzer is incorrect, the most probable cause is the A17 RF
assembly.
NOTE
Note that these power levels are obtained using a 50
Ω
BNC to SMB
cable.
Summary of Contents for E4406A VSA Series
Page 4: ...4 ...
Page 10: ...10 Contents ...
Page 11: ...11 1 Troubleshooting ...
Page 66: ...66 Chapter1 Troubleshooting How to Return Your Instrument for Service ...
Page 67: ...67 2 Block Diagrams ...
Page 119: ...Chapter 2 119 Block Diagrams Block Diagrams Block Diagrams ...
Page 120: ...120 Chapter2 Block Diagrams Block Diagrams ...
Page 122: ...122 Chapter2 Block Diagrams Block Diagrams ...
Page 124: ...124 Chapter2 Block Diagrams Block Diagrams ...
Page 125: ...125 3 Parts List ...
Page 164: ...164 Chapter3 Parts List Hardware ...
Page 165: ...165 4 Assembly Replacement ...
Page 169: ......
Page 170: ...170 Chapter4 Assembly Replacement Removal and Replacement Procedures ...
Page 227: ...Chapter 4 227 Assembly Replacement Front Frame Subassemblies Figure 4 39 Keypad Parts ...
Page 231: ...231 5 Post Repair Procedures ...
Page 262: ...262 Chapter5 Post Repair Procedures Automated Adjustments ...


