Chapter 4
223
Assembly Replacement
Front Frame Subassemblies
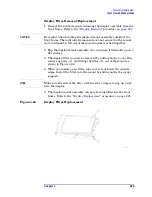
Display Filter Removal/Replacement
1. Remove the rubber mount containing the display assembly from the
front frame. Refer to the
procedure on
.
CAUTION
Be careful when handling the display/mount assembly outside of the
front frame. The individual components are not secured in the mount
and could possibly fall out of the mount unless it is held together.
2. Flip the display/mount assembly over and place it filter-side up on a
flat surface.
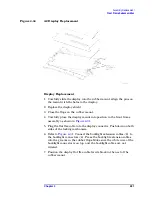
3. The display filter can now be removed by pulling back on one of the
corner supports
(2)
and lifting the filter
(1)
out of the mount as
shown in
.
4. When you install a new filter, take care to touch only the outside
edges. Install the filter into the mount by sliding under the corner
supports.
NOTE
Make sure the side of the filter with the silver edge is facing up, away
from the display.
5. The display/mount assembly can now be reinstalled into the front
procedure on
.
Figure 4-36
Display Filter Replacement
Summary of Contents for E4406A VSA Series
Page 4: ...4 ...
Page 10: ...10 Contents ...
Page 11: ...11 1 Troubleshooting ...
Page 66: ...66 Chapter1 Troubleshooting How to Return Your Instrument for Service ...
Page 67: ...67 2 Block Diagrams ...
Page 119: ...Chapter 2 119 Block Diagrams Block Diagrams Block Diagrams ...
Page 120: ...120 Chapter2 Block Diagrams Block Diagrams ...
Page 122: ...122 Chapter2 Block Diagrams Block Diagrams ...
Page 124: ...124 Chapter2 Block Diagrams Block Diagrams ...
Page 125: ...125 3 Parts List ...
Page 164: ...164 Chapter3 Parts List Hardware ...
Page 165: ...165 4 Assembly Replacement ...
Page 169: ......
Page 170: ...170 Chapter4 Assembly Replacement Removal and Replacement Procedures ...
Page 227: ...Chapter 4 227 Assembly Replacement Front Frame Subassemblies Figure 4 39 Keypad Parts ...
Page 231: ...231 5 Post Repair Procedures ...
Page 262: ...262 Chapter5 Post Repair Procedures Automated Adjustments ...

