246
Chapter 5
Post-Repair Procedures
Configuring a Replacement Flash Memory Assembly
Enter Option License Key Numbers
The option designation consists of three upper-case letters, as shown in
the Option column of the table below.
To re-install the license key number use the following procedure:
1. Press
System
,
More
until (3 of 3) is displayed,
Install
, and
Choose Option
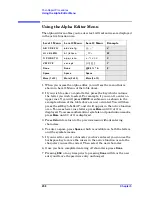
. This will activate the alpha editor menu. Use the
alpha editor to enter the three-letter option designation, in
upper-case, then press the
Done
key. As you enter the option number
you will see your entry in the active function area of the display. For
more information on the alpha editor, refer to
.
2. Press
License Key
. The license key number is a hexadecimal number
that will require entry of both letters and numbers. Use the alpha
editor to enter letters. Use the front panel numeric keyboard to enter
numerical values. You will see your entry in the active function area.
When you have completed entering the license key number, press
the
Done
key. For more information on the alpha editor, refer to
“Using the Alpha Editor Menu” on page 258
NOTE
It is very important to enter the number accurately. Since it is a
hexadecimal, the letter “O” can not be present, only zeros “0” are used
in the license key number.
3. After you have entered the active license key number and the
personality option, press
Install Now
. A
No
softkey and a
Yes
softkey
will appear in the
Install Now
menu, and a message will appear in the
active function area of the display, which reads
Insert disk and
power cycle instrument
. Press the
No
key only if you wish to
cancel the installation process. If you want to proceed with the
installation, press the
Yes
key and cycle the instrument off and then
on. When the instrument is powered on, the license key number will
be read and automatically loaded into your instrument.
NOTE
Currently, an installation disk is not required. Disregard the
Insert
disk
portion of the message that appears in the active function area
when the
Install Now
key is pressed.
Available Personality Options
Option
GSM measurement personality
BAH
cdmaOne measurement personality
BAC
Summary of Contents for E4406A VSA Series
Page 4: ...4 ...
Page 10: ...10 Contents ...
Page 11: ...11 1 Troubleshooting ...
Page 66: ...66 Chapter1 Troubleshooting How to Return Your Instrument for Service ...
Page 67: ...67 2 Block Diagrams ...
Page 119: ...Chapter 2 119 Block Diagrams Block Diagrams Block Diagrams ...
Page 120: ...120 Chapter2 Block Diagrams Block Diagrams ...
Page 122: ...122 Chapter2 Block Diagrams Block Diagrams ...
Page 124: ...124 Chapter2 Block Diagrams Block Diagrams ...
Page 125: ...125 3 Parts List ...
Page 164: ...164 Chapter3 Parts List Hardware ...
Page 165: ...165 4 Assembly Replacement ...
Page 169: ......
Page 170: ...170 Chapter4 Assembly Replacement Removal and Replacement Procedures ...
Page 227: ...Chapter 4 227 Assembly Replacement Front Frame Subassemblies Figure 4 39 Keypad Parts ...
Page 231: ...231 5 Post Repair Procedures ...
Page 262: ...262 Chapter5 Post Repair Procedures Automated Adjustments ...

