28
Chapter 1
Troubleshooting
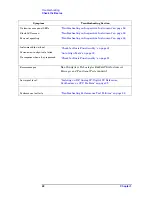
Troubleshooting LCD Display Problems
Troubleshooting LCD Display Problems
NOTE
There are no front panel adjustments for intensity and contrast of the
LCD.
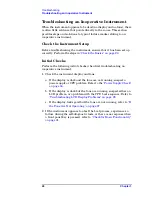
1. Verify the instrument went through a complete power-on sequence.
"Check for Basic Functionality" on page 31
2. If the display is dark, (not visible), connect an external VGA monitor
to the rear panel VGA output connector on the instrument. Some
multisync monitors might not be able to lock to a 60 Hz sync pulse. If
the video information is not present on the external VGA monitor,
the most probable cause is the A22 CPU assembly.
3. If the external VGA monitor is functioning, verify that the front
panel interface ribbon cable (W8) is properly plugged into the
motherboard at connector J11.
4. If W8 is properly connected, suspect a defective A3 front panel
interface board, one or both of the inverter boards (A3A1 and A3A2)
mounted on the interface board, the backlight assemblies (DS1 and
DS2), or the LCD assembly itself (A2).
5. If the display is dim, suspect the backlight assemblies. Always
replace both backlight bulbs at the same time.
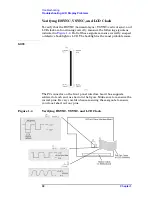
Verifying the A3A1 and A3A2 Inverter Boards
WARNING
High voltage is present on the inverter boards and the front
panel interface board. Be careful when measuring the following
signals and voltages.
NOTE
In order to access the front panel boards for measurements, it is
necessary to drop the front frame from the deck and remove the front
frame shield. Refer to
for these procedures.
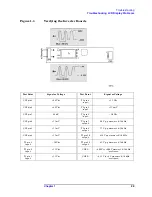
Measure the signals and voltages as indicated in
. If the
signals and voltages measure good, the inverter boards are functioning
correctly.
Summary of Contents for E4406A VSA Series
Page 4: ...4 ...
Page 10: ...10 Contents ...
Page 11: ...11 1 Troubleshooting ...
Page 66: ...66 Chapter1 Troubleshooting How to Return Your Instrument for Service ...
Page 67: ...67 2 Block Diagrams ...
Page 119: ...Chapter 2 119 Block Diagrams Block Diagrams Block Diagrams ...
Page 120: ...120 Chapter2 Block Diagrams Block Diagrams ...
Page 122: ...122 Chapter2 Block Diagrams Block Diagrams ...
Page 124: ...124 Chapter2 Block Diagrams Block Diagrams ...
Page 125: ...125 3 Parts List ...
Page 164: ...164 Chapter3 Parts List Hardware ...
Page 165: ...165 4 Assembly Replacement ...
Page 169: ......
Page 170: ...170 Chapter4 Assembly Replacement Removal and Replacement Procedures ...
Page 227: ...Chapter 4 227 Assembly Replacement Front Frame Subassemblies Figure 4 39 Keypad Parts ...
Page 231: ...231 5 Post Repair Procedures ...
Page 262: ...262 Chapter5 Post Repair Procedures Automated Adjustments ...


