10 Installation Note E4411-90045
Refer to
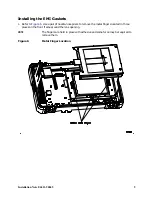
2. Locate the two long (8160–0959) and two short (8160–0960) EMI foam gaskets.
3. Install one of the short gaskets, along the left or right edge of the opening, approximately 1 mm
from the edge, as shown in the figure. Use the following steps:
a. Remove the protective paper backing from the gasket strip, to expose the self-stick adhesive.
b. On the inside of the front frame, center and align the gasket along the edge of the opening. (The
short gaskets should have approximately equal amounts of overlap at the top and bottom of the
opening.)
c. Firmly press along the length of the gasket to adhere it to the frame.
4. Repeat steps 3a through 3c with the remaining short gasket along the opposite edge of the opening.
5. Repeat steps 3a through 3c to install one of the long gaskets, along the top or bottom edge of the
opening as shown in the figure.
NOTE
Make sure that the long gaskets touch the ends of the short gaskets. This is
necessary to create an airtight seal around the inner plastic lens and the LCD
display. The seal minimizes particulate contamination that may cloud the lens.
6. Repeat steps 3a through 3c with the remaining long gasket along the opposite edge of the opening.
NOTE
The long gaskets will either partially or completely cover holes in the subpanel
through which rubber front panel alignment posts protrude. This is normal and
will not adversely affect the function of the gasket.
Figure 7
Gasket Placement


