background image

4GIPHQTOCVKQP

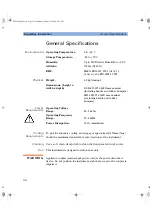
)GPGTCN5RGEKHKECVKQPU

)GPGTCN5RGEKHKECVKQPU

'PXKTQPOGPVCN

Operating Temperature: 

0 to 

+

55

°

C

Storage Temperature: 

20 to 

+

70

°

C

Humidity: 

Up to 95% Relative Humidity to 

+

40

°

C

Altitude: 

3000m (9,840 ft.)

EMC: 

M

EETS

 EN55011: 1991 (G

ROUP

 1, 

C

LASS

A), 

AND

 EN50082-1:1992 

2J[UKECN

Weight: 

4.2 kg Nominal

Dimensions: (height x 
width x depth) 

130H x 250W x 462D mm nominal 
(including handle and rubber bumpers)

88H x 212W x 363D mm nominal 
(excluding handle and rubber 
bumpers)

2QYGT

4GSWKTGOGPVU

Operating Voltage 
Range: 

85 - 264 Vac

Operating Frequency 
Range: 

47 - 440Hz

Power Dissipation: 

50 VA (maximum)

%QQNKPI

4GSWKTGOGPVU

To provide adequate cooling, and air gap of approximately 75mm (3ins) 

should be maintained around the vented sections of the instrument.

%NGCPKPI

Use a soft, clean, damp cloth to clean the front-panel and side covers.

7UG

This instrument is designed for indoor use only.

W A R N IN G

Appliance coupler (mains input power cord) is the power disconnect 
device. Do not position the instrument such that access to the coupler is 
impaired.

E4416-90002.book  Page 36  Wednesday, October 25, 2000  6:22 PM

Summary of Contents for E4416A

Page 1: ...Packard wie HP Halbleiterprodukte HP chemische Analysen oder HP Test und Messwesen nun zu der Firma Agilent Technology gehören Um Verwirrung zu vermeiden wurde lediglich bei Produktname und Nummer der vo laufende Firmenname geändert Produkte mit dem Namen Nummer HP XXXX lauten nun mehr Agilent XXXX Z B das Modell HP 8648 heißt nun Agilent 8648 Questo manuale potrebbe contenere riferimenti ad HP o ...

Page 2: ...P または 横河 ヒューレット パッカード株式会社 とい う語句を Agilent または アジレント テクノロジー株式会社 と変更して ください ヒューレット パッカード社の電子計測 半導体製品 化学分析ビジネス部門は分 離独立し アジレント テクノロジー社となりました 社名変更に伴うお客様の混乱を避けるため 製品番号の接頭部のみ変更しておりま す 例 旧製品名 HP 4294A は 現在 Agilent 4294A として販売いたしておりま す ...

Page 3: ... 2 2 5GTKGU 2GCM CPF XGTCIG 2QYGT GVGTU PUVCNNCVKQP WKFG E4416 90002 book Page 1 Wednesday October 25 2000 6 22 PM ...

Page 4: ...ther language without the prior written consent of Agilent Technologies Copyright 2000 Agilent Technologies Station Road South Queensferry Scotland EH30 9TG UK Agilent Part No E4416 90002 Printed in UK October 2000 GICN PHQTOCVKQP Certification Agilent Technologies certifies that this product met its published specifications at the time of shipment from the factory Agilent Technologies further cer...

Page 5: ...the like which if not correctly performed or adhered to could result in damage to or the destruction of part or all of the equipment Do not proceed beyond a caution until the indicated conditions are fully understood and met 6JG PUVTWEVKQP QEWOGPVCVKQP 5 ODQN 6JG RTQFWEV KU OCTMGF YKVJ VJKU U ODQN YJGP KV KU PGEGUUCT HQT VJG WUGT VQ TGHGT VQ VJG KPUVTWEVKQPU KP VJG UWRRNKGF FQEWOGPVCVKQP NVGTPCVKP...

Page 6: ...mmable gasses or fumes DO NOT use repaired fuses or short circuited fuseholders For continued protection against fire replace the line fuse s only with fuse s of the same voltage and current rating and type DO NOT perform procedures involving cover or shield removal unless you are qualified to do so Operating personnel must not remove equipment covers or shields Procedures involving the removal of...

Page 7: ...maintained DO NOT substitute parts or modify equipment Because of the danger of introducing additional hazards do not install substitute parts or perform any unauthorized modification to the product Return the product to a Agilent Sales and Service Office for service and repair to ensure the safety features are maintained E4416 90002 book Page 5 Wednesday October 25 2000 6 22 PM ...

Page 8: ...5CHGV 5 ODQNU E4416 90002 book Page 6 Wednesday October 25 2000 6 22 PM ...

Page 9: ...mote Interface Configurations 28 GPIB 28 RS232 RS422 29 Rack Mounting the Power Meter 30 Rack Mounting One Meter Using the Option 908 rack mount kit 30 Rack Mounting Two Meters Together Using the Option 909 rack mount kit 32 4GIWNCVQT PHQTOCVKQP 35 General Specifications 36 Compliance and Markings 38 IEC61010 1 Compliance 38 Electromagnetic Compatibility EMC 38 Safety 38 Markings 39 Regulatory Inf...

Page 10: ... QPVGPVU E4416 90002 book Page 8 Wednesday October 25 2000 6 22 PM ...

Page 11: ... GVVKPI 5VCTVGF E4416 90002 book Page 9 Wednesday October 25 2000 6 22 PM ...

Page 12: ...th variety of rear panel configurations have been used for the illustrations in this guide Your power meter may differ in detail to those shown PKVKCN PURGEVKQP Please inspect the shipping container for damage If the shipping container or packaging material is damaged it should be kept until the contents have been checked mechanically and electrically If there is mechanical damage notify the neare...

Page 13: ...Adobe Acrobat PDF Portable Document Format files on the supplied CD ROM in English French German Italian Japanese and Spanish languages The Programmer s Guide Shows you how to operate your power meter using the remote interfaces You can find the Programmer s Guide as an Adobe Acrobat PDF file on the supplied CD ROM in English language only Printed Guides available by ordering the following options...

Page 14: ...s on page 26 Remote Interface Configurations on page 28 Rack Mounting the Power Meter on page 30 General Specifications on page 36 Compliance and Markings on page 38 Regulatory Information on page 40 According to ISO 7779 Type Test on page 40 Responsibilities of the Customer on page 43 Agilent Sales and Service Offices on page 44 For more detailed operating information refer to the EPM P series po...

Page 15: ...esent a labeled key on the power meter front panel This is used to represent a labeled softkey and when used as part of a procedure indicates you should press the unmarked key beside the displayed text This is used to represent a displayed message Parameter This is used to represent a parameter value or title Zero Cal 5QHVMG GUUCIG E4416 90002 book Page 13 Wednesday October 25 2000 6 22 PM ...

Page 16: ...l sensor and meter combinations have the same features or capabilities The main differences are 5RGEKHKECVKQPU The specifications for the power meter are listed in the E4416A and E4417A User s Guide GCVWTGU 5GTKGU 5GTKGU 5GTKGU 5GTKGU XGTCIG 2QYGT QH 9 5KIPCN CN CEVQTU QP 241 4GCFKPIU UGE XGTCIG 2QYGT QH OQFWNCVGF UKIPCN 2GCM 2QYGT 4KUKPI FIG 6TKIIGT CNNKPI FIG 6TKIIGT E4416 90002 book Page 14 Wed...

Page 17: ...w the display If you want to remove the handle refer to Rack Mounting the Power Meter on page 30 6JG ECTT KPI JCPFNG ECP DG NQEMGF KPVQ VJTGG FKHHGTGPV RQUKVKQPU 2WNN VJG JCPFNG QWVYCTFU TQVCVG KV VQ VJG TGSWKTGF RQUKVKQP CPF TGNGCUG KV KPVQ QPG QH VJG VJTGG NQEMU E4416 90002 book Page 15 Wednesday October 25 2000 6 22 PM ...

Page 18: ...r on without connecting a power sensor or power sensor cable CAUTION The instrument has an autoranging power supply Ensure the supply voltage is within the range 85 to 264 Vac and 47 440Hz QPPGEV VJG 2QYGT QTF JGEM VJG QTCPIG KU NKV 219 4 E4416 90002 book Page 16 Wednesday October 25 2000 6 22 PM ...

Page 19: ...ions beyond its normal operating range the display may require a few minutes to warm up and operate normally 6WTP VJG OGVGT QP CPF EQPHKTO VJG ITGGP KU NKV 6JG OGVGT CWVQOCVKECNN UVGRU VJTQWIJ C UGNH VGUV TQWVKPG CPF KU PQY TGCF HQT WUG 219 4 E4416 90002 book Page 17 Wednesday October 25 2000 6 22 PM ...

Page 20: ...VQ VJG OGVGT JGEM VJG RQYGT OGVGT HWUG UGG 5VGR CKNU UGNH VGUV U H VJGTG CTG CP UGNH VGUV HCKNWTGU VJG OGVGT KU FGHGEVKXG QPVCEV QWT PGCTGUV IKNGPV 5GTXKEG GPVGT 4GHGT VQ IKNGPV 5CNGU CPF 5GTXKEG 1HHKEGU QP RCIG KPG KPRWV HWUG CPF URCTG In line Fuse Spare Fuse E4416 90002 book Page 18 Wednesday October 25 2000 6 22 PM ...

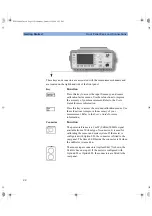
Page 21: ...n The green LED lights Press this key to select the measurement window or the individual measurement display lines Any measurement setup you create is implemented in the selected measurement Press this key to choose windowed expanded or full screen display Press this key to preset the power meter when it is operating in local mode front panel operation A pop up window is displayed asking you to co...

Page 22: ...s key to access the channel configuration tables and menus Channel parameters such as averaging and offsets are configured from this menu Press this key to access the triggering menu Unless an E series E9320A sensor is connected all the menu keys are disabled greyed out Use this key to configure the selected measurement Use this key together with to configure measurement displays System Channel Tr...

Page 23: ... is displayed Press to access the previous page QH is displayed These unmarked keys are called softkeys and are referred to by the text on the display beside them For example during a Preset a pop up window asks you to confirm the command Press to continue that is press the softkey beside the displayed word confirm Similarly pressing the softkey beside the word cancel stops the Preset The arrow ke...

Page 24: ...of your measurement Refer to the User s Guide for more information Connector Function The power reference is a 1 mW 0 dBm 50 MHz signal available from a 50 ohm type N connector It is used for calibrating the sensor and meter system If the meter is configured with Option 003 the connector is fitted to the rear panel The Green LED beside the connector is lit when the calibrator is turned on The sens...

Page 25: ...eries NOTE The following shows the procedure for single channel meters configured with front panel mounted POWER REF and CHANNEL connectors The procedure is similar for meters configured with rear panel connectors Also for dual channel meters E4417A you should repeat the procedure for the channel B sensor 2QYGT 5GPUQT 5GTKGU 5GTKGU 5GTKGU 5GTKGU 5GTKGU 5GTKGU QPPGEV VJG UGPUQT VQ CP IKNGPV UGTKGU ...

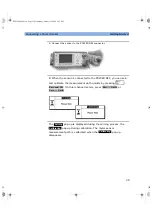
Page 26: ...WV EQPPGEVQT QPHKTO VJG OGUUCIG RQR WR CRRGCTU DTKGHN QPHKTO VJG FKURNC JCU EJCPIGF VQ C OGCUWTGOGPV TGCFKPI 4GCFKPI 5GPUQT GUUCIG FQGU PQV CRRGCT YJGP UGPUQT EQPPGEVKPI CP 5GTKGU RQYGT KCITCO UJQYU FKURNC YKVJ CP UGTKGU RQYGT UGPUQT EQPPGEVGF E4416 90002 book Page 24 Wednesday October 25 2000 6 22 PM ...

Page 27: ...CVG VJG OGCUWTGOGPV RCVJ SWKEMN D RTGUUKPI 1P FWCN EJCPPGN OGVGTU RTGUU QT 6JG RQR WR KU FKURNC GF FWTKPI VJG GTQKPI RTQEGUU VJG RQR WR FWTKPI ECNKDTCVKQP 6JG OGVGT UGPUQT OGCUWTGOGPV RCVJ KU ECNKDTCVGF YJGP VJG RQR WR FKUCRRGCTU Zero Cal GTQ CPF CN GTQ CN GTQ CN GTQKPI CNKDTCVKPI CNKDTCVKPI E4416 90002 book Page 25 Wednesday October 25 2000 6 22 PM ...

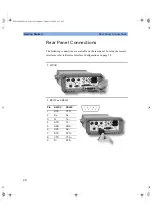
Page 28: ...wing connections are available on the rear panel To setup the remote interfaces refer to Remote Interface Configurations on page 28 2 2 RS232 and RS422 2KP 45 45 65 4Z 4Z 6Z 6Z 64 6Z 0 0 54 4Z 465 465 65 65 4 465 E4416 90002 book Page 26 Wednesday October 25 2000 6 22 PM ...

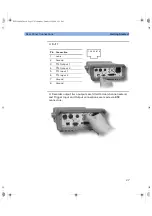
Page 29: ...YQ QWVRWVU CTG HKVVGF VQ FWCN EJCPPGN OGVGTU CPF 6TKIIGT PRWV CPF 1WVRWV EQPPGEVKQPU CTG OCFG XKC 0 EQPPGEVQTU 2KP QPPGEVKQP PQPG TQWPF 66 1WVRWV 66 1WVRWV 66 PRWV 66 PRWV TQWPF TQWPF 1 2 3 4 5 6 7 8 E4416 90002 book Page 27 Wednesday October 25 2000 6 22 PM ...

Page 30: ... and 30 are valid The GPIB address is stored in non volatile memory To change the address proceed as follows 2TGUU 6JG 2 CFFTGUU RQR WR CRRGCTU 7UG VJG CPF MG U VQ UGNGEV JKIJNKIJV VJG FKIKV QW YCPV VQ EJCPIG WUG VJG CPF MG U VQ KPETGCUG QT FGETGCUG VJG XCNWG 2TGUU VQ EQPHKTO CPF UCXG VJG PGY CFFTGUU 2TGUUKPI TGUVQTGU VJG RTGXKQWU XCNWG 6Q GPUWTG VJG 2 KPVGTHCEG KU UGNGEVGF RTGUU System 4GOQVG PVG...

Page 31: ...select highlight the digit you want to change use the and keys to increase or decrease the value Press to confirm and save the new value Pressing restores the previous value 4 Press to access the second page of the settings menu To configure the power meter to use the serial RS232 or RS422 interfaces press or System 4GOQVG PVGTHCEG QPHKIWTG PVGTHCEG 5GTKCN QTG System 4GOQVG PVGTHCEG QPHKIWTG PVGTH...

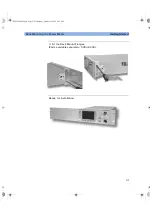
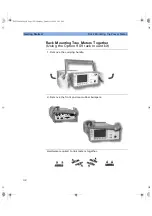
Page 32: ...KPI VJG 2QYGT GVGT 4CEM QWPVKPI VJG 2QYGT GVGT 4CEM QWPVKPI 1PG GVGT 7UKPI VJG 1RVKQP TCEM OQWPV MKV 4GOQXG VJG ECTT KPI JCPFNG 4GOQXG VJG HTQPV CPF TGCT TWDDGT DWORGTU E4416 90002 book Page 30 Wednesday October 25 2000 6 22 PM ...

Page 33: ...4CEM QWPVKPI VJG 2QYGT GVGT GVVKPI 5VCTVGF KV VJG 4CEM QWPV NCPIGU 2CTVU CXCKNCDNG UGRCTCVGN 4GCF HQT KPUVCNNCVKQP E4416 90002 book Page 31 Wednesday October 25 2000 6 22 PM ...

Page 34: ...T GVGT 4CEM QWPVKPI 6YQ GVGTU 6QIGVJGT 7UKPI VJG 1RVKQP TCEM OQWPV MKV 4GOQXG VJG ECTT KPI JCPFNG 4GOQXG VJG HTQPV CPF TGCT TWDDGT DWORGTU CTFYCTG TGSWKTGF VQ NKPM OGVGTU VQIGVJGT E4416 90002 book Page 32 Wednesday October 25 2000 6 22 PM ...

Page 35: ...N TCEM OQWPVKPI HNCPIG VQ QRRQUKVG UKFGU QH GCEJ RQYGT OGVGT 2CTVU CXCKNCDNG UGRCTCVGN CPF KV VYQ HTQPV NKPMKPI RNCVGU VQ GCEJ RQYGT OGVGT PICIG VJG NKPMKPI RNCVGU CV VJG HTQPV QH VJG RQYGT OGVGTU E4416 90002 book Page 33 Wednesday October 25 2000 6 22 PM ...

Page 36: ... GVVKPI 5VCTVGF 4CEM QWPVKPI VJG 2QYGT GVGT VVCEJ VJG TGCT NKPMKPI DTCEMGVU 4GCF HQT KPUVCNNCVKQP E4416 90002 book Page 34 Wednesday October 25 2000 6 22 PM ...

Page 37: ...4GIWNCVQT PHQTOCVKQP E4416 90002 book Page 35 Wednesday October 25 2000 6 22 PM ...

Page 38: ...ndle and rubber bumpers 2QYGT 4GSWKTGOGPVU Operating Voltage Range 85 264 Vac Operating Frequency Range 47 440Hz Power Dissipation 50 VA maximum QQNKPI 4GSWKTGOGPVU To provide adequate cooling and air gap of approximately 75mm 3ins should be maintained around the vented sections of the instrument NGCPKPI Use a soft clean damp cloth to clean the front panel and side covers 7UG This instrument is de...

Page 39: ...or serviceable parts inside Refer servicing to qualified personnel To prevent electrical shock do not remove covers WARNING If this instrument is not used as specified the protection provided by the equipment could be impaired This instrument must be used in a normal condition only in which all means for protection are intact CAUTION This instrument is designed for use in Installation Category II ...

Page 40: ...ormity assessment requirements have been met using the technical Construction file route to compliance using EMC test specifications EN 55011 1991 Group 1 Class A and EN 50082 1 1992 In order to preserve the EMC performance of the product any cable which becomes worn or damaged must be replaced with the same type and specification Refer to the Declaration of Conformity on page 41 5CHGV This instru...

Page 41: ...IKUVGTGF VTCFGOCTM QH VJG WUVTCNKCP QOOWPKECVKQPU WVJQTKV 6JKU UKIPKHKGU EQORNKCPEG YKVJ VJG WUVTCNKCP TCOGYQTM 4GIWNCVKQPU WPFGT VJG VGTOU QH VJG 4CFKQ EQOOWPKECVKQPU EV QH ZVGTPCN 2TQVGEVKXG CTVJ 6GTOKPCN 9JKNG VJKU KU C NCUU RTQFWEV RTQXKFGF YKVJ C RTQVGEVKXG GCTVJKPI EQPFWEVQT KP C RQYGT EQTF CP GZVGTPCN RTQVGEVKXG GCTVJKPI VGTOKPCN JCU CNUQ DGGP RTQXKFGF 6JKU VGTOKPCN KU HQT WUG YJGTG VJG GCT...

Page 42: ...rdnung vom 18 Januar 1991 Sound Pressure LpA 70 dB Am Arbeitsplatz Normaler Betrieb Nach DIN 45635 T 19 Typprufung CPWHCEVWTGTU GENCTCVKQP This statement is provided to comply with the requirements of the German Sound DIN 45635 T 19 Typprufung Sound Pressure LpA 70 dB At operator position Normal operation According to ISO 7779 Type Test E4416 90002 book Page 40 Wednesday October 25 2000 6 22 PM ...
Page 43: ...QH VJG OGODGT UVCVGU TGNCVKPI VQ GNGEVTQOCIPGVKE EQORCVKDKNKV CICKPUV VGUV URGEKHKECVKQPU 0 TQWR NCUU CPF 0 U GVCKNGF KP NGEVTQOCIPGVKE QORCVKDKNKV 6GEJPKECN QPUVTWEVKQP KNG 6 0Q UUGUUGF D VK RRQKPVGF QORGVGPV QF 6GUV GPVTG CTEQPK XKQPKEU VF CZYGNN WKNFKPI QPKDTKUVNG PFWUVTKCN 2CTM 5EQVNCPF 7PKVGF KPIFQO 6GEJPKECN 4GRQTV 0WODGT 4 FCVGF 5GRVGODGT 5CHGV 6JG RTQFWEV EQPHQTOU VQ VJG HQNNQYKPI UCHGV UV...

Page 44: ...QH VJG OGODGT UVCVGU TGNCVKPI VQ GNGEVTQOCIPGVKE EQORCVKDKNKV CICKPUV VGUV URGEKHKECVKQPU 0 TQWR NCUU CPF 0 U GVCKNGF KP NGEVTQOCIPGVKE QORCVKDKNKV 6GEJPKECN QPUVTWEVKQP KNG 6 0Q UUGUUGF D VK RRQKPVGF QORGVGPV QF 6GUV GPVTG CTEQPK XKQPKEU VF CZYGNN WKNFKPI QPKDTKUVNG PFWUVTKCN 2CTM 5EQVNCPF 7PKVGF KPIFQO 6GEJPKECN 4GRQTV 0WODGT 4 FCVGF 5GRVGODGT 5CHGV 6JG RTQFWEV EQPHQTOU VQ VJG HQNNQYKPI UCHGV UV...

Page 45: ...to and use of all information and facilities determined necessary by Agilent to service and or maintain the products Insofar as these items may contain proprietary or classified information the customer shall assume full responsibility for safeguarding and protection from wrongful use Routine operator maintenance and cleaning as specified in the Agilent Operating and Service Manuals Consumables su...

Page 46: ... unit is still within its warranty period UNITED STATES Agilent Technologies tel 1 800 829 4444 CANADA Agilent Technologies Canada Inc Test Measurement tel 1 877 894 4414 EUROPE Agilent Technologies Test Measurement European Marketing Organization tel 31 20 547 2000 JAPAN Agilent Technologies Japan Ltd tel 81 426 56 7832 fax 81 426 56 7840 LATIN AMERICA Agilent Technologies Latin America Region He...

Reviews: