Chapter 6
105
Replacement Procedure
Power Supply Assembly Replacement
6. Re
placem
ent Pro
c
e
d
u
re
Power Supply Assembly Replacement
Tools Required
•
Torque screwdriver, TORX T20
•
Torque screwdriver, TORX T8
•
Torque screwdriver, TORX T10
•
Box torque wrench, 5/8 inch
•
Box torque wrench, 5.5 mm
Removal Procedure
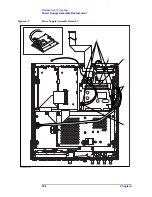
Refer to Figure 6-9 for this procedure.
Step 1.
Remove the 3/4 rack module top as described in “3/4 Rack Module Top Replacement” on
page 90.
Step 2.
Remove the PPMC PCA as described in “PPMC PCA Replacement” on page 101.
Step 3.
Remove the A1 Mother Board as described in “A1 Mother Board Replacement” on
page 103.
Step 4.
Disconnect the cable of the inlet (item 1) from the Power Supply Assembly.
Step 5.
Remove the four 5.5 mm Standoff (item 2).
Step 6.
Remove the TORX T10 screw (item 3) fastening the CPU cover.
Step 7.
Remove the CPU cover (item 4).
Step 8.
Remove the Power Supply Assembly with the cable power control.
Step 9.
Disconnect the cable power control (item 5) from the Power Supply Assembly.
NOTE
Do not pull out the power cable (P/N : E4980-61601) from the Power Supply Assembly
when you detach the Power Supply Assembly. There is a possibility that the Power Supply
Assembly could break when the power cable is forcibly pulled out. (Refer to sub-figure in
Figure 6-9.)
Replacement Procedure
Step 1.
Reverse the order of the removal procedure.
NOTE
When you fasten the CPU cover with the TORX T10 screw, set screwdriver's torque to 8.7
in-lb.
When you fasten the Power Supply Assembly with the 5.5 mm Standoff, set box torque
wrench's torque to 7 in-lb.
When you replace the Power Supply Assembly with a new one, use a new power cable
(P/N : E4980-61601).
Summary of Contents for E4980A
Page 12: ...12 Contents ...
Page 60: ...60 Chapter4 Troubleshooting Performance test failure troubleshooting ...
Page 86: ...86 Chapter5 Replaceable Parts Replaceable Parts List ...
Page 126: ...126 Chapter6 Replacement Procedure Display Interface Replacement ...
Page 136: ...136 AppendixB Firmware Update Update the E4980A firmware using USB cable ...
Page 140: ...140 AppendixC Power Requirement Power Requirements Figure C 3 Power Cable Supplied ...
Page 152: ...152 AppendixD Error Messages Error number 45 ...


