Chapter 11
299
Specifications and Supplemental Information
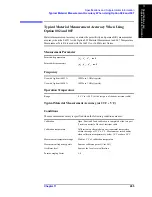
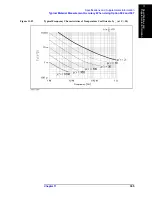
Typical Material Measurement Accuracy When Using Option 002 and 007
11
. S
pecifications an
d
Su
pple
m
en
ta
l Infor
m
ation
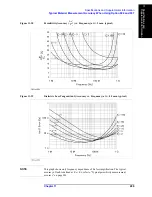
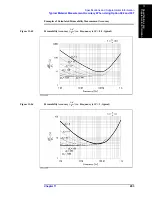
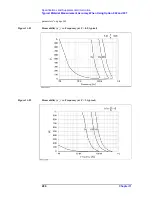
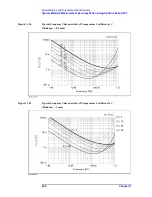
with temperature compensation
=
=
1 MHz
≤
f < 500 MHz
500 MHz
≤
f
≤
1 GHz
=
1 MHz
≤
f < 500 MHz
500 MHz
≤
f
≤
1 GHz
=
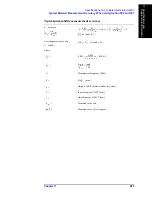
Measurement frequency [GHz]
=
[GHz]
=
Thickness of MUT (material under test) [mm]
=
Measured value of
=
Difference of measurement temperature from calibration
temperature
=
Maximum temperature change (
°
C) at test port from
calibration temperature after the calibration is performed.
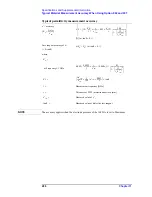
K
1
1 10
6
–
60 150
f
×
+
(
)
×
×
K
2
3 10
6
–
×
1 10
f
×
+
(
)
ε′
rm
t
----------
1
1
f
f
0
----
2
–
------------------------
×
10
+
f
×
×
×
3 10
6
–
×
5 2
f
×
+
(
)
×
ε′
rm
t
----------
1
1
f
f
0
----
2
–
------------------------
×
10
+
f
×
×
K
3
5 10
3
–
×
0.3 3
f
×
+
(
)
×
1
ε′
rm
t
----------
1
1
f
f
0
----
2
–
------------------------
×
10
+
f
×
-------------------------------------------------------------------
×
5 10
3
–
×
1.5 0.6
f
×
+
(
)
×
1
ε′
rm
t
----------
1
1
f
f
0
----
2
–
------------------------
×
10
+
f
×
-------------------------------------------------------------------
×
f
f
0
13
ε′
r
----------
t
ε′
rm
ε′
r
Δ
T
Δ
T
max
Summary of Contents for E4991A
Page 6: ......
Page 24: ...18 Contents ...
Page 80: ...74 Chapter3 Setting Measurement Conditions Averaging Measurement Results ...
Page 220: ...214 Chapter9 Setup and Use of Control Management Functions System Recovery ...
Page 338: ...332 AppendixB Probe Station Connection Kit Option 010 OPEN SHORT LOAD Calibration ...
Page 428: ...422 AppendixD Menu References Menu References ...
Page 482: ...476 AppendixI Messages Wait measuring comp standard ...

