Chapter 4
111
Troubleshooting
Function Specific Troubleshooting
4. T
ro
uble
s
hoo
tin
g
between the A52 and A22. Also check the cables between the A51 LCD and A52.
•
If the cables are normal, check the A51 LCD.
To Check the External Keyboard
Procedure
Step 1.
Connect the external keyboard to the E5061A/E5062A rear panel connector.
Step 2.
Turn the instrument on.
Step 3.
Press
key.
Step 4.
Press
and
keys on the external keyboard, and verify that the cursor on the menu
bar moves up and down. If it doesn't work, the external keyboard or the A20 digital
motherboard may be faulty.
To Check the Mouse
Procedure
Step 1.
Connect the mouse to the E5061A/E5062A rear panel connector.
Step 2.
Turn the instrument on.
Step 3.
Move the mouse and verify that the mouse pointer moves smoothly. If it doesn't move
smoothly, check first whether a foreign substance (dust, lint, etc.) is in the track ball hole of
the mouse or not.
Step 4.
Verify that the mouse buttons work normally. If any button doesn't work or the mouse
pointer doesn't move, a failure in the mouse or the A20 digital motherboard is suspected.
To Check the FDD
Procedure
Step 1.
Connect the external keyboard to the E5061A/E5062A rear panel connector.
Step 2.
Turn the instrument on.
Step 3.
Insert a 1.44 MB floppy disk, formatted in DOS format, into the FDD slot.
Step 4.
Press
key, and click
Save State
in the menu bar.
Step 5.
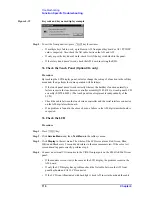
Click
File Dialog...
to open the "Save As" dialog box.
Step 6.
Select 3 1/2 Floppy [A:] from "Save in" pull-down menu.
Step 7.
Enter
e5061a
in the file name box from the keyboard.
Step 8.
Click "Save" button.
Step 9.
Press
key, and click
Recall State
in the menu bar.
Step 10.
Click
File Dialog...
to open the "Open" dialog box.
Summary of Contents for E5061A
Page 142: ...142 Chapter5 Replaceable Parts Replaceable Parts List Front Panel Figure 5 9 Front Panel ...
Page 168: ...168 Chapter6 Replacement Procedure Front Panel Removal Figure 6 2 Front Panel Removal ...
Page 192: ...192 Chapter6 Replacement Procedure A51 LCD Display Replacement Figure 6 16 A51 LCD Removal ...
Page 194: ...194 Chapter6 Replacement Procedure LCD Backlight Replacement ...
Page 198: ...198 Chapter7 Post Repair Procedures Post Repair Procedures ...
Page 202: ...202 AppendixA Manual Changes Manual Changes ...
Page 218: ...218 AppendixB System Recovery Calibration of the Touch Screen ...
Page 233: ...233 E Power Requirement E Power Requirement ...

