background image

Chapter 2

 19

Troubleshooting

How to exit from the E5061B Measurement View

2. T

ro

uble

shoo
tin

g

How to exit from the E5061B Measurement View

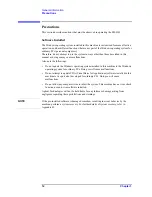
You need to exit from the E5061B Measurement View to perform some troubleshooting. 
The following is the procedure to exit from the E5061B Measurement View.

Step 1.

Connect the mouse and external keyboard to the connectors on the E5061B rear panel.

Step 2.

Turn the instrument on.

Step 3.

Press 

 key.

Step 4.

Click 

Service Menu

 - 

Exit

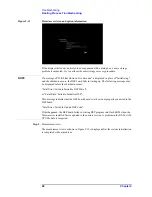
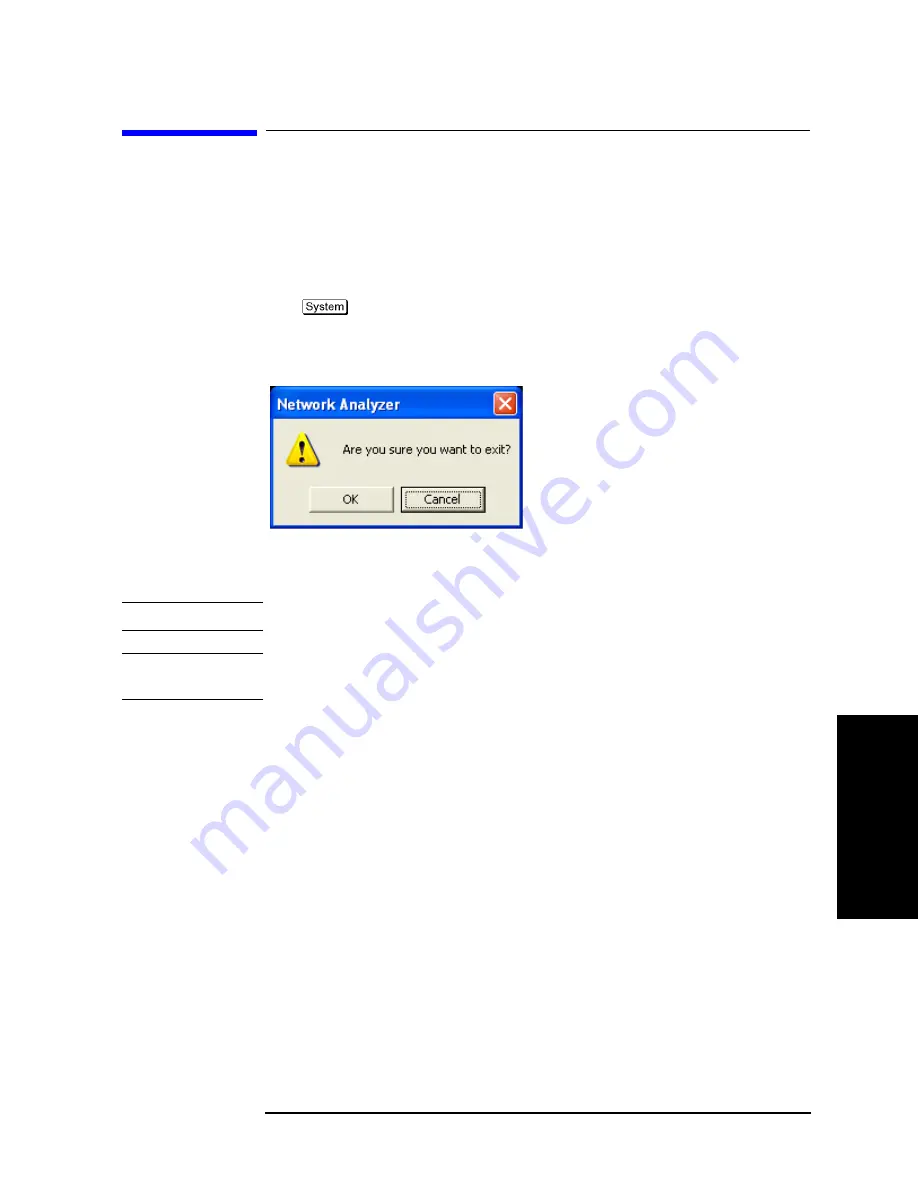
. Exit dialog box is as shown in Figure 2-1.

Figure 2-1 

Exit dialog box

Step 5.

Click 

OK

 in 

Exit

 Menu. Then the E5061B exit the Measurement View, then.windows 

desktop screen appears.

NOTE

If you wish to return to the Measurement View, double-click "Network Analyzer" icon. 

NOTE

If you need to shut down the E5061B and again turn on, perform in accordance with the 
following procedure.

a.

To get "Start" menu bar displayed, move the pointer to the bottom of the screen with 
mouse.

b.

Click "Start" and "Shut Down..." in the pull down menu. "Shut Down Windows" dialog 
box opens.

c.

Select "Shut down" button in the pull down menu.

d.

Click "OK" button in the dialog box.

Summary of Contents for E5061B

Page 1: ... Established 1981 Advanced Test Equipment Rentals www atecorp com 800 404 ATEC 2832 ...

Page 2: ...Agilent E5061B Network Analyzers Service Guide Second Edition Manufacturing No E5061 90105 December 2010 ...

Page 3: ...egistered UNIX is a registered trademark in U S and other countries licensed exclusively through X Open Company Limited Portions Copyright 1996 Microsoft Corporation All rights reserved Copyright 2009 Agilent Technologies Manual Printing History The manual s printing date and part number indicate its current edition The printing date changes when a new edition is printed Minor corrections and upda...

Page 4: ...ments are to be confirmed by the builder of the system Ground the Instrument To avoid electric shock the instrument chassis and cabinet must be grounded with the supplied power cable s grounding prong DO NOT Operate in an Explosive Atmosphere Do not operate the instrument in the presence of inflammable gasses or fumes Operation of any electrical instrument in such an environment clearly constitute...

Page 5: ...to refer to the instrument manual Alternating current Direct current On Supply Off Supply In position of push button switch Out position of push button switch Frame or chassis terminal A connection to the frame chassis of the equipment which normally include all exposed metal structure Stand by WARNING This warning sign denotes a hazard It calls attention to a procedure practice condition or the l...

Page 6: ...to the implied warranties of merchantability and fitness for a particular purpose Agilent shall not be liable for errors or for incidental or consequential damages in connection with the furnishing use or performance of this document or any information contained herein Should Agilent and the user have a separate written agreement with warranty terms covering the material in this document that conf...

Page 7: ...eled Sample key may be omitted Sample menu button box Indicates a menu button box on the screen labeled Sample which can be selected executed by clicking menu button or box may be omitted Sample block toolbar Indicates a block group of hardkeys or a toolbar setup toolbar labeled Sample Sample 1 Sample 2 Sample 3 Indicates a sequential operation of Sample 1 Sample 2 and Sample 3 menu button or box ...

Page 8: ...ic Test 31 Program Overall 32 Diagnostic Test Failure Troubleshooting 33 Function Specific Troubleshooting 36 To Check the Device Driver 37 To Check the Front Panel 38 To Check the Touch Panel 39 To Check the LCD 40 To Check the External Keyboard 40 To Check the Mouse 40 To Check the Video output 41 To Check the External Trigger Input 41 To Check the GPIB 41 To Check the USB 41 Performance Test fa...

Page 9: ...ed 64 Removal Procedure 64 Replacement Procedure 64 A60 CPU Module Replacement 66 Tools Required 66 Removal Procedure 66 Replacement Procedure 66 24 Bit I O Assembly Replacement 68 Tools Required 68 Removal Procedure 68 Replacement Procedure 68 DSP Assembly Replacement 70 Tools Required 70 Removal Procedure 70 Replacement Procedure 70 A9 LF Source Bias Module Replacement 72 Tools Required 72 Remov...

Page 10: ...ocedure 88 Touch Screen Control Board Replacement 89 Tools Required 89 Removal Procedure 89 Replacement Procedure 89 Inverter Board Replacement 90 Tools Required 90 Removal Procedure 90 Replacement Procedure 90 Power Switch Assembly Replacement 92 Tools Required 92 Removal Procedure 92 Replacement Procedure 92 A52 Front Panel Interface Board Key Pad Replacement 94 Tools Required 94 Removal Procedu...

Page 11: ...ery 112 C Firmware Update Firmware Update 114 Required Equipment 114 How to update the E5061B firmware 114 D Power Requirement Preparation for Power Supply 116 Power Requirements 116 Power Cable 116 Turning the Power ON and OFF 118 Turning the power ON 118 Turning the power OFF 118 E Messages Error Messages 121 Warning Message 121 ...

Page 12: ...11 1 General Information 1 General Information The Service Guide is a guide to servicing the E5061B RF Network Analyzer The guide contains information requisite to troubleshooting and repairs ...

Page 13: ... operating system installed in this machine to the Windows operating system for ordinary PCs Doing so will cause malfunctions Do not attempt to update VBA Visual Basic for Applications software installed in this machine to its equivalent developed for ordinary PCs Doing so will cause malfunctions Do not allow any computer virus to infect the system This machine has no virus check function nor anti...

Page 14: ...his chapter lists the procedures required to verify the E5061B operation after an assembly is replaced with a new one Appendix A Manual Changes This appendix contains the information required to adapt this manual to versions or configurations of the E5061B manufactured earlier than the current printing date of this manual The information in this manual applies directly to E5061B units with the ser...

Page 15: ...low Manual Changes supplement or have a different manual part number This sheet contains change information that explains how to adapt the manual to the newer instrument In addition to change information the supplement may contain information for correcting errors Errata in the manual To keep this manual as current and accurate as possible Agilent Technologies recommends that you periodically requ...

Page 16: ...23A with Opt H01 1 P Attenuator Switch Driver Agilent 11713A 1 P Step Attenuator Agilent 8496G with Opt 001 Opt H60 1 P Calibration Kit Agilent 85032F 1 P A Power Splitter Agilent 11667A 1 P A 6 dB Fixed Attenuator Agilent 8491A with Opt 006 Opt H60 1 P 10 dB Fixed Attenuator Agilent 8491A 1 P A Feedthrough Agilent p n 04192 61002 2 P A BNC Tee Agilent p n 1250 0781 1 P A Dual Banana Agilent p n 1...

Page 17: ...del Qty Use 1 Frequency Counter Agilent 53131A 132A with Opt 010 and 030 2 Opt 050 and Opt 124 can be substituted for Opt 030 In this case a N m BNC f adapter is necessary 2 1 P A Feedthrough Agilent 10100C 1 P A Cable Agilent p n 5062 6691 1 P A Short Agilent 11512A Agilent p n 85032 60016 2 2 P P 1 P Performance Tests A Adjustment 2 Opt 050 and Opt 124 can be substituted for Opt 030 In this case...

Page 18: ...17 2 Troubleshooting 2 Troubleshooting This chapter provides the procedure to isolate a faulty assembly in the E5061B ...

Page 19: ...ening of covers or removal of parts is likely to expose dangerous voltages Disconnect the instrument from its power supply beforehand CAUTION Many of the assemblies in the instrument are very susceptible to damage from ESD electrostatic discharge Perform the following procedures only at a static safe workstation and wear a grounding strap CAUTION DO NOT operate without following instructions Progr...

Page 20: ...vice Menu Exit Exit dialog box is as shown in Figure 2 1 Figure 2 1 Exit dialog box Step 5 Click OK in Exit Menu Then the E5061B exit the Measurement View then windows desktop screen appears NOTE If you wish to return to the Measurement View double click Network Analyzer icon NOTE If you need to shut down the E5061B and again turn on perform in accordance with the following procedure a To get Star...

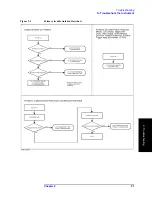
Page 21: ...ars on the LCD after the E5061B is turned on go to No Display Troubleshooting on page 22 If the E5061B stops in booting process despite something being displayed on the LCD go to Booting Process Troubleshooting on page 25 The power on self test is performed once automatically after the E5061B measurement view is displayed If the power on self test fails go to Troubleshooting Using Diagnostic Test ...

Page 22: ...Chapter 2 21 Troubleshooting To Troubleshoot the Instrument 2 Troubleshooting Figure 2 2 Primary trouble isolation flowchart ...

Page 23: ...ered from proper ac power line isolate the failure in accordance with the procedure shown in Figure 2 3 Connect the keyboard to the E5061B rear panel connector turn the power on and start trouble isolation The methods of trouble isolation are described in the procedural step 1 to 6 Figure 2 3 No display trouble isolation procedure ...

Page 24: ...check if the following LEDs light 3 3 V and 5 V dc monitor LEDs on A50 A60 CPU Module as shown in Figure 2 4 LEDs on DSP module as shown in Figure 2 5 Figure 2 4 LEDs on CPU module Figure 2 5 LEDs on DSP module NOTE To check all the outputs of the power supply measure the dc voltages at the output lead connectors with a DMM The dc output voltages and lead color information is provided in the modul...

Page 25: ... problem seems in the CPU module Figure 2 6 LED of the Num Lock key Make sure the following before replacing the CPU module Whether all the connections to the A50 A60 CPU Module are normal or not Check if there is any disconnection or connection working loose Step 4 Checking with the external monitor Connect an external VGA monitor to the VIDEO output on the E5061B rear panel If something is displ...

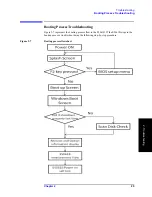
Page 26: ...hooting 2 Troubleshooting Booting Process Troubleshooting Figure 2 7 represents the booting process flow in the E5061B If the E5061B stops in the booting process troubleshoot using the following step by step procedure Figure 2 7 Booting process flowchart ...

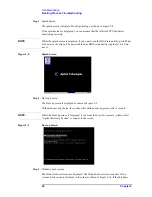
Page 27: ...enter BIOS setup unility is agt0nly 0 is Zero not o Figure 2 8 Splash Screen Step 2 Boot up Screen The Boot up screen is displayed as shown in Figure 2 9 Without choose any choice the system will continue boot up process after 3 second NOTE While the Boot up screen is displayed if you want to do system recovery please select Agilent Recovery System as soon as in the screen Figure 2 9 Boot up Scree...

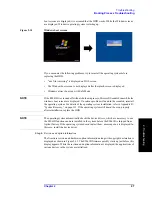
Page 28: ...ndisk reinstall the operating system For details of the operating system installation refer to Appendix B System Recovery on page 111 If the operating system still doesn t boot up properly after reinstallation replace the HDD NOTE The operating system automatically checks the device drivers which are necessary to use the E5061B functions and are installed in the system before the E5061B is shipped...

Page 29: ...following message may be displayed before the shutdown occurs Fatal Error Failed to Initialize DSP Driver or Fatal Error Failed to Initialize DSP This message indicates that the DSP board doesn t work or is not properly connected to the DSP board Fatal Error Failed to Update DSP Code If this happened the DSP board failed in writing DSP program into flash ROM when the firmware was installed first o...

Page 30: ... The power on self test is executed once automatically before the measurement starts While the power on self test is in progress Power on test is displayed at the left in the instrument status bar If the power on test fails an error message is displayed there For more details refer to Troubleshooting Using Diagnostic Test on page 30 ...

Page 31: ...vidual tests and narrow down failure possibilities NOTE The following procedure can be used to restart the power on self test as required a Press key b Click Service Menu and then Test Menu in the softkeys c Click Power On Test to restart the test Wait until the power on test ends d The test result OK or Failed is displayed in the Power On Test key PLL unlock When a PLL of the frequency synthesize...

Page 32: ...l keys NOTE To perform the diagnostic test properly the following conditions must be met 1 Environmental temperature 23 C 5 C NOTE Do not operate front panel keys keyboard and mouse during the diagnostic test Changing the instrument settings while the diagnostic test is in progress will cause incorrect test results Step 1 Connect a mouse and an external keyboard to the E5061B s rear panel connecto...

Page 33: ... test click Exit button Program Overall Instrument Information The option and serial number for the E5061B and test date can be entered automatically Test Conditions The test conditions Temperature Humidity and person doing the test Tested by can be entered Test Items The following test can be selected To execute the test you select click Execute button DC BUS Test Internal Level Monitor Test RF O...

Page 34: ...ollow the instructions as shown below on the E5061B display for performing the test Figure 2 16 Setup dialog box The test result file named resultDT txt is created on the drive D D Agilent Service Log of the E5061B after Exit button of the Main Menu is pressed The text file can be read and edited with a PC Diagnostic Test Failure Troubleshooting Table 2 3 and Table 2 4 represents the contents of t...

Page 35: ...est Probable faulty board assembly A1 A11 Source Module A2 Receiver Module A9 LF Source Bias Module 1 DC BUS Test ALL A1 A11 Source Module A2 Receiver Module A9 LF Source Bias Module 2 Internal Level Monitor Test ALL A1 A11 Source Module 3 RF Output Level Range Test 4 RF Output Level Power Sweep Test 5 Receiver Absolute Measurement Test 6 Receiver Compression Test 7 Receiver IF Ranging Test 8 Gain...

Page 36: ...ce Module A3 A4 Receiver Module 2 Internal Level Monitor Test ALL A11 Source Module 3 RF Output Level Range Test 4 RF Output Level Power Sweep Test 5 Receiver Absolute Measurement Test 7 Receiver IF Ranging Test Chapter 2 35 Troubleshooting Troubleshooting Using Diagnostic Test 2 Troubleshooting Most suspicious assembly Suspicious assembly Possible faulty assembly NOTE Diagnostic tests 1 and 2 are...

Page 37: ...u bar softkey label and others are indicated on the 10 4 inch color LCD display Refer to To Check the LCD on page 40 External keyboard The external keyboard can be used for the entry of numerical and character data when it is connected to USB connector on front and rear panels Refer to To Check the External Keyboard on page 40 Mouse The mouse can be used to move the pointer on the LCD display sele...

Page 38: ...nce with the procedure described in How to exit from the E5061B Measurement View on page 19 Then Windows desktop screen is displayed Step 2 Click My Computer with the right button and select Properties as shown in Figure 2 17 Then the System Properties Figure 2 18 will appear Figure 2 17 Opening System Property Window Figure 2 18 System Properties Window General Step 3 Click Hardware tab and Devic...

Page 39: ...indow Hardware Click the icon with the right button and click Property to show the detail of the status as shown in Figure 2 20 Figure 2 20 Opening Device Driver Property To Check the Front Panel Procedure Randomly press the front panel keys and rotate the knob to verify that they work normally ...

Page 40: ... work a problem in A52 Front Panel I F board or A50 CPU Module is suspected Also check the flat cable between the A52 Front Panel I F board and CPU module If only a specific key doesn t work check first if the key is subsided in the panel If the rotary knob doesn t work check the A52 Front Panel I F board involving the RPG To Check the Touch Panel Procedure By touching the LCD display panel select...

Page 41: ...U module If the cables are normal check the A51 LCD To Check the External Keyboard Procedure Step 1 Connect the external keyboard to the E5061B rear panel USB port Step 2 Turn the instrument on Step 3 Press key Step 4 Press and keys on the external keyboard and verify that the cursor on the menu bar moves up and down If it doesn t work the external keyboard or the A50 CPU Module may be faulty To C...

Page 42: ...in the menu bar to set the trigger mode to External Step 4 Connect a BNC Short or 50 Ω termination to the Ext Trig connector on the rear panel and disconnect it Thereby a measurement trigger should be generated and a measurement result trace should be refreshed Step 5 If no trigger occurs a failure in the DSP board is suspected To Check the GPIB Procedure Perform the E5061B performance test progra...

Page 43: ... 6 and Table 2 7 shows the recommended adjustments when the performance test fails Select the adjustment program corresponding to the recommended adjustment and perform the adjustment Table 2 6 Recommended adjustment for performance test failure Option 3L5 Test Num First failed test Recommended adjustment Oven reference Frequency reference Local gain Mixer local leakage Receiver absolute gain Rch ...

Page 44: ...namic accuracy test Opt 3L5 16 Magnitude ratio phase frequency response test Opt 3L5 17 Trace noise test Opt 3L5 18 DC measurement accuracy test Opt 3L5 Table 2 6 Recommended adjustment for performance test failure Option 3L5 Test Num First failed test Recommended adjustment Oven reference Frequency reference Local gain Mixer local leakage Receiver absolute gain Rch Synthesizer gain Source output ...

Page 45: ... IF linearity at 1 195GHz 10 IF linearity at LF 11 Uncorrected System Performance test 44 Chapter2 Troubleshooting Performance Test failure Troubleshooting Performance Test failure Troubleshooting Table 2 8 and Table 2 9 represents the relationships between the failed test and probable faulty assembly If the performance test failure cannot be removed by a proper adjustment replace the assembly sho...

Page 46: ...ccuracy test 2 RF output level accuracy and flatness test 3 RF output level linearity test 4 Trace noise test 5 Crosstalk system Dynamic Range test 6 Dynamic accuracy test 7 Uncorrected system performance test 8 LF output level accuracy flatness test Opt 3L5 9 LF output level linearity test Opt 3L5 10 DC bias accuracy test Opt 3L5 11 Crosstalk noise level test Opt 3L5 12 Input impedance test Opt 3...

Page 47: ... accuracy test 2 RF output level accuracy test 3 RF output level linearity test 4 Crosstalk system dynamic range test 5 Noise Floor Test 6 Trace Noise Test 7 Dynamic Accuracy Test 8 Compression 9 IF linearity at 1 195GHz 10 IF linearity at LF 11 Uncorrected System Performance test 46 Chapter2 Troubleshooting Performance Test failure Troubleshooting Most suspicious assembly Suspicious assembly Poss...

Page 48: ...47 3 Replaceable Parts 3 Replaceable Parts This chapter contains information for ordering replacement parts for the E5061B ...

Page 49: ... minimum amount for parts ordered through a local Agilent Technologies Sales Office when the orders require billing and invoicing Prepaid transportation There is a small handling charge for each order No invoices In order for Agilent Technologies to provide these advantages please send a check or money order with each order Mail order forms and specific ordering information are available through y...

Page 50: ...ter 3 49 Replaceable Parts Replaceable Parts List 3 Replaceable Parts Replaceable Parts List The latest replaceable parts list is shown on the Agilent web site See the http www agilent com find ena_support ...

Page 51: ...50 Chapter3 Replaceable Parts Replaceable Parts List ...

Page 52: ...51 4 Replacement Procedure 4 Replacement Procedure This chapter provides procedure for removing and replacing the major assemblies in the E5061B ...

Page 53: ... the necessary adjustments Refer to Chapter 3 Adjustment 5 Perform the necessary performance tests Refer to Chapter 2 Performance Tests WARNING These servicing instructions are for use by qualified personnel only To avoid electrical shock do not perform any servicing unless you are qualified to do so WARNING The opening of covers or removal of parts is likely to expose dangerous voltages Disconnec...

Page 54: ... T15 T20 1 5 mm 5 5 mm 9 16 in 5 8 in 5 16 in Outer Cover Front Panel Hard Disk Assembly Power Supply Assembly A50 CPU Module A60 CPU Module 24 Bit I O Assembly DSP Assembly A9 LF Source Bias Module A2 Receiver Module A3 A4 Receiver Module A1 Source Module A11 Source Module A10 Analog Mother Board Ref Oven Fan Assembly Angle for Fan Assembly Touch Screen Control Board Inverter Board Power Switch A...

Page 55: ...move the four bottom feet item 1 Step 3 Remove the two TORX T20 screws item 2 fastening the side strap handles Step 4 Remove the four TORX T15 screws item 3 fastening the four rear foot Step 5 Remove the four TORX T15 screws item 4 fastening the cover Step 6 Slide up the outer cover and remove it carefully Replacement Procedure Step 1 Reverse the order of the removal procedure NOTE Set a torque to...

Page 56: ...Chapter 4 55 Replacement Procedure Outer Cover Replacement 4 Replacement Procedure Figure 4 1 Outer Cover Removal ...

Page 57: ...placement on page 54 Step 2 Remove the top trim item 1 using a flat edge driver Step 3 Remove the seven TORX T15 screws item 2 fastening front panel Step 4 Gradually push the front panel assembly towards the outside Step 5 Release the flat cable item 3 from the cable clamp item 4 Step 6 Disconnect the flat cable item 3 from the front panel Replacement Procedure Step 1 Reverse the order of the remo...

Page 58: ...Chapter 4 57 Replacement Procedure Front Panel Replacement 4 Replacement Procedure Figure 4 2 Front Panel Removal ...

Page 59: ...d Disk Drive Step 3 Disconnect the S ATA cable item 2 from the Hard Disk Drive Step 4 Release the clamped cables from the clamps item 3 on the Hard Disk Assembly and the A50 CPU Module Step 5 Remove the four TORX T10 screws item 4 fastening the Hard Disk Assembly Step 6 Lift the Hard Disk Assembly Step 7 Remove the four TORX T10 screws item 5 fastening the Hard Disk Drive Replacement Procedure Ste...

Page 60: ...Chapter 4 59 Replacement Procedure Hard Disk Assembly Replacement Option 019 4 Replacement Procedure Figure 4 3 Hard Disk Assembly Removal ...

Page 61: ...ening the Hard Disk Assembly Step 2 Slide out the Hard Disk Assembly Step 3 Disconnect the power supply cable item 2 from the Hard Disk Drive Step 4 Disconnect the S ATA cable item 3 from the Hard Disk Drive Step 5 Remove the four TORX T10 screws item 4 fastening the Hard Disk Drive Replacement Procedure Step 1 Reverse the order of the removal procedure NOTE Set a torque to 9 in lb for torque driv...

Page 62: ...Chapter 4 61 Replacement Procedure Hard Disk Assembly Replacement Option 020 4 Replacement Procedure Figure 4 4 Hard Disk Assembly Removal option 020 ...

Page 63: ...3 for the Hard Disk Drive Fan Assembly and A50 CPU Module Step 5 Remove the two TORX T10 screws and two washers item 4 fastening the chassis assembly for power supply Step 6 Remove the three TORX T10 screws item 5 from the rear panel Step 7 Lift the power supply assembly Step 8 Remove the two hex screws 5 5 mm and two washers item 6 Step 9 Remove the gasket item 7 and then re install the two hex s...

Page 64: ...Chapter 4 63 Replacement Procedure Power Supply Assembly Replacement 4 Replacement Procedure Figure 4 5 Power Supply Assembly Removal ...

Page 65: ...n the A50 CPU Module Step 6 Remove the flat cable from the clamp item 4 Step 7 Remove the two S ATA cables and power supply cable item 5 from the A50 CPU Module Step 8 Remove the three TORX T10 screws item 6 fastening the Chassis Assembly for the A50 CPU Module with Hard Disk Assembly Step 9 Remove the three TORX T10 screws item 7 fastening rear panel of the Chassis Assembly for the A50 CPU Module...

Page 66: ...Chapter 4 65 Replacement Procedure A50 CPU Module Replacement 4 Replacement Procedure Figure 4 6 A50 CPU Module Removal ...

Page 67: ...ree cables item 1 on the A60 CPU Module Step 5 Remove the two S ATA cables and power supply cable item 2 from the A60 CPU Module Step 6 Remove the three TORX T10 screws item 3 fastening the Chassis Assembly for the A60 CPU Module with Hard Disk Assembly Step 7 Remove the two TORX T10 screws item 4 fastening rear panel of the Chassis Assembly for the A60 CPU Module with Hard Disk Assembly Step 8 Li...

Page 68: ...Chapter 4 67 Replacement Procedure A60 CPU Module Replacement 4 Replacement Procedure Figure 4 7 A60 CPU Module Removal ...

Page 69: ...ront Panel Replacement on page 56 Step 3 Disconnect the flat cable item 1 from the 24 Bit I O Assembly and the DSP Assembly Step 4 Release the flat cable from the clamp item 2 Step 5 Disconnect the cable item 3 from the 24 Bit I O Assembly and the A50 CPU Module Step 6 Release the cable from the clamp item 4 Step 7 Remove the two TORX T10 screws item 5 fastening the 24 Bit I O Assembly Step 8 Slid...

Page 70: ...Chapter 4 69 Replacement Procedure 24 Bit I O Assembly Replacement 4 Replacement Procedure Figure 4 8 24 Bit I O Assembly Removal ...

Page 71: ...n Front Panel Replacement on page 56 Step 3 Disconnect the flat cable item 1 from the DSP Assembly Step 4 Disconnect the two S ATA cable item 2 from the DSP Assembly Step 5 Remove the two 5 8 inch nuts and the two washers item 3 from the BNC connectors Step 6 Remove the two TORX T10 screws item 4 fastening the DSP Assembly Step 7 Slide forward the DSP Assembly Replacement Procedure Step 1 Reverse ...

Page 72: ...Chapter 4 71 Replacement Procedure DSP Assembly Replacement 4 Replacement Procedure Figure 4 9 DSP Assembly Removal ...

Page 73: ...ement on page 54 Step 2 Remove the Front Panel as described in Front Panel Replacement on page 56 Step 3 Disconnect the cable item 1 from the A9 LF Source Bias Module Step 4 Disconnect the three RF cables item 2 from the A9 LF Source Bias Module Step 5 Remove the two TORX T10 screws item 3 fastening the A9 LF Source Bias Module Step 6 Slide forward the A9 LF Source Bias Module Replacement Procedur...

Page 74: ...Chapter 4 73 Replacement Procedure A9 LF Source Bias Module Replacement 4 Replacement Procedure Figure 4 10 A9 LF Source Bias Module Removal ...

Page 75: ...ove the three semi rigid cables item 1 Step 4 Disconnect the three RF cables item 2 from the A2 Receiver Module and the A9 LF Source Bias Module Step 5 Remove the two TORX T10 screws item 3 fastening Chassis Assembly for the A2 Receiver Module Step 6 Remove the TORX T15 screw item 4 fastening Chassis Assembly for the A2 Receiver Module Step 7 Slide forward the A2 Receiver Module Replacement Proced...

Page 76: ...Chapter 4 75 Replacement Procedure A2 Receiver Module Replacement 4 Replacement Procedure Figure 4 11 A2 Receiver Module Removal ...

Page 77: ...n page 54 Step 2 Remove the Front Panel as described in Front Panel Replacement on page 56 Step 3 Remove the two semi rigid cables item 1 Step 4 Remove the two TORX T10 screws item 2 fastening Chassis Assembly for the A3 A4 Receiver Module Step 5 Slide forward the A3 A4 Receiver Module Replacement Procedure Step 1 Reverse the order of the removal procedure NOTE Set a torque to 9 5 in lb for open t...

Page 78: ...Chapter 4 77 Replacement Procedure A3 A4 Receiver Module Replacement 4 Replacement Procedure Figure 4 12 A3 A4 Receiver Module Removal ...

Page 79: ...anel Replacement on page 56 Step 3 Remove the A2 Receiver Module as described in A2 Receiver Module Replacement on page 74 Step 4 Disconnect the four RF cable connectors item 1 from the A1 Source Module and the A9 LF Source Bias Module Step 5 Remove the two TORX T10 screws item 2 fastening the A1 Source Module Step 6 Slide forward the A1 Source Module Step 7 Remove the four TORX T10 screws item 3 ...

Page 80: ...Chapter 4 79 Replacement Procedure A1 Source Module Replacement 4 Replacement Procedure Figure 4 13 A1 Source Module Removal ...

Page 81: ...s described in Outer Cover Replacement on page 54 Step 2 Remove the Front Panel as described in Front Panel Replacement on page 56 Step 3 Remove the A3 A4 Receiver Module as described in A3 A4 Receiver Module Replacement on page 76 Step 4 Remove the two TORX T10 screws item 1 fastening the A11 Source Module Step 5 Slide forward the A11 Source Module Replacement Procedure Step 1 Reverse the order o...

Page 82: ...Chapter 4 81 Replacement Procedure A11 Source Module Replacement 4 Replacement Procedure Figure 4 14 A11 Source Module Removal ...

Page 83: ... Source Bias Module Replacement on page 72 A2 Receiver Module Refer to A2 Receiver Module Replacement on page 74 A1 Source Module Refer to A1 Source Module Replacement on page 78 Step 4 Remove the three 9 16 inch nuts and the three washers item 1 from the BNC connectors Step 5 Remove the seven TORX T10 screws item 2 fastening the rear panel Step 6 Remove the TORX T10 screw item 3 fastening the sma...

Page 84: ...Chapter 4 83 Replacement Procedure A10 Analog Mother Board Replacement 4 Replacement Procedure and item 7 Figure 4 15 A10 Analog Mother Board Removal ...

Page 85: ...three 9 16 inch nuts and the three washers item 1 from the BNC connectors Step 3 Remove the seven TORX T10 screws item 2 fastening the rear panel Step 4 Disconnect the two cable connectors item 3 from the Ref Oven Step 5 Remove the three TORX T10 screws item 4 fastening the Ref Oven Step 6 Lift the Ref Oven Replacement Procedure Step 1 Reverse the order of the removal procedure NOTE Set a torque t...

Page 86: ...Chapter 4 85 Replacement Procedure Ref Oven Opt 1E5 Replacement 4 Replacement Procedure Figure 4 16 Ref Oven Removal ...

Page 87: ... cable ties item 3 fastening the Fan Assembly cables Step 5 Disconnect the two cable connectors item 4 from the Fan Assembly Step 6 Remove the six TORX T10 screws item 5 fastening the Fan Assembly Step 7 Lift the Fan Assembly Step 8 Remove the eight rivets plastic item 6 fastening the Fans for the blacket Step 9 Peel off the tape item 7 fastening the Fan Assembly cables Replacement Procedure Step ...

Page 88: ...Chapter 4 87 Replacement Procedure Fan Assembly Replacement 4 Replacement Procedure Figure 4 17 Fan Assembly Removal ...

Page 89: ... 1 Remove the Outer Cover as described in Outer Cover Replacement on page 54 Step 2 Remove the Fan Assembly as described in Fan Assembly Replacement on page 86 Step 3 Remove the two TORX T10 screws item 1 fastening the Angle for Fan Assembly Step 4 Lift the Angle item 2 Replacement Procedure Step 1 Reverse the order of the removal procedure NOTE Set a torque to 9 in lb for torque driver when faste...

Page 90: ...n page 54 Step 2 Remove the Front Panel as described in Front Panel Replacement on page 56 Step 3 Remove the two TORX T8 screws item 1 fastening the Touch Screen Control Board for the front panel rear side Step 4 Disconnect the flat cable connector item 2 from the A52 Front Panel Interface Board Step 5 Disconnect the flat cable connector item 3 from the LCD Assembly Replacement Procedure Step 1 Re...

Page 91: ...age 89 Step 4 Remove the cable clamp nylon item 1 from the front panel rear side cover Step 5 Remove the six TORX T10 screws item 2 fastening the front panel rear side cover Step 6 Lift the front panel rear side cover Step 7 Remove the two TORX T10 screws item 3 fastening the Inverter Board Assembly Step 8 Lift the Inverter Board Assembly and disconnect the two cable connectors item 4 from the Inv...

Page 92: ...Chapter 4 91 Replacement Procedure Inverter Board Replacement 4 Replacement Procedure Figure 4 20 Inverter Board Removal ...

Page 93: ...ement on page 56 Step 3 Remove the Touch Screen Control Board as described in Touch Screen Control Board Replacement on page 89 Step 4 Remove the front panel rear side cover as described in Inverter Board Replacement on page 90 Step 5 Disconnect the connector item 1 of cable from the A52 Front Panel Interface Board Step 6 Remove the two TORX T10 screws item 2 fastening the Power Switch Assembly St...

Page 94: ...Chapter 4 93 Replacement Procedure Power Switch Assembly Replacement 4 Replacement Procedure Figure 4 21 Power Switch Assembly Removal ...

Page 95: ...as described in Inverter Board Replacement on page 90 Step 5 Remove the rotary knob item 1 using hex key from the front panel Step 6 Disconnect the three connectors item 2 of the cables Step 7 Remove the TORX T10 screw and washer item 3 fastening the cable from the LCD Assembly Step 8 Remove the 13th TORX T10 screws item 4 fastening the A52 Front Panel Interface Board Step 9 Remove the Key Pad ite...

Page 96: ...Chapter 4 95 Replacement Procedure A52 Front Panel Interface Board Key Pad Replacement 4 Replacement Procedure Figure 4 22 A52 Front Panel Interface Board Key Pad Removal ...

Page 97: ...ch Screen Control Board as described in Touch Screen Control Board Replacement on page 89 Step 4 Remove the Inverter Board as described in Inverter Board Replacement on page 90 Step 5 Disconnect the two connectors item 1 of the cables Step 6 Release the clamped cable from the clamp item 2 on the LCD Assembly Step 7 Remove the two cables item 3 on the LCD Assembly Step 8 Remove the four TORX T15 sc...

Page 98: ...Chapter 4 97 Replacement Procedure LCD Assembly Replacement 4 Replacement Procedure Figure 4 23 LCDAssembly Removal ...

Page 99: ...ement on page 54 Step 2 Remove the Front Panel as described in Front Panel Replacement on page 56 Step 3 Remove the four TORX T15 screws item 1 fastening the Front Frame Step 4 Remove the seven TORX T20 screws item 2 fastening the Front Frame Step 5 Slide forward the Front Frame Replacement Procedure Step 1 Reverse the order of the removal procedure NOTE Set a torque to 14 in lb for torque driver ...

Page 100: ...Chapter 4 99 Replacement Procedure Front Frame Replacement 4 Replacement Procedure Figure 4 24 Front Frame Removal ...

Page 101: ...4 25 for this procedure Step 1 Remove the four TORX T20 screws item 1 fastening the Handle Assembly Step 2 Remove the end caps both side item 2 from the Handle Assembly Step 3 Detach parts at both sides item 3 of the Handle Assembly Step 4 Remove the strap cover item 4 of the Handle Assembly Replacement Procedure Step 1 Reverse the order of the removal procedure ...

Page 102: ...Chapter 4 101 Replacement Procedure Handle Assembly Replacement 4 Replacement Procedure Figure 4 25 Handle Assembly Removal ...

Page 103: ...102 Chapter4 Replacement Procedure Handle Assembly Replacement ...

Page 104: ...103 5 Post Repair Procedures 5 Post Repair Procedures This chapter lists the procedures required to verify the E5061B operation after an assembly is replaced with a new one ...

Page 105: ... the following required adjustments using A1 Source Module in Spot Adjustment of the program To Execute the Diagnostic Test on page 31 Frequency Accuracy Test RF Output Level Accuracy and Flatness Test RF Output Level Linearity Test Trace Noise Test Crosstalk System Dynamic Range Test Dynamic Accuracy Test Uncorrected System Performance Test LF Output Level Accuracy Test Opt 3L5 LF Output Level Li...

Page 106: ... following required adjustments using A9 Bias Module in Spot Adjustment of the program To Execute the Diagnostic Test on page 31 Frequency Accuracy Test RF Output Level Accuracy and Flatness Test RF Output Level Linearity Test Trace Noise Test Crosstalk System Dynamic Range Test Dynamic Accuracy Test Uncorrected System Performance Test LF Output Level Accuracy Test Opt 3L5 LF Output Level Linearit...

Page 107: ... O Board No adjustment needed To Execute the Diagnostic Test on page 31 HDD Perform HDD Hard Disk Drive in Spot Adjustment of the program Calibration of the Touch Screen for opt 016 Inspect the Booting Process Power Supply Assembly No adjustment needed Inspect the Booting Process LCD Not adjustment needed Inspect the Booting Process To Check the LCD on page 40 Touch panel for Opt 016 Calibration o...

Page 108: ...program To Execute the Diagnostic Test on page 31 Frequency Accuracy Test RF Output Level Accuracy Test RF Output Level Linearity Test Crosstalk System Dynamic Range Test Noise Floor Test Trace Noise Test Dynamic Accuracy Test Compression Test IF Linearity at 1 195 GHz Test IF Linearity at LF Test Uncorrected System Performance Test A10 Analog Motherboard No adjustment needed Inspect the Booting P...

Page 109: ...justment needed Inspect the Booting Process LCD Not adjustment needed Inspect the Booting Process To Check the LCD on page 40 Touch panel for Opt 016 Calibration of the Touch Screen Inspect the Booting Process To Check the Touch Panel on page 39 Inverter Board No adjustment needed Inspect the Booting Process Table 5 2 Post Repair Procedures Replaced Assembly or Part Required Adjustments Correction...

Page 110: ... required to adapt this manual to versions or configurations of the E5061B manufactured earlier than the current printing date of this manual The information in this manual applies directly to E5061B units with the serial number that is printed on the title page of this manual ...

Page 111: ...mber Serial Prefix or Number Make Manual Changes Table A 2 Manual Changes by Firmware Version Version Make Manual Changes Agilent Technologies uses a two part ten character serial number that is stamped on the serial number plate Figure A 1 The first five characters are the serial prefix and the last five digits are the suffix Figure A 1 Serial Number Plate Example ...

Page 112: ...111 B System Recovery B System Recovery This appendix describes how to recover the operating system Windows XP when the operating system has been damaged ...

Page 113: ...operating system and the firmware to the factory state at the time of purchase 1 The procedure of system recovery is described in Installation Guide Please refer to Agilent website below http www agilent com find ena_support 1 If the hard disk failed and has been replaced after purchase the state when the replacement was performed is recovered ...

Page 114: ...113 C Firmware Update C Firmware Update This appendix describes how to update the E5061B firmware When you want to update the E5061B firmware refer to this appendix ...

Page 115: ...ith keyboard and mouse USB mass storage How to update the E5061B firmware The firmware update procedure is described in E5061B WebHelp Please refer to Agilent website as below http ena tm agilent com e5061b manuals webhelp eng index htm product_information maintenance updating_firmware htm ...

Page 116: ...115 E Power Requirement D Power Requirement ...

Page 117: ...um power consumption 300 VA Power Cable In accordance with international safety standards this instrument is equipped with a three wire power cable When connected to an appropriate ac power outlet this cable grounds the instrument frame The type of power cable shipped with each instrument depends on country of destination Refer to Figure D 1 for the part numbers of the power cables available WARNI...

Page 118: ...Appendix D 117 Power Requirement Preparation for Power Supply E Power Requirement Figure D 1 Power cable options ...

Page 119: ...Press the standby switch in the lower left part of the front panel now in the pressed down position to the popped up position Send the shutdown command from an external controller These operations will start the E5061B shutdown process required software and hardware processes for turning the power off and the power will turn OFF after a few seconds NOTE Under normal circumstances always press the ...

Page 120: ...e the internal operating status of the equipment This appendix explains what these messages mean They are listed in alphabetical order Messages showing the status of the E5061B are displayed in the lower left area of the E5061B LCD screen These messages include error messages that occur during the ...

Page 121: ...nt Error messages are indicated following the character string Err and can be read out by a GPIB command Other kinds of messages are indicated without the Err character string and cannot be read out by a GPIB command This section explains the meaning of each message and how to resolve the problem it indicates ...

Page 122: ...lp Please kindly refer to Agilent Website below http ena tm agilent com e5061b manuals webhelp eng index htm product_information e rror_messages error_messages htm Warning Message A warning message is displayed in the instrument message Warning area in the lower left part of the display against a gray background Pushing a front panel key or executing DISP CCL command clears the message This messag...

Page 123: ...122 AppendixE Messages ...

Reviews: