178
Chapter 4
Troubleshooting
To Troubleshoot the Instrument
To Troubleshoot the Instrument
This section describes basic procedural flow of troubleshooting when servicing the
E5071C. The primary procedural tool in this section is the flowchart. The flowchart
contains entire troubleshooting path from a failure symptom to the isolation of faulty
assembly, and will direct you to the completion of repair in an ordinary manner through the
possible failure symptoms. Reference letters (Yes/No) on the flowcharts point to
procedural steps that briefly explain the troubleshooting method to be performed next.
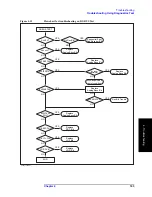
Primary Trouble Isolation
The primary trouble isolation procedure can be performed without disassembling the
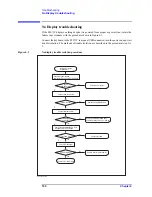
E5071C. Figure 4-2 shows the trouble isolation flow chart.
Step 1.
Turn the instrument power on
About a few minutes after the E5071C is turned on, the measurement view is displayed on
the screen. The display on the screen should be similar to Figure 4-8, “Measurement view,”
on page 185.
Step 2.
Check the display
•
If no display appears on the LCD after the E5071C is turned on, go to “No Display
troubleshooting” on page 180.
•
If the E5071C stops in booting process despite something being displayed on the LCD,
go to “Boot Process Troubleshooting” on page 182.
•
The power-on self test is performed once automatically after the E5071C measurement
view is displayed. If the power-on self test fails, go to “Troubleshooting Using
Diagnostics Test” on page 186.
Step 3.
Check the basic function
If the front-panel/keyboard/mouse controls, LCD display, data storage, remote interface or
another function (except for measurement part) does not work correctly, go to “Function
Specific Troubleshooting” on page 195.
Step 4.
Check the measurement function
If the instrument fails on performance test, go to “Performance test failure
troubleshooting” on page 202.
If the measurement function does not work correctly, perform the diagnostics test provided
in the E5071C's service function. When the diagnostics test fails, go to “Troubleshooting
Using Diagnostics Test” on page 186.
NOTE
The diagnostics test includes some unique measurement function tests in addition to the
tests that are common to the power-on self test. Thus, it is necessary to perform this test
even if the power-on self test passed.
Summary of Contents for E5071C
Page 14: ...14 Contents ...
Page 168: ...168 Chapter2 Performance Test E5071C Performance Test Record ...
Page 212: ...212 Chapter4 Troubleshooting To configure the CPU Mother Board Assembly and BIOS ...
Page 262: ...262 Chapter5 Replaceable Parts Power Cables and Plug Configurations ...
Page 326: ...326 Chapter6 Replacement Procedure Probe Power and Power Switch Board Replacement ...
Page 332: ...332 Chapter7 Post Repair Procedures Post Repair Procedures ...
Page 360: ...360 AppendixB System Recovery Calibration of the Touch Screen ...
Page 364: ...364 AppendixC Firmware Update Firmware Update ...
Page 365: ...365 D Power Requirement D Power Requirement ...


