Installation Note E8364-90011
17
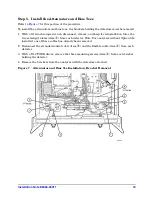
Step 7. Lower and Fasten the Receiver Deck and Connect the Bias Tee
Control Cables
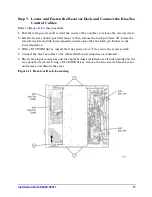
Refer to
for this procedure.
1. Pull the latch pin (item
②
) toward the center of the analyzer to release the receiver deck.
2. Lift the receiver deck to partially lower it, then release the latch pin (item
②
). Lower the
receiver deck to its fully lowered position and ensure that the latch pin latches in the
lowered position.
3. With a T-10 TORX driver, install the four screws (item
①
) to secure the receiver deck.
4. Connect the bias tee cables to the A16 motherboard connectors as indicated.
5. The dc bias input connectors and fuse holders (fuses included) are already installed on the
rear panel but covered. Using a T-10 TORX driver, remove the four screws from the cover
and remove and discard the cover.
Figure 11 Receiver Deck, Lowering


