background image


Data Analysis Features 

143 


Track Peaks ON OFF

  When Track Peaks is ON, markers will find the new 

peak with every sweep.  While in this Mode, the markers can NOT be turned 
OFF or moved.   


Find 3 Peaks

  Three markers are created and find the highest peaks (faults) 

on the trace. 

What Is a ‘Peak’ 

You define what the FieldFox considers a "peak" by setting the Peak 

Threshold


and Peak 

Excursion

.  

These two peak criteria settings are set individually for each trace and for each 
mode (CAT, SA, or NA). 

These settings do NOT survive a FieldFox or Mode Preset.  

NOTE


The Peak Threshold and Excursion settings are NOT available in DTF 
measurements. To make these settings, create a non-DTF CAT mode 
measurement, then change the measurement back to DTF. 

How to set Peak Criteria 


Press  

Mrk ->/Tools

.


In 

CAT and NA

 modes: 

o


Then 

Peak Search


In 

SA

 mode: 

o


Then 

More


o


Then 

Mkr Properties


Then 

Peak Criteria


Then select the following:  

o


Peak Threshold


 Minimum amplitude (dB). To be considered valid, the peak 

must be 

above

 the threshold level. The valley on either side can be below the 

threshold level. Default = –190 for CAT and NA Modes; –90 for SA Mode.  

Note:

 CAT mode Loss measurements are displayed in positive values. In 

these cases, the Peak Threshold setting is inverted. For example, Peak 
Threshold = -20 will consider any peak that has less Loss than 20 dB to be 
valid. 

o


Peak Excursion 

 The vertical distance (dB) between the peak and the 

valleys on both sides. To be considered a peak, data values must "fall off" 
from the peak on both sides by the excursion value. Default = 0.5 dB for CAT 
and NA Modes; 6 dB for SA Mode.  

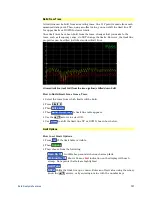
For example

, the settings for the trace in the following image are: 

o


Threshold: –10 dB 

o


Excursion: 1 dB 

o


Scale = 1 dB / Division. 

Summary of Contents for FieldFox N9912A

Page 1: ...Agilent FieldFox RF Analyzer N9912A User s Guide Manufacturing Part Number N9912 90001 Print Date October 01 2012 Supersedes September 04 2012 Agilent Technologies Inc ...

Page 2: ...d commercial license terms and non DOD Departments and Agencies of the U S Government will receive no greater than Restricted Rights as defined in FAR 52 227 19 c 1 2 June 1987 U S Government users will receive no greater than Limited Rights as defined in FAR 52 227 14 June 1987 or DFAR 252 227 7015 b 2 November 1995 as applicable in any technical data Technology Licenses The hardware and or softw...

Page 3: ...exception to your version of the library but you are not obligated to do so If you do not wish to do so delete this exception statement from your version ____________________________________________________________________________ Elements of this product s software use ANTLR Copyright c 2005 2008 Terence Parr All rights reserved Conversion to C Copyright c 2008 2009 Sam Harwell Pixel Mine Inc All...

Page 4: ...3 FieldFox High Temperature Protection 13 Avoid Overpowering the FieldFox 14 Take the FieldFox Tour 15 Front Panel 16 Top Panel 17 Side Panel 17 Screen Tour 18 How to Enter Numeric Values 19 CAT Cable and Antenna Test Mode 20 CAT Mode Settings 21 Return Loss Measurements 28 1 Port Cable Loss Measurements 28 2 Port Insertion Loss Measurements 30 DTF Distance to Fault Measurements 31 DTF Measurement...

Page 5: ...CPM Channel Power Meter Mode Option 311 118 Power Meter Settings 118 Power Meter Mode Option 302 121 Power Meter Settings 122 VVM Vector Voltmeter Mode Option 308 127 Overview 128 VVM Mode Settings 129 1 Port Cable Trimming Measurements 132 2 Port Transmission Measurements 133 Data Analysis Features 135 All about Markers 135 All about Limit Lines 145 All about Trace Math 148 File Management 151 Sa...

Page 6: ...atus 172 Charging the Battery 174 Reconditioning the Battery 175 Battery Care 176 Maximizing Battery Life 177 Lithium Ion Battery Disposal 177 Hardkey Softkey Menus 178 Safety Considerations 188 Certification and Compliance Statements 202 Appendix A Connector Care Review 203 Appendix B Specifications Data Sheet 204 Appendix C Instrument Calibration 205 Index 206 ...

Page 7: ...ased Resolution 26 NA mode Point Averaging 46 Increased Resolution 48 Manual Output Power Setting 49 Time Domain Opt 010 53 CPM Channel Power Meter mode New Mode Opt 311 118 Power Meter mode Step Detection 126 VVM mode Frequency setting to 1 Hz resolution 129 System Relative Limit Lines 146 Build Limits from Trace 147 Security Level 168 Instrument Calibration 205 ...

Page 8: ...General purpose measurements for basic monitoring and troubleshooting 100 kHz to 4 GHz Option 230 100 kHz to 6 GHz Option 231 SA Mode on page 69 Preamplifier for Spectrum Analyzer Option 235 On page 76 Interference Measurements Option 236 On page 105 Channel Power Meter Mode Option 311 No Power Meter required On page 118 Power Meter Mode Option 302 Use with Agilent External USB Power Sensors Power...

Page 9: ...n battery with 4 hr life Easily removable battery AC DC adapter External battery charger N9910X 872 On page 172 FieldFox Data Link Software Easily manage files and compile reports Reads data from the FieldFox and plots traces Help file included with the software installation Download the latest version of the software at http www agilent com find fieldfox Additional Features Menus localized to 7 l...

Page 10: ...ally and follow these color conventions Softkey Blue indicates an available setting Softkey Green indicates a change in menu level when selected Softkey Black indicates the default or selected setting Softkey Yellow indicates an active entry in process Softkey Grey indicates a key that is NOT available Safety Notes The following safety notes are used throughout this manual Familiarize yourself wit...

Page 11: ...ur ordered options are included in the shipment according to the Box Contents List 3 For any question or problems refer to Contacting Agilent on page 2 Meeting Power Requirements for the AC DC Adapter Voltage 100 VAC to 250 VAC Frequency 50 Hz to 60 Hz Current 1 25 0 56 A The AC DC adapter supplied with the analyzer is equipped with a three wire power cord in accordance with international safety s...

Page 12: ... life A lithium ion battery has no memory effect so it can be used partially charged as shipped A fully charged battery will power your FieldFox for about four hours so if you plan to use it for this long you should fully charge the battery NOTE The FieldFox will shut down to prevent the battery from discharging to a level that is damaging If this occurs charge the battery either internally or ext...

Page 13: ...can be fully charged externally using the external battery charger Opt 872 in about 4 hours When the battery is removed the FieldFox can still be powered by the AC DC adapter FieldFox ON OFF Settings To turn power ON briefly press the power button The LED is green Boot up takes about 1 minute To switch to Stand By mode low battery drain briefly press the power button The LED is orange and blinks T...

Page 14: ...situations Temperature Control mode may not stop an increase in the FieldFox internal temperature At approximately 75 C High Temperature Shutdown will engage and turn OFF the FieldFox Just prior to shutdown the FieldFox will display a warning of imminent shut down Avoid Overpowering the FieldFox The FieldFox can be damaged with too much power or voltage applied Exceeding the maximum RF power level...

Page 15: ...Preparing for Initial Use of Your New FieldFox 15 Take the FieldFox Tour Front Panel ...

Page 16: ... recalls saved data from memory 151 11 Limit Sets limit lines for quick Pass Fail judgment 145 12 Run Hold Toggles between free Run and Hold Single operation 159 13 Cal Displays a submenu for calibration functions 53 14 Arrow keys Increases or decreases a value or setting 15 Back Returns to the previous menu selection 16 Rotary knob Highlights an item for selection or enables incremental changes t...

Page 17: ... 27 dBm RF SA Mode on page 69 Side Panel Caption Description Learn More Ethernet cable connector to read trace data using the FieldFox Data Link Software Download the latest version of the software at http www agilent com find fieldfox Reserved for future use DC power connector used to connect to the AC DC adapter Maximum 19 VDC 4 ADC On page 12 Micro Secure Digital slot Use to extend the memory o...

Page 18: ...pendent 9 Data Mem Display CAT and NA Step FFT SA 148 Trace Math 80 Res BW 10 Resolution Setting Mode dependent 11 Measurement Start Freq or Distance Mode dependent 12 Bandpass Lowpass setting Fault Meas IF BW in NA Mode 34 13 Output Power Level CAT and NA 27 14 Measurement Stop Freq or Distance Mode dependent 15 Actual Sweep Time Mode dependent 16 Limit Line Status 145 17 Time and Date 165 18 Mar...

Page 19: ...eviously entered values Esc exits data entry without accepting the new value To complete the setting Press Enter or a different softkey or hardkey Multiplier Abbreviations Many times after entering numeric values a set of multiplier or suffix softkeys are presented The following explains the meaning of these abbreviations Select Frequency multipliers as follows GHz Gigahertz 1e9 Hertz MHz Megahert...

Page 20: ...ed on page 31 In this Chapter Measurement Selection 21 Dual Trace Configurations 22 Coupled Frequency 23 Quick Settings 22 Frequency Range 24 Scale Settings 24 Averaging 25 Single Continuous 26 Resolution 26 Sweep Time 26 Output Power 27 Interference Rejection 27 Procedures Return Loss Measurement 28 1 Port Cable Loss Measurement 28 2 Port Insertion Loss Measurement 30 Distance to Fault Measuremen...

Page 21: ...y settings that are used to make the DTF measurement This pair of measurements is created as a Dual Trace configuration Learn more on page 22 o Return Loss 1 port reflection measurement that displays the amount of incident signal energy MINUS the amount of energy that is reflected The higher the trace is on the screen the more energy being reflected back to the FieldFox Learn how to measure Return...

Page 22: ...e configuration Press Trace 6 Then Num Traces Then choose from the following The default measurements depend on the options that are installed x1 1 trace standard configuration x2 2 traces overlayed on a single graticule x2H 2 traces on separate horizontal graticules How to activate a trace in order to change the measurement or a setting Use the arrows OR Press Trace 6 then select Trace 1 or Trace...

Page 23: ...default setting Both traces have the same frequency range settings Coupled Frequency OFF Both traces are allowed to have individual frequency range settings When set to OFF The non DTF measurement frequency settings are made in the usual manner Learn how on page 24 When a new Start or Stop frequency is selected Coupled Frequency is automatically set to OFF The DTF measurement is made using the fre...

Page 24: ...ow When finished changing ALL settings press Done to save your settings Frequency Range Set the range of frequencies over which you would like to make CAT Mode measurements When the frequency range is changed after a calibration is performed the cal becomes interpolated Learn more on page 65 How to set Frequency Range Press Freq Dist Then choose from the following o Start and Stop frequencies begi...

Page 25: ...the Bottom graticule o Enter a negative value by pressing Run Hold either before or after typing a value Scale annotation on the FieldFox screen Reference Line red arrow Ref Level 40 dB Ref Position 1 Scale 2 dB per division Averaging Trace Averaging helps to smooth a trace to reduce the effects of random noise on a measurement The FieldFox computes each data point based on the average of the same...

Page 26: ...tinuous Makes continuous measurements This is the typical setting when battery power is not critical You can also use Run Hold to toggle between Single and Continuous Resolution Number of Data Points Data points are individual measurements that are made and plotted across the X axis to form a trace Select more data points to increase measurement resolution However more data points require more tim...

Page 27: ...elp prevent damage to your DUT when Output Power is changed in CAT Mode it is changed to the same value in NA Mode How to set Output Power Press Meas Setup 4 Then Output Power High Low The underlined value is the current setting o High Sets output power to approximately 5 dBm o Low Sets output power to approximately 25 dBm Interference Rejection Use this setting when you suspect that other signals...

Page 28: ...n CAT Cable and Antenna Test Then Return Loss Default measurement Press Freq Dist and enter Start and Stop frequency values of the measurement Press Meas Setup 4 then Settings to make appropriate settings before calibrating Disconnect the cable or DUT and press Cal 5 then follow the calibration prompts Reconnect the cable or DUT The return loss trace is displayed on the FieldFox screen NOTE If the...

Page 29: ... OSL 8 Follow the prompts to perform calibration at the end of the jumper cable or adapter Learn more about Calibration on page 62 9 Connect the cable to be tested NOTE Low level standing waves also also known as ripple which may be visible in reflection measurements can hide the actual loss of the cable Steps 10 through 13 can minimize the ripple Perform the measurement with and without steps 10 ...

Page 30: ...erally more accurate than 1 port Cable Loss measurements NOTE A Normalization Cal is REQUIRED for making accurate 2 port CAT or NA measurements Learn how on page 64 For highest accuracy when measuring the DUT also attach any cable or adapter that was used in the normalization cal How to make a 2 port Insertion Loss Measurement 1 Press Mode then CAT 2 Then More then Insertion Loss 2 Port 3 Press Fr...

Page 31: ...ers 135 Limit Lines 145 Save Measurement Settings and Results 151 Trace Math is NOT available in DTF Measurements How to make DTF Measurements Before starting you may need the following Jumper cable or adapter to connect the beginning of the DUT to the FieldFox LOAD with correct connector type and gender to terminate the end of the DUT if possible The known length and cable type of the DUT If the ...

Page 32: ...ress Next Page and Previous Page to view all settings To change a setting o Use the arrows or rotary knob to highlight a setting o Numeric settings can be changed by pressing numbers using the numeric keypad Then press Enter or select a suffix if available o Other settings require you to press Edit then press a softkey to change the value o When finished changing a value press Done Edit Press Dock...

Page 33: ...ng o Start Distance Enter a value using the numeric keypad the arrows or the rotary knob then Enter By default the Start Distance is set to 0 Meters This means that the measurement will display faults starting at the point at which calibration standards are connected o Stop Distance Enter a value between the start distance and 5 km or 16 404 ft using the numeric keypad the arrows or the rotary kno...

Page 34: ...or the DTF measurement These exact frequencies may not be used but a narrower frequency range may be used that will still pass through the bandpass filter To see the frequencies that are used in the DTF measurement press Meas Setup 4 then Settings then Next Page The calculated Start and Stop frequencies determine the exact frequency range being used Coupled Frequency When both a DTF and non DTF me...

Page 35: ...show 0 dB for 100 reflection How to enter Cable Loss and Velocity Factor Cable Loss and Velocity factor can be entered using one of the following methods Manually enter cable loss and velocity factor for the measurement Select or create a cable file which contains the cable loss and velocity factor With a DTF measurement present Press Meas Setup 4 Then DTF Cable Specifications Select Cable Corr o ...

Page 36: ...nd resets header information to default settings Press Done to close the Cable Editor How to Save or Recall a Cable Press Save Cable to saves your changes to the specified Storage Device Enter a filename using the FieldFox labeler learn more on page 151 Learn more about Cable files below Press Recall Cable to load a Cable file from the specified Storage Device Storage Device Changes the device use...

Page 37: ... for loss for travel down the DUT and back so double the correction 0 9 dB 2 1 8 dB Window Settings Window settings provide the ability to choose between optimizing DTF measurements for resolving closely spaced faults or for the ability to measure low level faults How to select Window settings Press Meas Setup 4 Then Settings Then press arrows to move to the Window row Then press Edit Then press W...

Page 38: ... Vf c Points 2 Bandwidth where o Vf velocity factor o c speed of light o Points resolution o Bandwidth frequency range Alias free Range On Off o On No Alias images o Off Alias images may appear in the response About Alias Faults An alias fault is not a true device response An alias fault appears because of the method used to convert frequency to time On the DTF Settings page above the c Alias free...

Page 39: ...e NOT alias faults These faults appear as the signal reflects off the open at the end of the cable and travels back down the cable toward the connection at the FieldFox Re reflections are measured at the FieldFox as mirror images of the original faults The largest fault is the open end of the cable To avoid confusion set the Stop distance shortly after that fault ...

Page 40: ...ndwidth 47 Smoothing 47 Single Continuous 47 Resolution number of points 48 Sweep Time 48 Output Power 49 System Impedance 49 Port Extensions 50 Velocity Factor 50 S21 Transmission Measurement 52 Increase Dynamic Range 52 See Also All about Calibration 53 Set Markers 135 Use Limit Lines 145 Use Trace Math 148 Learn how to make 75Ω ohm Measurements in the Supplemental Online Help www agilent com fi...

Page 41: ...are only useful for making relative measurements The Y Axis and markers are labeled in dB NOT dBm Specifically R1 does NOT indicate the actual power levels out of the source port The actual power level is close to the typical output power of 5 dBm High power and 25 dBm Low power Learn more about raw receiver measurements in the FieldFox Supplemental Online Help www agilent com find fieldsfoxsuppor...

Page 42: ...parate horizontal graticules X3 3 traces overlayed on a single graticule x4 4 traces on separate graticules How to activate a trace in order to change a setting Use the arrows OR Press Trace 6 then select Trace 1 Trace 2 Trace 3 or Trace 4 Only traces that are shown can be activated How to maximize the viewing of the active trace Press System 7 Then Full Screen Press any key to return to the stand...

Page 43: ...E Learn more about Display Formats in the FieldFox Supplemental Online Help www agilent com find fieldsfoxsupport How to select a NA Format Press Measure 1 Then Format current setting Then choose from the following o Log Magnitude Displays magnitude in dB o Linear Displays positive values only Y axis Unitless U for ratioed measurements Watts W for unratioed measurements o VSWR S11 and Fault Locati...

Page 44: ... end of the sweep 2 Center and Span frequencies Specify the center frequency and span of frequencies half on either side of center Follow each by entering a value using the numeric keypad the arrows or the rotary knob After using the arrows or the rotary knob press Enter The increment setting of the arrows is based on the current span and can NOT be changed in NA Mode After using the keypad select...

Page 45: ...asurement trace To apply an electrical delay to all measurement traces use Port Extensions Learn how on page 50 Phase is available only with S11 measurements NOT S21 Learn how to set Phase formats on page 43 How to set Electrical Delay Press Scale Amptd Then More Then Electrical Delay Enter a time value using the numeric keypad the arrows or the rotary knob Press a multiplier key Learn about multi...

Page 46: ...erform the calibration but there will be less noise in the resulting error terms which means that subsequent measurements will also have less noise In addition noise is further reduced by continuing to average after calibration How to set Averaging Press BW 2 Then Average n where n is the number of measurements to average Enter a value using the numeric keypad Enter 1 for NO averaging Press Enter ...

Page 47: ...othing aperture Aperture is set by specifying a percentage of the X axis span Trace smoothing does NOT significantly increase measurement time Smoothing is used in Group Delay measurements although it can be used with any NA format EXCEPT Polar or Smith Chart Learn more about NA Mode formats including Group Delay on page 43 When enabled Smo appears on the FieldFox screen How to set Smoothing Press...

Page 48: ... set Resolution Press Sweep 3 Then Resolution Then choose from the following 101 201 401 601 801 1001 1601 4001 10001 Using SCPI Resolution can be set to ANY number of points between 3 and 10001 See the Programming Guide at www agilent com find fieldsfoxsupport Sweep Time The fastest possible sweep time is always used as the default setting Use the Min Swp Time setting to slow the sweep time when ...

Page 49: ...ayed FieldFox frequency span Please see the FieldFox Specifications on page 204 for expected power levels o Low Sets output power to approximately 45 dBm FLAT across the displayed FieldFox frequency span o Man Set output power to an arbitrary value FLAT across the displayed FieldFox frequency span If flattened power can NOT be achieved a warning message and beep occurs To achieve a flattened outpu...

Page 50: ...the FieldFox that you have added the length to a specific port With S11 the FieldFox doubles the port extension valued that you enter to account for the additional delay in the forward and reverse directions Port extensions and Electrical Delay differ in the following ways Electrical delay is applied to a specific trace Port extensions are applied to specific ports Port Extensions and Electrical D...

Page 51: ...vailable with option 110 is used to measure the loss through a DUT or cable over a specified frequency range The FieldFox signal source is transmitted out the RF OUT connector through the DUT and into the RF IN connector Both ends of the DUT must be connected to the FieldFox An S21 measurement is exactly the same measurement as 2 Port Insertion Loss in CAT Mode NOTE A Normalization Cal is REQUIRED...

Page 52: ...ion band of a base station filter The following steps MAY help you increase the dynamic range of your NA Mode measurement The results you see will depend on the performance of your DUT 1 Set Start and Stop frequency 2 Press Meas 4 then Output Power High 3 Lower the IFBW Press BW 2 then IF BW then 300 Hz 4 Increase Averaging Press BW 2 then Average then enter 10 5 Select S21 6 Perform a Normalizati...

Page 53: ... Window Layout 56 Transform Window 56 Line Loss and Velocity Factor 57 Data Chain 58 Trace Settings Transform Enable 58 Gating Enable 58 Gating Settings Start Stop Center and Span Gate Times 59 Gating Type 59 Overview In normal NA Mode operation the FieldFox measures the characteristics of a test device as a function of frequency With Time Domain opt 010 frequency information is used to calculate ...

Page 54: ... most of the Time Domain settings on the Transform Settings table Transform Settings Table The following settings are listed in the order they appear on the Transform Settings menu selection How to make settings on the Transform settings table Press Meas Setup 4 Then Transform Then Transform Settings Press Next Page and Previous Page to view all settings To change a setting o Use the arrows or rot...

Page 55: ...C and negative frequencies are extrapolated Therefore when either Lowpass mode is selected Set Freq Low Pass is automatically applied to adjust the start frequency Learn more about Set Frequency Lowpass below When the Start Frequency or resolution is changed AFTER selecting a Lowpass mode then Stimulus mode is set to Band Pass and Transform is disabled Band pass Easiest method can be used with any...

Page 56: ...stance Select the units in which the marker distance data is presented Distance Units are also used when setting Time Domain Line Loss Learn more on page 57 Choose from m meters or Feet Window Layout This setting is used to create additional traces or select a new layout for traces that are already created Choose from x1 x2 x2H x3H x4 Learn more about multi trace configurations on page 41 Transfor...

Page 57: ...the physical material of a cable A VF of 1 0 corresponds to the speed of light in a vacuum or the fastest VF possible A polyethylene dielectric cable has VF 0 66 and a cable with PTFE dielectric has VF 0 7 o Line Loss is specified in dB m or ft In addition to the length of the cable loss is also directly proportional to the frequency of the signal that passes through the cable The following is an ...

Page 58: ...8510 The data processing chain used by the Agilent 8510 network analyzer Transform calculations are performed BEFORE error correction and trace math Learn more at the FieldFox Supplemental Online Help website http na tm agilent com fieldfox help FieldFox htm Trace Settings The following two settings apply to specific traces Transform Enable Enable Time Domain transform for the specific trace Selec...

Page 59: ... does NOT compensate for this How to make Time Domain Gating settings Press Measure 4 Then Transform Then Gating Then choose from o On Gating is being performed o Off Gating is NOT being performed Start Stop Center and Span Gate Times These settings specify the time in the trace to be gated in or out The gate times can be specified using either Start and Stop or Center and Span Press Gating Start ...

Page 60: ...me T2 is the time between the edge of the passband and the 6 dB point representing the cutoff rate of the filter T3 is the time between the 6 dB point and the edge of the gate stopband For all filter shapes T2 is equal to T3 and the filter is the same on both sides of the center time Minimum gate span is twice the cutoff time Each gate shape has a minimum recommended gate span for proper operation...

Page 61: ...stood systematic errors that are measured and calculated during the calibration process These errors are caused by leakage signals inside the FieldFox by the frequency response of the FieldFox receivers and by reflections inside the FieldFox that interact with the DUT After calibration these errors are removed from subsequent measurements To maintain highest measurement accuracy perform a new cali...

Page 62: ...alibration also known as CalReady Every FieldFox is factory calibrated at the RF Out connector over the entire frequency range of the FieldFox using a number of data points that allows reasonable interpolation over the FieldFox frequency range This CalReady condition allows you to start using your FieldFox immediately if you are measuring a device that is directly connected to the RF Out test port...

Page 63: ...en making DTF measurements press Skip Load This step does little to improve accuracy Press Finish Cal ON Q is shown on the screen when a QuickCal is correcting the measurement O S L Cal An OPEN SHORT LOAD Cal is performed using discrete standards from a Cal Kit Several Cal Kit definitions are built into the FieldFox firmware In addition Cal Kits can be edited and uploaded to the FieldFox using Dat...

Page 64: ...e correctly applied to obtain the most accurate calibration Then press Start Cal Press Open Short and Load in any order Connect the corresponding standard at the point where the DUT will be connected then press Measure Measure each of the three standards Standards can be measured again at any time if you feel a standard was not connected securely Press Finish to complete the O S L calibration Norm...

Page 65: ...terisk is added to the screen annotation as follows Cal ON For highest accuracy a new cal should be performed when the temperature changes more than about 10 F 5 C or when the connection to the DUT requires a different jumper cable or adapters How to turn Error Correction OFF Error Correction is applying the results of a calibration to a measurement Error Correction is automatically turned ON afte...

Page 66: ...e Frequency Range Resolution Power Hi Low and IF BW in NA Mode settings of the two calibrations are identical When both conditions occur you can switch between the 1 port and the 2 port measurements and both will remain fully calibrated In a DTF measurement the frequency range over which the calibration is made can be viewed using the calculated Start and Stop Frequency on the Settings page Learn ...

Page 67: ...e significant movement in the peaks of the measurement trace when moving the cable 5 dB the jumper cable may need to be replaced Using QuickCal to Calibrate at the End of a Long Cable The QuickCal process requires that there be sufficient resolution data points to unwrap the cable reflection phase correctly This requirement is met by having a step frequency frequency span between data points with ...

Page 68: ...uickCal should be performed when good accuracy is required and when using a jumper cable or adapter o During QuickCal do NOT Skip Load when measuring a DUT with good match Return Loss better than 15 dB Preset Cal is ONLY useful for DUT connections made at the RF Out port and most accurate at room temperature For highest accuracy a new QuickCal or O S L Cal should be performed o when the temperatur...

Page 69: ...cs App Note 150 at http cp literature agilent com litweb pdf 5952 0292 pdf SA display with markers Carrier with 5 kHz frequency modulation and deviation of 1 kHz In this Chapter Frequency Range 70 Radio Standard 72 Channel Selection 73 Scale and Units 74 External Gain 75 Attenuation and Preamp Control 75 Check for Compressed Measurements 77 Field Strength Measurements 77 Tune and Listen 80 Indepen...

Page 70: ...ram Display 105 Waterfall Display 108 Record Playback 109 Optional settings Markers 135 Limit Lines 145 Save Measurement Settings and Results 151 SA Mode Settings Select SA Mode before making any setting in this chapter Because there is no calibration these settings can be made in any order How to select SA Mode Press Mode_ Then SA Frequency Range The X axis frequency range determines the frequenc...

Page 71: ...side of center When the Center and Frequency Span values are entered then the X axis annotation on the screen shows the Center and Span frequencies o Start and Stop frequencies Start is the beginning of the X axis and Stop is the end of the X axis When the Start and Stop frequencies are entered then the X axis annotation on the screen shows the Start and Stop frequencies Follow each of these by en...

Page 72: ...below the X axis After a Radio Standard has been selected the frequency range can be changed by selecting channel numbers rather than frequency Learn how on page 73 When a Channel Measurement is selected such as ACPR other relevant settings will be changed such as Integration BW Learn more about Radio Standards and Channel Measurements on page 96 How to select a Radio Standard Press Measure 1 OR F...

Page 73: ...cy Once enabled the channel number is appended to the X axis frequency range How to enable Channel selection Press Freq Dist Then More Then Unit Freq Chan How to change the Channel Number of the measurement With Unit Chan the FieldFox will NOT allow you to specify channels outside of the selected Radio Standard Press Freq Dist Then choose from the following o Center Channel Places the center frequ...

Page 74: ... shows the Center Freq Channel and Frequency Span When Start or Stop Channel is specified the X axis shows the Start Freq Channel and Stop Freq Channel Change Channel Step Size Optional This setting allows you to use the arrows to increment the channel number by the specified value Press Channel Step Enter a step value using the numeric keypad the arrows or the rotary knob Then press Enter Scale a...

Page 75: ... fit the Min and Max amplitude of the trace on the screen How to set Y axis Units The Unit setting appears for the reference line marker readouts and trigger level All Unit choices are available in both Log and Linear Scale Types The UNIT setting survives Mode Preset but NOT Preset Press Scale Amptd then More then Unit Then choose from the following o dBm default setting dBmV dB milli Volts dBuV d...

Page 76: ...automatically adjusted for RF Attenuation As the attenuation value changes the displayed power level should NOT change How to set Attenuation The default Attenuation setting is 10 dB This value can be changed from 0 to 31 dB in 1 dB steps Press Scale Amptd Then RF Atten Auto Man Auto RF Attenuation is set by adjusting the Reference Level As the Reference Level is lowered for example from 10 dB to ...

Page 77: ... to Check for a Compressed Measurement Using a marker at the signal peak make note of the signal power level Increase the RF Attenuation level by 5 dB o If the signal level does NOT change then NO compression exists This indicates that the signal is in the linear region of the FieldFox receiver o If the signal level DOES increase then the receiver was compressed Set the RF Attenuation value at the...

Page 78: ...ield Strength measurements The Antenna and Cable correction data survives a Mode Preset and Preset All Correction ON OFF states survive a Mode Preset but NOT a Preset Press Scale Amptd Then More Then Corrections Then choose from the following o Apply Corrections ON OFF Turn ON and OFF correction for all settings o Antenna ON OFF Turn ON and OFF Antenna correction o Edit Save Recall Antennas Recall...

Page 79: ...Freq Value pairs from the table and resets header information to default settings When the table edits are complete Press Done to closes the Antenna Cable Editor Press Save Antenna or Save Cable to saves your changes to the specified Storage Device Enter a filename using the FieldFox labeler learn how on page 151 Learn more about Antenna and Cable files below Press Recall Antenna or Recall Cable t...

Page 80: ...ed from older Agilent Spectrum Analyzers Data Link does NOT support the SA Mode cable or antenna csv or ANT files Learn more about Data Link software at www agilent com find fieldfoxsupport How to create a Cable file from an S21 NA mode measurement 1 Measure the S21 of a cable Learn how in NA Mode on page 51 2 Use Manage Folders to change the active folder to CABLES Learn how to manage folders on ...

Page 81: ...Wide bandwidth Choose for high quality music transmissions of FM broadcast radio Tune Frequency The Tune Listen tuner is separate from the SA display This allows you to listen to one frequency while displaying a different range of frequencies Set the Tune Frequency using one of three methods 1 Selecting Preset Mode Preset or Meas Preset sets Tune Frequency to 3 0 GHz 2 Specify Tune Frequency Press...

Page 82: ...p 4 Then Volume Enter a value in percent between 0 and 100 loudest using the numeric keypad arrows or the rotary knob Volume can also be changed and easily muted from the System menu Learn more on page 160 Demod ON and OFF To quickly stop the audio demodulation and perform only the normal SA sweeps select the following Press Meas Setup 4 Then Demod ON OFF Independent Source Tracking Generator A tr...

Page 83: ...xis 0 dBm if UNIT is set to dBm SrcN is annotated on the screen Normalize is automatically turned OFF when the frequency range or Resolution is changed Learn more about Trace Display States on page 89 Source Power Sets the source power from 45 dBm to 0 dBm in 1 dB steps NOTE The FieldFox output power is approximate and NOT flat across the frequency range Source CW Freq Sets the CW frequency that i...

Page 84: ...e smoothing occurs as the Video BW is set lower However as the Video BW is narrowed the sweep speed becomes slower How to set VBW Press BW 2 Then Video BW Auto Man o Auto Couples Video BW to the ResBW in a 1 to 1 ratio o Man Enter a Video BW value using the numeric keypad the arrows or the rotary knob Then press a multiplier if necessary or press Enter NOTE To change this setting from Man to Auto ...

Page 85: ...ate rate However you can adjust this setting in order to increase the probability of intercepting and viewing pulsed RF signals For example with SwpAcquisition set to Auto a pulsed GSM signal is NOT visible on the FieldFox screen as shown in a blue trace in the following image However while watching the trace increase the SwpAcquisition value until the pulse spectrum rises out of the noise and rea...

Page 86: ... Span Measurements When setting the frequency span to Zero there is NO spectrum of frequencies to display so the X axis units becomes Time The SA becomes like a tunable oscilloscope with the center frequency being the frequency of interest This capability is useful for analyzing modulation characteristics such as pulsed measurements GSM signal framed data format timeslot 0 and 3 on Sweep Time is s...

Page 87: ... at www agilent com find fieldsfoxsupportFieldFox htm NOTE The following Trigger Settings are available ONLY when performing an FFT sweep or when in Zero Span Learn more about FFT on page 84 Learn more about Zero Span on page 86 Trigger Type Press Sweep 3 Then Trigger Settings Then Trig Type Then choose from the following o Free Run Triggering is provided by the FieldFox internal circuitry A new s...

Page 88: ...or positive slope will initiate a sweep The Units depend on the Scale Type setting Log or Linear Learn more on page 74 The Video Trigger Level is a time domain Zero Span signal level comparison Therefore the sweep will trigger close to the displayed level in Zero Span measurements In frequency span measurements processing can cause broadband signal energy to display at lower power levels than the ...

Page 89: ...ch Run Hold or Single press causes the SA to make ONE sweep then Hold The Hold annotation changes to an arrow while the sweep occurs o Single Automatically sets Continuous OFF and causes the SA to make ONE sweep then Hold o Restart Resets the Average counter to 1 When in Hold causes the SA to make ONE sweep then Hold The Average counter has is used with MaxHold and MinHold Trace States Learn more ...

Page 90: ...Displays no trace Press Default All to return all traces to their default settings Trace 1 Clear Write all other traces Blank NOTE Trace 4 data WILL be overwritten by the FieldFox when using the Independent Source Normalize feature page 80 or using Field Strength antenna or cable corrections page 77 Average Type In SA Mode there are four different processes in which Averaging is performed Average ...

Page 91: ...verage counter is shown in the left edge of the screen below the Average Type For all three of these Trace States when Sweep 3 Continuous is set to OFF press Restart to reset the sweep count to 1 perform n sweeps then return to Hold How to set Average Count Press Meas Setup 4 Then Average Count Enter a value from 1 to 10 000 using the numeric keypad the arrows or the rotary knob Press Enter Detect...

Page 92: ...lassified as noise does NOT rise and fall then Normal is equivalent to Positive Peak o Positive Peak Pk Displays the maximum value of all the measurements in each bucket This setting ensures that no signal is missed However it is not a good representation of the random noise in each bucket o Negative Peak NPk Displays the minimum value of all the measurements in each bucket o Sample Smp Displays t...

Page 93: ...o accurately measure noise the Noise Marker should NOT be placed on or too close to a signal The distance from a signal depends on several factors To know if an accurate reading is being made move the Noise Marker until consistent measurements are displayed in adjacent data points In addition when a Noise Marker is displayed the Detection method is automatically switched to Average and PAvg is sho...

Page 94: ... change to Power average Other Detection methods or Averaging type settings will usually cause measurement inaccuracy Learn more about Detection method on page 91 and Averaging Type on page 90 Summary In Zero span an Interval Power Marker yields the average power over the specified time interval In non Zero span a Band Power Marker yields the total power over the specified frequency range How to m...

Page 95: ...each frequency count update requires another sweep If the FieldFox is in HOLD press Single to update the frequency count results Audio Beep at Marker Power When enabled the Audio Beep feature emits a repetitive beep sound which varies in tone pitch and repetition rate to indicate the relative power level of the active marker The highest tone pitch and fastest beep rate occurs when the marker Y axi...

Page 96: ...ore the current data trace does not match the screen annotation See the asterisk on page 69 Channel Measurements The following Channel Measurements are offered in SA Mode Channel Power 97 Occupied Bandwidth 99 Adjacent Channel Power Ratio 100 The following four sections Radio Standards and Channel Measurements Measurement Preset Averaging and Traces are relevant for ALL Channel Measurements Radio ...

Page 97: ... the average of the last 15 measurements When enabled this average setting is automatically making the following averaging settings in order to provide the most accurate power measurements Averaging Type is set to Power Trace State is set to Average Detector is set to Average Count is set to 15 Any of these settings can be changed manually during a Channel measurement Learn more about these settin...

Page 98: ... Attenuation Integration Bandwidth When Channel Power is selected vertical posts appear on the display to mark the current Integration Bandwidth setting The displayed Channel Power and Power Spectral Density values are measured and calculated over the specified Integration Bandwidth By default the displayed frequency span is automatically coupled to the Integration Bandwidth As you change the Inte...

Page 99: ...ting on page 103 Occupied Bandwidth Occupied Bandwidth measures the power of the displayed frequency span and displays vertical posts at the frequencies between which the specified percentage of the power is contained The frequency span between the two vertical posts is the Occupied Bandwidth The Occupied Power the power that is contained between the two posts is also displayed in dBm OBW measurem...

Page 100: ...cent Press Meas Setup 4 Then Power Percent Enter a value between 10 and 99 99 using the numeric keypad arrows or the rotary knob Press Enter Other Occupied Bandwidth Settings All relevant FieldFox settings are made automatically to ensure the highest accuracy such as ResBW VideoBW and sweep SwpAcquisition speed These and all other SA Mode settings can be changed manually in a Occupied Bandwidth me...

Page 101: ...jacent Channel Power When ACPR is selected the following settings are maintained from a previous measurement Center Frequency Preamp ON OFF and RF Attenuation Frequency Range Channel When a Radio Standard is selected the appropriate center frequency or channel and span is set automatically The frequency or channel number can then be changed from the Freq Dist menu Learn how to select a Radio Stand...

Page 102: ...an offset Then Offset State to set that offset ON or OFF Select Offset Freq This is the difference between the carrier center frequency and the center frequency of the offset channel Then enter a value using the numeric keypad Select Offset Integ BW This is the frequency range over which power is measured in that offset half of the range below and half above the Offset Freq How to set limits for a...

Page 103: ... subtracting the measured carrier power from the measured offset power Man dB or dBc value is computed by subtracting the entered RefValue from the measured offset power o Press Ref Value o Then enter a value to be used to reference the data using the numeric keypad arrows or the rotary knob Other ACPR Settings All relevant FieldFox settings are made automatically to ensure the highest accuracy su...

Page 104: ...ally when included in a selected radio standard To set and enable RRC Weighting Press Meas Setup 4 Then RRC Weighting ON OFF Then More Then RRC Alpha current setting Enter a value between 0 no smoothing and 1 most smoothing using the numeric keypad arrows or the rotary knob A standard level of filtering is 22 Press Enter ...

Page 105: ... visual history of the measured spectrum Each display type can be used to locate intermittent signals or to view signal levels over time Spectrogram is a single horizontal line of color coded power while Waterfall uses a 3 D color coded display The functional difference between these two displays is that Spectrogram provides less trace detail than Waterfall display However it also allows more trac...

Page 106: ...n more on page 89 How to select Spectrogram Press Meas 1 Then Interference Analysis Then Spectrogram How to modify the Spectrogram You can change how the spectrogram is displayed relative to the data trace This setting affects the total number of trace records that can be displayed Press Meas Setup 4 Then Spectrogram Settings Then Spectrogram View Then choose from the following o Overlay Displays ...

Page 107: ...lways be less than the Red limit Press Meas Setup 4 Then Spectrogram Waterfall Settings Then choose from the following o Red Limit Using the arrows rotary knob or keypad select the HIGHEST power level that you expect to measure This power level and those measured higher than this level appear Red o Blue Limit Using the arrows rotary knob or keypad select the LOWEST power levels that you expect to ...

Page 108: ...tart Averaging Averaging can be enabled on the underlying measurement Press Trace 6 then State Average Learn more on page 89 Measurement Preset Measurement Preset resets ONLY the Spectrogram and Waterfall display settings It does not reset the measurement settings Press Preset Then Meas Preset Waterfall Display The live trace is always drawn on a Waterfall display Older trace records scroll up fro...

Page 109: ...ased space between records Learn how to set Red and Blue Limits and Time Markers on page 107 Record Playback Record Playback allows you to record SA trace sweeps and play them back at a later time Use this feature to monitor spectrum activity over a period of time You can record traces continuously record a specified number of traces segments or record when triggered by a specified power level Tra...

Page 110: ...an determine the length of time over which recording can occur by setting the Record Interval the time between recorded traces and other settings Learn more in Recording Configuration on page 113 To view and edit the maximum number of records Just after opening or initiating a session Press Session Data Then Trace Record Limit n n Max number of traces that can be recorded Clear All Records Empties...

Page 111: ...sted above are changed during a recording a state tag is inserted at the first trace number to be recorded with the new setting In addition you can insert a User Tag at any time during a recording session to indicate an external event such as when an antenna is moved During playback you can move quickly to any of these tags or scroll through these tags A symbol is used on the screen annotation to ...

Page 112: ...ft of screen graticules During recording choose from the following Pause Resume Temporarily halts recording until pressed again The incoming trace continues to sweep Press again to continue recording Stop Immediately stops recording Then choose from the following o Press Play to start replaying the recording from the beginning o Press Record to continue recording User Tag Press to insert a User Ta...

Page 113: ...ange Configuration settings or Close the session Recording Configuration To change Recording Configuration settings Press Trace 6 Then Record Playback Setup Then New Session or Recall an existing session Then Recording Configuration Then choose from the following o Record Time Sets the amount of time to record traces Default is MAX which is to record indefinitely Enter a value between 1s and 1 Ms ...

Page 114: ...nt Count to 1 o To record ALL traces after a limit is exceeded set Segment Count OFF When used with Record Time the timer counts down even when traces are not being recorded limits are not being exceeded Recording starts when a limit is exceeded and stops when the timer reaches 0 When used with Record Interval a trace is recorded when a limit is exceeded then no recordings during the specified wai...

Page 115: ... processing but before any trace state processing Data can be recorded from Traces 1 2 3 or 4 which includes the trace state Max Hold Min Hold and so forth Recording from a Clear Write trace yields exactly the same data as recording from the Raw Meas block Data is ALWAYS played back at the same location in the data flow just after the Raw Meas block through all currently active Traces and onto the...

Page 116: ...r change the name of the session AutoSession n is the default name where n is the next available number Learn how to use the labeler on page 151 o Sort Arrange the listing of sessions by Name by Date or by file Size o Delete After a confirmation prompt removes the contents of the selected session from the list o Copy Copies the selected session to a different storage device or the same storage dev...

Page 117: ...This session can be played back into any Trace State For example Play the Max Hold recording into a Clear Write trace to see the data exactly as it was recorded Press Trace 6 then with Trace 1 and press State then Clr Wr Then Record Player Then Play Play the Max Hold recording into a Max Hold trace to show the accumulation of Max Hold activity over the entire recording Press Trace 6 then with Trac...

Page 118: ...is Chapter Set Frequency Span 119 The following CPM settings are identical to the standard Power Meter settings Learn more about these settings Set Scale 123 Set Relative and Offset Power 124 Set Display Units 124 Set Averaging 125 Single Continuous 125 Set Limits 126 Power Meter Settings Connect the power to be measured to the RF IN port on the FieldFox top panel Select CPM Mode before making any...

Page 119: ...Then Frequency Then Center Then type a value using the numeric keypad Then press a multiplier key Learn about multiplier abbreviations on page 19 The current frequency f is shown on the FieldFox screen Optionally use the arrows to quickly change Center frequency The size of the frequency step can also be changed Press CF Step then type a step size value using the numeric keypad then select a multi...

Page 120: ...llowing CPM settings are identical to the standard Power Meter settings To learn about these settings please refer to the following pages Set Scale 123 Set Relative and Offset Power 124 Set Display Units 124 Set Averaging 125 Single Continuous 125 Set Limits 126 ...

Page 121: ... Zeroing 122 Set Frequency 123 Set Scale 123 Set Relative and Offset Power 124 Set Display Units 124 Set Averaging 125 Single Continuous 125 Step Detection Mode 126 Set Limits 126 Supported Power Sensors Power Meter measurements are made using any of the Agilent U2000 Series USB Power Sensors NOTE The FieldFox does NOT support the following U2000 Series features External Triggering Time Gated Burs...

Page 122: ...ed light indicates an error has occurred with the power sensor Refer to power sensor documentation No light indicates the FieldFox is not communicating with the power sensor This is the case when NOT in Power Meter Mode Power Meter Settings Select Power Meter Mode before making any setting in this section How to select Power Meter Mode Press Mode_ Then Power Meter USB Sensor Zeroing The Agilent US...

Page 123: ...t Press Freq Dist or Meas Setup 4 Then Frequency Then type a value using the numeric keypad The default frequency is 50 MHz Then press a multiplier key Learn about multiplier abbreviations on page 19 The current frequency is shown on the FieldFox screen Scale The scale of the Power Meter display can be set manually or automatically The major and minor ticks are set automatically and can NOT be cha...

Page 124: ...o ON the FieldFox measures and stores the current power level Subsequent power measurements display a power level which is relative to the stored value When relative is ON the units change from dBm to dB or from Watts to o Offset On Off Toggles ON and OFF the displayed power level using the Offset value o Offset Val Value by which the power meter display is offset A positive value compensates for ...

Page 125: ... is displayed When a number is entered Averaging is automatically set to Man Single or Continuous Measure This setting determines whether the FieldFox measures continuously or only once each time the Single button is pressed Use Single to conserve battery power or to allow you to save or analyze a specific measurement This setting can be changed at any time without affecting calibration accuracy H...

Page 126: ...OFF Disables step detection Limits In Power Meter Mode Minimum and Maximum limits set a visible range of acceptable readings between these two values Readings that are below the minimum or above the maximum are clearly visible on the power meter display How to set Limits Press Limit 8 Then choose from the following o Min Limit On Off Toggles the display of the Minimum limit ON and OFF o Min Limit ...

Page 127: ...th Magnitude and Phase The 2 Port Transmission measurement displays Magnitude ONLY Display for the 1 Port Cable Trimming measurement In this Chapter Overview 128 VVM Calibration 129 Measurement Selection 129 Frequency Selection 129 Display Resolution 130 IF Bandwidth 130 Output Power 130 Averaging 130 Single Continuous 131 Zeroing 131 Procedures 1 Port Cable Trimming Measurement 132 2 Port Transmi...

Page 128: ...signal B To measure the ratio of the Reflected Incident signals you were required to select B A for both the Magnitude and Phase display In the following FieldFox block diagram the source and directional coupler are inside the instrument This allows you to connect the DUT to ONLY the FieldFox RF Out port with NO external instruments in order to make Cable Trimming measurements FieldFox block diagr...

Page 129: ... can NOT be changed How to select VVM Mode Press Mode Then VVM Measurement Selection How to select a VVM Measurement Press Measure 1 Then choose from the following o 1 Port Cable Trimming 1 port reflection measurement Learn how to make this measurement on page 132 o 2 Port Transmission 2 port transmission MAGNITUDE ONLY measurement Learn how to make this measurement on page 133 Frequency Selection...

Page 130: ...BW Then choose from the following 300 Hz 1 kHz 3 kHz 10 kHz 30 kHz Output Power Set the power level out of the FieldFox to either High power or Low power Generally the high power level default setting is more accurate because the receivers are measuring farther from the noise floor However some devices are sensitive to high power levels Use the Low power setting when measuring amplifiers How to se...

Page 131: ...ime the Single button is pressed Use Single to conserve battery power or to allow you to save or analyze a specific measurement This setting can be changed at any time without affecting calibration accuracy How to set Single or Continuous Press Sweep 3 Then choose one of the following o Single Automatically sets Continuous OFF and causes FieldFox to make ONE measurement then hold for the next Sing...

Page 132: ...erence in phase between the Open and Short standard Once that value is known perform steps 10 through 14 to verify a calibration 1 Press Mode then NA Select S11 2 Press Freq Dist and enter start and stop frequencies that span about 40 of the VMM measurement frequency For example for a 1 GHz measurement enter Start 8 GHz and Stop 1 2 GHZ 3 Perform a calibration using a cal kit NOT Quick Cal 4 Press...

Page 133: ...ion loss gain or isolation of a device The FieldFox signal source is transmitted out the RF OUT connector through the DUT and into the RF IN connector Both ends of the DUT must be connected to the FieldFox NOTE Only Magnitude NOT Phase is displayed In the following image the gain of an amplifier is being measured 2 Port Transmission measurement of an amplifier How to make a 2 Port Transmission Mea...

Page 134: ...134 N9912A FieldFox User s Guide RF Out and RF In test port cables attached to form a Thru connection ...

Page 135: ...ace Math 148 About Math Operations 149 All about Markers Markers move along the X axis range of the measurement trace to provide a numerical readout of each measured data point Markers also allow you to search for specific Y axis values A trace can contain up to six markers The marker readout on the FieldFox screen displays X and Y axis information for the current active marker ONLY A Marker Table...

Page 136: ...icate the current setting of each marker Then move the marker as when it was first created Markers can also be moved using one of the marker search functions Learn more on page 139 Marker 2 is Active marker 1 is NOT active About Delta Markers A Delta marker provides X and Y axis readout information that is relative to a reference marker A Delta marker is created with a delta symbol to distinguish ...

Page 137: ...he marker to the new position Then press Delta again to turn the Delta marker back ON Fix the position of the Reference marker SA Mode ONLY In SA mode the reference marker can be fixed at the Y axis position of the data trace when the marker was created or it can float with each sweep at the Y axis position of the data trace In CAT and NA mode the reference marker always floats with the data trace...

Page 138: ... simultaneously create and move markers that have the same number for all traces For example when marker 2 is created on a trace a marker 2 is created for ALL traces When any marker 2 is moved they all move together to the same X axis position Coupled markers are relevant only in multi trace configurations All markers are either coupled or uncoupled There can NOT be one marker coupled and another ...

Page 139: ...X axis position Marker Trace SA Mode Marker Trace determines the trace number on which a marker resides A marker is created on or can later be changed to the trace number specified by the Marker Trace selection When changed a marker moves to the same X axis location on the specified trace Learn more about SA Traces on page 89 How to move a marker between traces With two or more traces present pres...

Page 140: ...ndwidth search Then press Mrk Tools Then Marker Search Then choose one of the following o Tracking ON OFF NA Mode ONLY o ON causes the active marker to search for the specified criteria with each new sweep Search criteria can include Target Bandwidth Peak Min The searches begin with the first sweep after Tracking is turned ON based on the current search type The stimulus setting for a marker can N...

Page 141: ...range o Bandwidth ON OFF NA Mode ONLY Use to quickly toggle BW Markers ON and OFF When OFF the marker table appears showing the X and Y axis positions of all enabled markers o Bandwidth NA Mode ONLY Specify the level in dB from the peak or valley where bandwidth is measured o Negative numbers search for a Peak bandpass such as a filter S21 response o Either of the following TWO methods can be used...

Page 142: ... left of marker 1 Right Frequency of marker 2 or 3 to right of marker 1 Press Back to return to the previous menu Press Peak Search then choose from the following Peak Moves the active marker to the HIGHEST amplitude data point of the trace Peak Excursion value is ignored In SA Mode the LO feed through signal 0 Hz is also ignored Next Peak Moves the active marker to the next highest amplitude peak...

Page 143: ...ria Press Mrk Tools In CAT and NA modes o Then Peak Search In SA mode o Then More o Then Mkr Properties Then Peak Criteria Then select the following o Peak Threshold Minimum amplitude dB To be considered valid the peak must be above the threshold level The valley on either side can be below the threshold level Default 190 for CAT and NA Modes 90 for SA Mode Note CAT mode Loss measurements are disp...

Page 144: ... Mode ONLY The group delay value of the active marker becomes the electrical delay setting of the trace Learn how to set group delay format on page 43 Learn more about electrical delay on page 45 o Mkr RefLev SA Mode ONLY The reference level becomes the magnitude of the active marker o Mkr Tune Freq SA Mode with Tune Listen ONLY The Tune Listen Frequency becomes the frequency of the active marker ...

Page 145: ...wed in NA Mode with Smith Chart or Polar display formats A simple Display Line is also available in SA Mode ONLY Learn more on page 92 Limit lines can be saved and recalled with an sta file Learn more on page 151 They can also be saved and recalled independently from the Limit softkeys Learn more on page 148 How to Create Fixed Limit Lines There are two ways to build a Fixed limit line 1 Build lim...

Page 146: ...ves the limit Line on which the cursor resides o Clear All Removes ALL limit lines Press Back to return to the Limit menu Relative Limit Lines Relative limit lines are X Y coordinates that are referenced to the center frequency X axis and Reference level Y axis Use relative limits to test devices or signals that are identical except for the center frequency or amplitude With relative limit lines i...

Page 147: ... down 5 dB How to Build Limit Lines from a Trace Select the trace from which limits will be built Press Limit 8 Then Edit Limits Then Build From Trace A limit line table appears Use the arrows to select ON Use Offset to shift the limit line UP or DOWN Learn how below Limit Options How to set Limit Options Press Exit if the limit table is visible Then Options Then choose from the following o Beep O...

Page 148: ...e that is included in the Data Link software How to Save and Recall Limits Press Save Recall then Select Device to set the Device Internal SD card or USB flash drive to be used for the Save or Recall Learn more on page 153 Then press Limit Then choose from the following o Save Limits After limit lines have been defined this saves the line definition to a file on the specified device o Recall Limit...

Page 149: ...to the data in memory o Data Memory D M Current measurement data is subtracted from the data in memory o Data Memory D M Current measurement data is divided by the data in memory o Math Off Data Displays trace data with NO math applied About Math Operations Data Memory and Data Memory math operations are performed on complex linear data before it is formatted Because data is often viewed in log fo...

Page 150: ...the second pair of connectors have much better S11 performance 50 and 52 and the relative significance is shown in the Data Mem values Values to compare Data Mem Data Mem for S parameters with 20 log relationship Data Mem for absolute power levels with 10 log relationship 10 dB and 12 dB 2 dB 24 dB 14 dB 50 dB and 52 dB 2 dB 64 dB 54 dB ...

Page 151: ...o Save a File Press Save Recall 9 Then Save At the top of the current labeler screen see following image check the File Type to save and Device Internal USB Storage Card to which the file is saved Learn how to change these settings on page 153 Then use the labeler to specify a filename How to use the FieldFox labeler The FieldFox labeler is used to edit or change the current filename It is also us...

Page 152: ...move the cursor up and down the rows When the current filename is complete Press Done to save the file to the specified filename If the filename already exists a warning is displayed Press Cancel to close the labeler without saving a file If the filename already exists you are prompted to choose from the following o Press Yes to overwrite the existing file o Press Cancel to edit the filename Recal...

Page 153: ... Link software will read data ONLY from the UserData folder o SD Card Saves Recalls files to from the microSD card not included inserted in the card slot See FieldFox Tour on page 15 Only the root folder is available o USB Saves Recalls files to or from a USB Flash drive not included that is inserted in one of the USB connectors Only the root folder is available NOTE Insert only ONE USB Flash Driv...

Page 154: ...meters and for S21 phase When both are corrected data is returned for both S parameters even when not displayed When the format is Mag Phase zero filled data appears as 0 dB and 0 degrees When the format is Real Imaginary zero filled data appears as 1 0 Data is returned with the correction type that is applied for each S parameter The correction type for each S parameter is annotated in the header...

Page 155: ...f the file to copy or delete NOTE When selecting Internal it may also be necessary to first select Manage Folders to specify an active folder which contains the files to copy or delete Then More Then Manage Files Then choose from the following o Copy File Select a file to copy Then select a destination to copy the file to Choose from Internal USB must be inserted or SD Card must be inserted The fi...

Page 156: ...the displayed keywords You can change these keywords using the following Edit Keywords function o Delete Folder The selected folder and its contents are deleted after a warning prompt is displayed A Parent folder or system folder can NOT be deleted Press Exit when finished Edit Keywords The preselected keywords FILE SITE and so forth can be edited to meet your specific needs Your keywords will rem...

Page 157: ...ave operation How to enable and disable the current Prefix Press Save Recall 9 Then More Then Prefix ON OFF The current selection is underlined How to edit the current Prefix Press Save Recall 9 Then More Then Prefix Then choose from the following o Press Select to add the cursor character to the end of the Prefix o Press Backspace to erase the last character from the end of the Prefix o Press Cle...

Page 158: ... can NOT print the measurement display directly from the FieldFox to a printer You can save a Picture file to a USB Flash Drive or microSD card and then print from any computer Measurements can also be printed using the FieldFox Data Link software ...

Page 159: ...e 167 Security Level 168 Date and Time Settings 168165 LAN Settings 169 Erase User Data 170 See Also Battery Usage 12 FieldFox Internal Temperatures 13 Run Hold The Run Hold key determines whether the FieldFox sweeps continuously or does NOT sweep but holds the display results of the last sweep that was performed Use Hold to conserve battery power or to allow you to save or analyze the results of ...

Page 160: ...lowing settings always survive Preset and Mode Preset External Reference state page 167 SA Units page 74 SA Correction states page 77 VVM Display Resolution page 130 Marker Peak Excursion and Threshold page 143 Volume Control How to Preset the FieldFox Press Preset Then choose one of the following o Preset Returns ALL Modes to the factory default settings o Mode Preset Returns only the current Mod...

Page 161: ...color settings and trace width to remain through a FieldFox shutdown save the display settings as Preferences Learn how on page 163 NOTE Clean the transflective screen with gentle and minimal wiping using Isopropyl alcohol applied to a lint free cloth Display Brightness Change the brightness of the background How to set Display Colors Press System Then Display Then Brightness Use the arrows the ro...

Page 162: ...roximately 65 alpha numeric characters To view the Title area see the Screen Tour on page 18 How to add or edit a Title Press System Then Display Then Title Then enter or edit a title using the FieldFox labeler This is the same labeler function that is used to name files Learn how to use the labeler on page 151 Then Title ON OFF to make the title appear and disappear from the screen Edit Keywords ...

Page 163: ...n o Francais French o Russian o Japanese o Chinese o Turkish Save Preferences You can save your Display settings Volume Control setting Battery Saver setting and Time Zone setting as preferences that will remain set through a FieldFox shutdown In addition the following GPS settings are saved as preferences GPS state data display state elevation units and latitude longitude format Learn about GPS o...

Page 164: ...ngle sweep acquisitions The RF source stays at the stop frequency until another sweep begins This provides a constant uninterrupted RF output from the RF OUT port This behavior also provides the highest trace stability sweep to sweep which may only be evident while using either single sweep or Run Hold With Battery Save OFF the use of a full battery charge is reduced by approximately 45 minutes Sy...

Page 165: ...ps and AutoRoute versions 2010 and later The GPS receiver is NOT available from Agilent Only the GPS USB receiver is used with the FieldFox Therefore it is NOT necessary to purchase the very latest version of the map software GPS can be used in all FieldFox modes Your GPS settings can be saved with Preferences Learn more on page 163 How to make GPS settings Press System 7 Then System Configuration...

Page 166: ... OFF after Sync was ON the date and time does NOT revert back to the settings before the clock was synchronized Display ON OFF Enable and disable the GPS display on the FieldFox main window Lat Lon Format Change the format of the GPS display on the FieldFox screen Choose from o ddd mm ss sss degrees minutes seconds default setting o ddd mm mmmmm degrees minutes fractional minutes o ddd ddddddd dec...

Page 167: ...f measurements in CAT NA and SA Modes The External Reference setting will survive a FieldFox or Mode Preset and is saved as part of the Instrument State How to set External Reference Connect the 10 MHz External Reference to the EXT TRIG EXT REF BNC connector on the FieldFox top panel Learn about External Trigger Input on page 87 Press System 7 Then System Configuration Then Frequency Ref Then Freq...

Page 168: ...n o Set to None Preset Mode Preset or FieldFox restart Date and Time Format and Time Zone Settings Set the local date and time Date and Time format and Time Zone that is shown on the FieldFox screen The Date and Time is also used to identify files that are saved If it is NOT saved with Preferences then it is reset when the FieldFox is powered OFF and ON The Date and Time can also be set by synchro...

Page 169: ...name Change the name that can be used to address the FieldFox if your server supports this feature The default hostname is generated automatically o Obtain IP Choose from o DHCP IP Address is assigned dynamically If your server supports this feature the IP Address for the FieldFox is assigned each time it is started o Static Set the IP Address manually The Address remains until you change it o Sta...

Page 170: ...etwork name and current IP address of your FieldFox Error Log The Error Log shows the information that has appeared on the FieldFox screen The most recent information is at the top of the table Press Clear Errors to erase this information Battery Learn about this table on page 172 Internal Temperatures Learn all about this table and the importance of the internal FieldFox temperatures on page 13 E...

Page 171: ...ccurs o All data files and folders are deleted from the UserData partition o A large file of 0s is written to all of the free blocks on the partition o The large file is deleted All blocks released by deleting this file are now available for use o The FieldFox is rebooted which manages the newly freed data and re writes the factory cal kits and cable files ...

Page 172: ... Connected to external power through the AC DC adapter Battery installed and charging The amount of charge is indicated by the number of bars shown Battery not charging with 84 battery life remaining Battery fully charged A fully charged battery MAY NOT read 100 Learn more on page 175 Reconditioning the Battery Service Diagnostics Battery Screen The Battery screen displays the following informatio...

Page 173: ... full capacity of a new battery 11 Remaining Capacity number of amp hours remaining 12 Full Charge Capacity number of amp hours when fully charged 13 Present Run Time to Empty minutes of run time remaining based on amount of current being used now 14 Average Run Time to Empty minutes of run time remaining based on running average of current being used 15 Charge Cycles number of charge cycles batte...

Page 174: ...ry at any time regardless of the current charge status However this could impair the accuracy of its internal charge remaining indicator When the Max Error is 10 or greater the battery should be reconditioned Learn more on page 175 Internal Charging with the AC DC Adapter Important Read the safety information for the AC DC adapter on page 189 Internal charging time for a fully depleted battery is ...

Page 175: ...low flashing Reconditioning the accuracy of the battery s internal LED charge gauge is being renewed See Reconditioning Batteries Yellow green Battery is reconditioned Red flashing Error Yellow Standby For more information refer to the Instruction Manual included with the external battery charger Reconditioning the Battery The battery contains electronics that monitors battery usage and tracks how...

Page 176: ...tery by disconnecting the AC DC adapter then leave the FieldFox ON until it shuts down about four to five hours 4 Remove the battery from the FieldFox wait one minute then re install the battery 5 Reconnect the AC DC adapter 6 Charge the battery and verify a full charge 7 Check the System then Service Diagnostics then Battery screen to verify that the Max Error is less than 10 How to Recondition w...

Page 177: ... C to 50 C Within 1 month 20 C to 45 C Within 6 months 20 C to 40 C Within 1 year 20 C to 35 C Battery charging limits Charge temperature 0 C to 45 C 10 C slows charge on some batteries Discharge temperature 10 C to 60 C Operate the FieldFox on battery power between the ambient temperatures of 10 and 50 C 14 to 122 F Using the battery at lower or higher temperatures can damage it and reduce operat...

Page 178: ...y is in process On Off Underlined items indicate current setting Press to toggle between settings Resolution 201 Brackets indicate the factory default or currently selected setting Press to select a different setting Mode CAT Cable and Antenna Test SA Spectrum Analyzer Power Meter Power Meter USB CPM Channel Power Meter NA Network Analyzer VVM Vector Voltmeter Freq Dist CAT SA Pwr Mtr CPM NA Mode ...

Page 179: ...pply Correction Antenna ON OFF Edit Save Recall Antennas Edit Antenna New Save Antenna Recall Antenna Storage Device Back Cable ON OFF Edit Save Recall Cables Edit Cable New Save Cable Recall Cable Storage Device Back Back External Gain Preamp ON OFF Back Relative Offset Offset Val Scale Min Scale Max More Unit Autoscale Resolution CPM Only Internal Attn Back Autoscale Autoscale All Scale Div Ref ...

Page 180: ...Off More Marker 1 2 3 4 5 6 Markers All Off Marker Trace Auto Data Mem Coupled Markers Smith and Polar Formats Only Marker Format Back None Mkr Tools CAT SA Pwr Mtr NA Mode VVM Peak Next Peak Peak Left Peak Right All except DTF Marker Center More Min Search Peak Criteria Peak Excursion Peak Threshold Back Back DTF ONLY More Marker Start Distance Peak Next Peak Mkr Center Mkr RefLev Mkr TuneFreq Mo...

Page 181: ... Port DTF Lin Back Radio Standard Radio Standard Import Radio Standards Delete Radio Standards Back Channel Measurements None Channel Power Occupied BW Adjacent Channel Power Tune Listen None AM FM Narrow FM Wide Interference Analysis Opt 236 None Spectrogram Waterfall Source Source Enable Source Mode Normalize Source Power Source CW Freq Back All Meas Off None S11 S21 Format Log Mag LinMag VSWR P...

Page 182: ...g Delay Trig Level AutoTrigTime Back Single Continuous Single Continuous Restart Resolution MinSwpTime None Meas Setup 4 CAT SA Pwr Mtr CPM NA Mode VVM Settings Output Power Interference Rej DTF Settings ONLY DTF Window DTF ONLY DTF Cable Specs Velocity Factor AverageType AverageCount In Chan Power Integ BW RRC Weighting More RRC Alpha Averaging Num Averages Unit Relative Pwr Mtr Only Step Detecti...

Page 183: ... Next Page Previous Page Dock Window Done Transform Start Stop Time Gating Gating Start Stop More TransformWind ow Set FreqLowpass Line Loss Back Cal 5 CAT SA Pwr Mtr CPM NA Mode VVM See page 62 None Power Meter ONLY Ext Zero See page 62 See page 62 Trace 6 CAT SA Pwr Mtr CPM NA Mode VVM Trace 1 2 Num of Traces All except DTF Math and Memory Data Mem Data Memory Data Memory Trace 1 2 3 4 State Def...

Page 184: ...lected Close Session Session Data TraceRecordLimit Clear All Records Back Recording Configuration Record Time Record Source Record Interval Segment Count FreqMaskTrigger Back FreqMaskTrigger Configuration Edit Mask Save Mask Recall Mask Back Playback Configuration Playback Interval Back Recorder Player Pause Resume Play Stop Record User Tag Playback Trace Math Off Data Mem Data Mem Data Mem Back ...

Page 185: ...ptions Install Option Back GPS OFF External Sync Clock Display ON OFF Lat Lon Format Elevation Unit Frequency Ref Freq Ref Source Back Security Level More Save Shows labeler Select BackSpace Clear Cancel Done Recall Shows list of files Recall File Sort by Name Sort by Date Next Page Previous Page Cancel Device Internal SD Card USB File Type State Trace State Picture Data SNP Data CSV More Manage F...

Page 186: ...all Limits Options Beep Warning Limit Type Offset Margin Back All except ACPR Edit Limits Edit Add Clear All Limits Off Build From Trace Exit All Limits Save Limits Recall Limits Display Line Options Beep Warning Limit Type Offset Margin Back In ACPR Set Limits 1 2 3 Lower Offset Limit Upper Offset Limit Back Min Limit On Off Min Limit Value Max Limit On Off Max Limit Value Edit Limits Edit Add Cl...

Page 187: ...us 187 Limit Test ON OFF Preset All Modes Preset Mode Preset In SA Chan Meas Meas Preset Run Hold All Modes Press to toggle between Continuous and Single sweep SA Mode has slightly different behavior Learn more on page 89 ...

Page 188: ...rmal condition in which all means for protection are intact when attached to the AC DC adapter WARNING The unit may be used only in the operating conditions and positions specified by the manufacturer The Agilent N9912 Handheld Cable and Antenna Tester complies with the following standards IEC 61010 2nd Edition EN 61010 2nd Edition Canada CSA C22 2 No 61010 1 04 USA UL 61010 1 2nd Edition WARNING ...

Page 189: ...rted in a socket outlet provided with a protective earth contact Any interruption of the protective conductor inside or outside of the product is likely to make the product dangerous Intentional interruption is prohibited WARNING Use only the designated AC DC adapter supplied with the instrument WARNING Use only the designated power cord supplied with the AC DC adapter WARNING No operator servicea...

Page 190: ...kpack If you prefer to leave the FieldFox connected to the AC DC adapter while inside the backpack you can disconnect the AC DC adapter from its AC power source to prevent overheating CAUTION The AC DC adapter has an auto ranging line voltage input be sure the supply voltage is within the specified range CAUTION The AC DC adapter is for indoor use only CAUTION Never use a modified or damaged charg...

Page 191: ...ion devices which if damaged may cause the battery to generate heat explode or ignite WARNING Do not place the battery in direct sunlight or use or store the battery inside cars in hot weather Doing so may cause the battery to generate heat explode or ignite Using the battery in this manner may also result in a loss of performance and a shortened life expectancy WARNING There is a danger of explos...

Page 192: ...s the battery from being charged if the average charging current reaches or exceeds 3 5A for a time period of 120 seconds or more Secondary Overcharge Current This prevents the battery from being charged if the charging current reaches or exceeds 4A 20 for a time period of 20 milliseconds or more Primary Overdischarge Current This prevents the battery from being discharged if the average current o...

Page 193: ...atures This protection is resettable once the overstress condition is removed The maximum operating temperature of this fuse is 85C Secondary Overtemperature A second PTC polyfuse built into each Li ion cell will open up and limit current flow as a function of very high temperatures Tertiary Overtemperature A current interrupt device CID within each Li ion cell will permanently open up when the te...

Page 194: ...194 N9912A FieldFox User s Guide Batteries Safe Handling and Disposal ...

Page 195: ...Safety Considerations 195 Inspired Energy Battery ...

Page 196: ...196 N9912A FieldFox User s Guide ...

Page 197: ...Safety Considerations 197 ...

Page 198: ...198 N9912A FieldFox User s Guide ...

Page 199: ... input circuitry To avoid such damage it is recommended to dissipate any static charges by temporarily attaching a short to the cable or antenna prior to attaching to the instrument FieldFox Markings The CSA mark is a registered trademark of CSA International The C Tick mark is a registered trademark of the Australian Spectrum Management Agency This symbol combines the following three markings CE ...

Page 200: ...rs is the expected useful life of the product CAUTION risk of danger refer to safety information in manual Dispose of properly Hot surface connectors get hot during extended operation so care must be taken when making connections and disconnections Battery Markings The CE mark shows that the product complies with all relevant European legal Directives if accompanied by a year it signifies when the...

Page 201: ...hen accompanied by a C and US it indicates compliance to both Canadian and US requirements NOM Mark Normality of Mexico indicates that the product was tested by an accredited laboratory in Mexicao and meets Mexico s safety requirements Japan s safety and EMC compliance mark China s safety and EMC compliance mark Taiwan s safety and EMC compliance mark Singapore s safety mark Korea s safety and EMC...

Page 202: ...mation and warnings that must be followed by the user to ensure safe operation and to maintain the product in a safe condition Declaration of Conformity Should the Declaration of Conformity be required contact an Agilent Sales Representative or the closest Agilent Sales Office See Contacting Agilent Compliance with German Noise Requirements This is to declare that this instrument is in conformance...

Page 203: ... Do Not Use a damaged connector ever Connector Cleaning Do Try compressed air first Use isopropyl alcohol a Clean connector threads Do Not Use any abrasives Get liquid into plastic support beads Gaging Connectors Do Clean and zero the gage before use Use the correct gage type Use correct end of calibration block Gage all connectors before first use Do Not Use an out of specification connector Maki...

Page 204: ...FieldFox User s Guide Appendix B Specifications Data Sheet To ensure the highest accuracy and consistency the N9912A Specifications are now stored ONLY at http cp literature agilent com litweb pdf N9912 90006 pdf ...

Page 205: ...uld represent about 12 months with average use With more frequent connections the calibration cycle should be sooner You can extend the time between calibrations and thereby save money by using connector savers and by performing proper Connector Care Learn more on page 203 How Do I Get an Instrument Calibrated To get your Agilent instrument calibrated send it to one of the Agilent Technologies ser...

Page 206: ...care of the battery 175 CAT mode 1 port cable loss measurements 28 2 port insertion loss measurements 30 calibration 61 DTF measurements 31 DTF settings 32 return loss measurements 28 settings 21 CD included 10 certification statements 200 Channel Power CHP 97 Channel Power Meter 118 Channel Selection 73 charge status viewing 171 charging the battery externally 174 internally 173 Clean Screen 16 c...

Page 207: ...ernal zeroing 121 internal reconditoning 175 normalization 64 QuickCal 62 single sweep while in Hold 159 trace math 148 preset 159 recall an sta file 152 recondition battery with external battery charger 175 save display settings as preferences 162 163 file 150 save and recall limits 147 select CAT mode 21 CAT mode measurements 21 language 162 NA formats 43 NA measurements 41 NA mode 40 power mete...

Page 208: ...Extensions 50 power meter mode 120 power requirements for the AC DC adapter 11 power sensor input 14 Power Spectral Density 98 power maximum 14 prefixes for file names 156 preparing for initial use 11 preset settings 159 printing 157 protection high temperature 13 protective functions of the battery 191 Q Quick Cal 62 Quick Settings 42 R Radio Standard 72 recalling files 150 151 reconditioning the...

Page 209: ...ltipliers 19 numeric 19 VBW 84 vector voltmeter 126 Velocity Factor 50 verifying integrity of calibration 66 jumper cables 66 Video Bandwidth SA mode 84 Video triggering 87 viewing charge status battery 171 installed options 162 163 Volume Control 159 VVM mode 1 port cable trimming measurements 131 2 port transmission measurements 132 bridge cancellation measurements 132 W Waterfall Display 108 wh...

Reviews: