36
Introducing the HP E5574A Optical Loss Analyzer
Getting Started
3
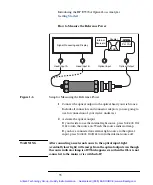
Press A
PPL
and activate “Powermeter”.
4
Check the “Head” parameter on the display.
5
Press
H
EAD
A
or
H
EAD
B
, respectively, to activate the head to
which you have connected the optical output.
6
Check the power output value on the display. For the internal
source it should be around –7.5 dBm.
All of the OLA
applications for loss
measurements provide the
D
ISP
–>R
EF
softkey.
7
Press
D
ISP
–>R
EF
.
8
Press A
PPL
to terminate the “Powermeter” application.
After storing the reference power, the instrument is ready to
measure power loss.
AT T E N T I O N
If you change the interface adaptors or the source,
you must measure and store the reference power anew.
Checking the Stability
Mechanical and electrical stability are vital issues in the
measurement of optical characteristics.
After warm-up, the electrical stability of the OLA reaches or
surpasses the values stated in its Technical Data sheet.
The mechanical stability depends on your setup.
After the first setup and after any change it is advisable to check the
stability. Most of the OLA applications offer the
S
TABILITY
softkey.
How to Check the Stability
1
Press
S
TABILITY
to measure the variation of the optical power
received by the head(s).
The instrument uses a sliding time window of 5 s and displays
the difference between the highest and lowest power value
Artisan Technology Group - Quality Instrumentation ... Guaranteed | (888) 88-SOURCE | www.artisantg.com


