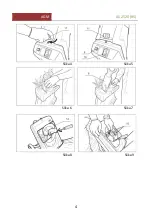
7
AGM
AS 2520 (GB)
Only use the device in the recommended position and only on a firm flat
surface.
Do not operate the device on paved or gravel surfaces where ejected material
may cause injury.
Check all screw and plug-in connections and protective equipment if firm and
tightened properly and whether all moving parts are running smooth whenever
the appliance is to be put into operation.
Check that the shredder, shredder screws and other fastenings are securely
fastened.
Replace worn or damaged blades and bolts in sets to preserve balance; Only
replace cutting unit in pairs.
Damaged or illegible security stickers must be replaced. Do not use the
appliance in bad weather, especially when there is a risk of storm.
Before starting the machine, make sure that the feeder is empty.
Keep your face and body away from the feeding chute.
Hands, other parts of the body or clothing must not be placed in the feeder, in
the ejection channel or near moving parts.
Do not use the appliance if you are tired, ill, under influence of drugs, alcohol
drinks or medicaments.
Provide adequate lighting or good lighting conditions when working with the
machine. Poor lighting/light conditions represent a high safety risk.
Do not overreach. Keep proper footing and balance at all times. Provide a safe
posture, especially on slopes.
When feeding material, never stand on a level higher than the level of the base
of the device.
Keep a distance from the ejection opening at all times. When feeding material
into the device, be extremely careful not to insert metal pieces, stones, bottles,
cans, or other foreign objects.
Switch off the device immediately and wait until all moving parts have come to
a standstill in the event of a foreign object being struck or if the device begins to
make unusual noises or vibrate. Disconnect the machine from the power source
and take the following steps before restarting and operating the machine:
-
Check for damage
-
Replace or repair damaged parts.
-
Check for loose parts and tighten them.
Do not allow processed material to accumulate in the ejection area as this may
prevent proper ejection and cause the material to bounce back through the
feed opening.
Summary of Contents for AS 2520
Page 1: ...1 AGM AS 2520 SI SEKLJALNIK AGM AS 2520 Originalna navodila za uporabo...
Page 2: ...2 AGM AS 2520 SI...
Page 4: ...4 AGM AS 2520 SI Slika 8 Slika 9 Slika 6 Slika 7 Slika 4 Slika 5...
Page 13: ...1 AGM AS 2520 GB ELECTRIC GARDEN SHREDDER AGM AS 2520 Original instruction manual...
Page 14: ...2 AGM AS 2520 GB...
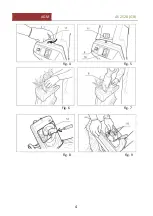
Page 16: ...4 AGM AS 2520 GB Fig 8 Fig 9 Fig 6 Fig 7 Fig 4 Fig 5...
Page 26: ...1 AGM AS 2520 RS SECKALICA ZA GRANE AGM AS 2520 Originalno uputstvo za upotrebu...
Page 27: ...2 AGM AS 2520 RS...
Page 29: ...4 AGM AS 2520 RS Slika 8 Slika 9 Slika 6 Slika 7 Slika 4 Slika 5...
Page 40: ...1 AGM AS 2520 BG AGM AS 2520...
Page 41: ...2 AGM AS 2520 BG...
Page 42: ...3 AGM AS 2520 BG 1 2 3 4 5 6 7 8 9 10 11 12 13 14 15 16 17 Inbus 1 3 2...
Page 43: ...4 AGM AS 2520 BG 8 9 6 7 4 5...
Page 45: ...6 AGM AS 2520 BG...
Page 46: ...7 AGM AS 2520 BG...
Page 47: ...8 AGM AS 2520 BG...
Page 48: ...9 AGM AS 2520 BG I RCD PRCD 30 mA 1 5 mm2 25 m 2 5 mm2 25 100A 230V...
Page 49: ...10 AGM AS 2520 BG...
Page 50: ...11 AGM AS 2520 BG II...
Page 51: ...12 AGM AS 2520 BG...
Page 52: ...13 AGM AS 2520 BG...
Page 54: ...1 AGM AS 2520 HR SJECKALICA ZA GRANE AS 2520 Originalne upute za uporabu...
Page 55: ...2 AGM AS 2520 HR...
Page 57: ...4 AGM AS 2520 HR Slika 8 Slika 9 Slika 6 Slika 7 Slika 4 Slika 5...
Page 68: ...1 AGM AS 2520 HU APR T SZECK Z G P AGM AS 2520 Eredeti haszn lati tmutat...
Page 69: ...2 AGM AS 2520 HU...
Page 71: ...4 AGM AS 2520 HU 8 bra 9 bra 6 bra 7 bra 4 bra 5 bra...
Page 82: ...1 AGM AS 2520 AGM AS 2520 O o...
Page 83: ...2 AGM AS 2520...
Page 84: ...3 AGM AS 2520 1 2 3 4 5 6 7 8 9 E 10 11 12 13 14 15 16 17 a 1 a 3 a 2 a a...
Page 85: ...4 AGM AS 2520 8 9 6 a 7 4 5...
Page 87: ...6 AGM AS 2520 E O T e O E O...
Page 88: ...7 AGM AS 2520 O O...
Page 89: ...8 AGM AS 2520...
Page 90: ...9 AGM AS 2520 O T FI RCD PRCD 30 mA 1 5 mm 2 25 m a 2 5 mm 2 25 off 100A 230V E E E...
Page 91: ...10 AGM AS 2520 E O O...
Page 92: ...11 AGM AS 2520 e O II o E...
Page 93: ...12 AGM AS 2520 O T E O E...
Page 94: ...13 AGM AS 2520 O E...
Page 96: ...1 AGM AS 2520 RS TOCATOR PENTRU CRENGI AGM AS 2520 Instruc iunea originala pentru utilizare...
Page 97: ...2 AGM AS 2520 RS...
Page 99: ...4 AGM AS 2520 RS Figura 8 Figura 9 Figura 6 Figura 7 Figura 4 Figura 5...
Page 110: ...1 AGM AS 2520 SK DRVI KON ROV AGM AS 2520 Origin lny n vod na pou itie...
Page 111: ...2 AGM AS 2520 SK...
Page 113: ...4 AGM AS 2520 SK Obr zo k 8 Obr zo k 9 Obr zo k 6 Obr zo k 7 Obr zo k 4 Obr zo k 5...
Page 124: ......


