17
To clean:
1.
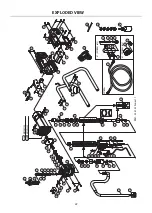
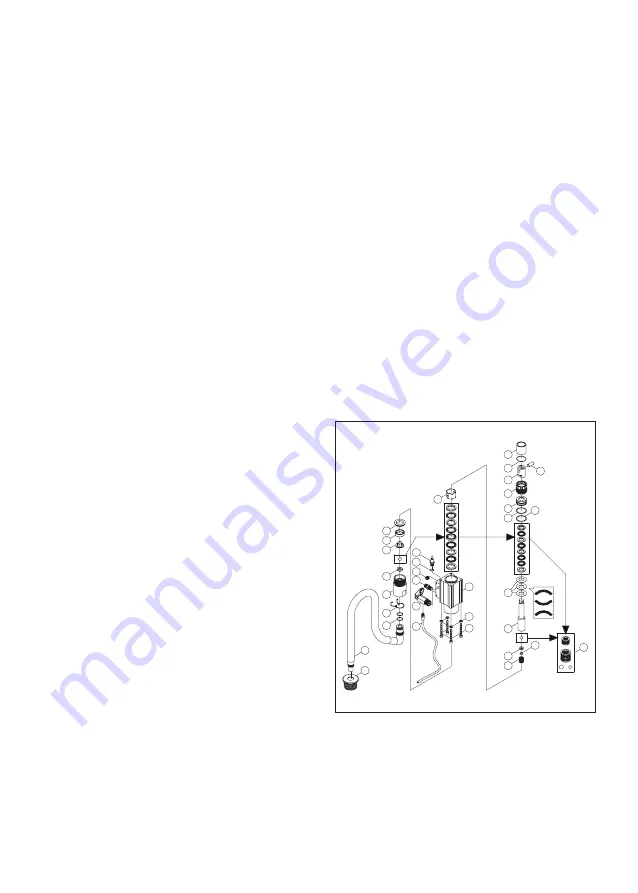
Remove the suction tube (73) by releasing the
hose clip (71) and pulling the hose free. Use a
wrench to loosen the gland nut.
2.
Remove the check ball and ball guide and
clean all related parts.
3.
Replace in the reverse of assembly and
tighten.
PUMP PACKINGS
The packings are a wearing part. If the pump can
no longer maintain pressure, has diffculty priming
and paint seeps into the throat of the pump, and
tightening the packing nut no longer helps, then
the packings will require replacement. This is best
entrusted to a qualified repair technician.
To remove the pump and replace the packings,
follow the instructions below:
PUMP REMOVAL
1.
Remove the suction tube by releasing the
hose clip and pulling the hose free.
2.
Turn the pump until the piston is at its lowest
point. To do this, it is necessary to remove the
left side frame leg (77) and then remove the 12
screws to remove the left side motor housing
(38). Then the motor may be turned by turning
the fan from the rear.
3.
Loosen and remove the 4 socket cap screws
(65)
4.
Pull the pump forward to disengage the
displacement piston (53) from the slot in the
bottom of the drive piston (45). (It must be at
its lowest point in order to disengage-see step
2 above)
5.
The pump unit may now be lifted away.
6.
Replacement is the reverse of removal. Grease
the junction slot of the drive piston when
assembling.
PACKINGS REPLACEMENT
1.
Loosen the packing nut with the tommy bar
supplied and remove.
2.
Pull out the piston.
3.
Remove all parts and clean. Clamp the
displacement piston (53) in the soft jaws of a
vise and remove the ball seat fastener (56) to
allow removal of the small ball seat (54) and
the small check ball.
4.
Discard all old packings.
5.
Soak the new leather packings in W30 oil for at
least one hour before assembling.
6.
Replace the packings, glands, o-rings and
check balls with the new parts from the
rebuild kit. Strictly follow the exact order and
orientation.
7.
Replace piston and thread on the packing nut.
After resistance from the disc springs is felt,
tighten the packing nut a further 3/4 turn.
46
56
54
55
53
52
49
48
47
44
43
57
70
69
67
66
65
50
58
59
68
51
45
64
74
71
62
63
60
61
72
73
85
A1
OPTIONAL to 58
A2
A3
A4
A5
A6
A7
Summary of Contents for 700W Mechanical
Page 1: ...Original Instructions ...
Page 24: ......

