background image


AGRETO AgriCounter Drive 

© AGRETO electronics GmbH  


page:8 

6.2


Operating Keys 

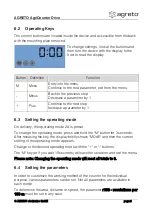
The control buttons are located inside the device and accessible from the back 

with the mounting plate removed. 

To change settings, look at the buttons and 

then turn the device with the display to the 

front to read the display. 


Button  Definition 

Function 

Menu 

Entry into the menu 

Continue to the next parameter, exit from the menu 

Minus 

Back to the previous step 

Decrease a parameter by 1 

Plus 

Continue to the next step 

Increase a parameter by 1 

6.3


Setting the operating mode 

On delivery, the operating mode 2A is preset. 
To change the operating mode, press and hold the "M" button for 3 seconds. 

After releasing the key, the display briefly shows "MOdE" and then the current 

setting of the operating mode appears. 
Change to the desired operating mode with the "+" or "-" buttons. 
The "M" key (or if you wait 10 seconds) will save the selection and exit the menu. 
Please note: Changing the operating mode will reset all totals to 0. 

6.4


Setting the parameters 

In order to customize the working method of the counter for the individual 

purpose, various parameters can be set. Not all parameters are available in 

each mode. 
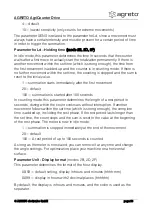
To determine the area, distance or speed, the parameter 

r100 - revolutions per 

100 m

 must be set in any case. 

Summary of Contents for AgriCounter Drive

Page 1: ...AGRETO electronics GmbH User Manual Acre meter AGRETO AgriCounter Drive...

Page 2: ...ing the mounting plate 12 7 3 Fastening the counter 13 7 4 Attaching the seal 13 8 Working with the device 14 8 1 Reading the area mode 2A 2B 14 8 2 Reading the distance mode 2C 2D 14 8 3 Reading the...

Page 3: ...s designed to measure the number of revolutions of wheels and other rotating parts on all types of machines and devices Activation takes place by direct rotation of the counter itself By multiplying t...

Page 4: ...r DANGER The AGRETO AgriCounter may only be operated by persons who are familiar with the operation of the device CAUTION Keep the work area clean Soiled areas contributes to accidents RISK Risk of in...

Page 5: ...AGRETO AgriCounter must not be operated in explosive areas 5 Technical specifications Packaging dimensions 220x160x50 mm LxWxH Package weight 450 g Device dimensions 73 x 52 x 33 mm WxHxD Weight 230...

Page 6: ...es depending on the path Operating mode 2B Area and hours In this mode the area is counted as in 2A Additionally the operating hours are recorded The counter reacts to vibrations and movements of the...

Page 7: ...ently of the rotation and shows the total number of operating hours too Operating mode 2F Speed In this mode the current speed is displayed by recording the revolutions of the counter around its own a...

Page 8: ...perating mode On delivery the operating mode 2A is preset To change the operating mode press and hold the M button for 3 seconds After releasing the key the display briefly shows MOdE and then the cur...

Page 9: ...m modes 2A 2B 2C 2D 2G This parameter specifies the number of revolutions of the counter around its own axis per 100 meters traveled You can calculate the number from the circumference of the wheel on...

Page 10: ...summation is started after 100 seconds In counting mode this parameter determines the length of a rest period in seconds during which the count continues without interruption If another movement follo...

Page 11: ...to 0 7 Assembly Only start with the assembly once you have clarified whether a change in the configuration is necessary for your application Please read the chapter Configuration before 7 1 Positionin...

Page 12: ...esired position to the desired mounting position Use the mounting plate as a template and mark the 2 holes with a pin Hit one notch each with a grain Drill the 2 holes with a 4 2 mm diameter drill Deb...

Page 13: ...then tighten every screw again so that the housing is evenly pressed against the mounting plate 7 4 Attaching the seal Thread the seal wire through the holes in the two screws Thread both ends of the...

Page 14: ...2B The sum of the counted area in hectares is displayed with 2 decimal places and the ha symbol lights up 8 2 Reading the distance mode 2C 2D The total of the counted distance in kilometers is display...

Page 15: ...is visible as a delimiter it is decimal with 2 decimal places 8 6 Symbols on the display Below the hour display there are various icons for displaying additional information The wavy line means that...

Page 16: ...er displayed is the sum of the hectares The s lights up in the setting mode when a parameter value is expected in seconds The m lights up in setting mode when a parameter value in meters is expected T...

Page 17: ...m properly Insert 2 new AAA batteries into the device in the specified direction Mount the counter again on the mounting plate Seal the device again with a new seal wire and a new seal 10 2 Area is no...

Page 18: ...rs even with minor movements To hold longer periods of rest during operation set the parameter hOLd upwards 10 6 Too many operating hours are counted Perhaps the machine is exposed to light movements...

Page 19: ...rranty period begins with the first accounting to an end customer and ends 5 years from this date of invoice Prerequisite for warranty service are the presentation of the original invoice and complian...

Page 20: ...o technical changes or design changes All information in this manual are supplied without liability despite careful preparation A liability by the author is excluded Copyright 2020 AGRETO electronics...

Reviews: