background image


AGRETO Animal Scale 

© AGRETO electronics GmbH  


Seite:6 


5


Technical specifications 

5.1


Loadcells 


high-resolution shearbeam loadcells, 3 mV/V, 350 ohm 


nominal load: 500 kg 


save overload 120 %, breaking load 150 % 


accuracy: +/- 0.02 % 


waterproof in accordance with protection class IP68 


operating temperature: -35 to +65 degrees Celsius 


temperature compensation: -10 to +40 degrees Celsius 


Summary of Contents for Swis721 LT BT Standart

Page 1: ...User Manual AGRETO Animal Scale 23 1 2019...

Page 2: ...6 5 1 Loadcells 6 6 Assembly of scale 7 6 1 Assembly of base frame 7 6 2 Mounting of side panels 8 6 3 Screwing together the side panels 9 6 4 Mounting the strengthening parts 9 6 5 Mounting the doors...

Page 3: ...is usually performed on site by the customer The standard package includes all parts of the scale with built in weighing technology 1 AGRETO HD1 weighing display this manual 3 Intended use The AGRETO...

Page 4: ...sembly personnel Appropriate means must be used when transporting machine parts with load bearing devices The wearing of safety shoes is mandatory for persons engaged in the assembly disassembly or in...

Page 5: ...at may lie in the vicinity 4 3 Safety instructions for machine operators HAZARD The AGRETO Single Animal Weighing Scale may only be operated by persons who are familiar with the handling of the applia...

Page 6: ...1 Loadcells high resolution shearbeam loadcells 3 mV V 350 ohm nominal load 500 kg save overload 120 breaking load 150 accuracy 0 02 waterproof in accordance with protection class IP68 operating tempe...

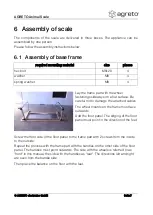
Page 7: ...ful not to damage the attached cables The wheel mounts on the frame must face outwards Add the floor panel The edging of the floor panel must point in the direction of the feet Screw the front side of...

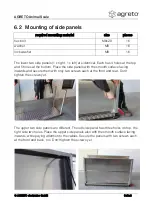
Page 8: ...bottom Place the side panels with the smooth surface facing inwards and secure them with only two screws each at the front and rear Don t tighten the screws yet The upper two side panels are differen...

Page 9: ...tach the lower side panels to the upper ones 6 4 Mounting the strengthening parts required mounting material size pieces hex bolt M8x20 10 washer M8 14 lock washer M8 10 nut M8 10 Turn the scale over...

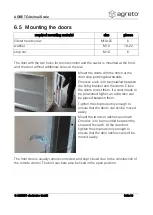
Page 10: ...stalled between the fixing bracket and the doors Close the doors to test them If a door needs to be positioned higher an extra disc can be placed between them Tighten the stop nuts only enough to ensu...

Page 11: ...nut M8 2 Mount the two wheels at the front of the scale One disc each is to be installed between the wheel and the fastening latch The wheels have a mounted inner socket and the screws can therefore b...

Page 12: ...nut M8 3 fillister head screw M10x25 1 washer M10 1 stop nut M10 1 hex bolt M12x25 1 Attach the mounting bracket on the left hand side of the scale with two M8 screws The standing component must poin...

Page 13: ...AGRETO Animal Scale AGRETO electronics GmbH Seite 13 Mount the ball outside on the lever Attach the rubber buffer on the left hand side panel as shown...

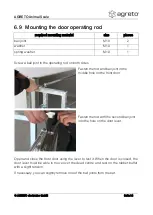
Page 14: ...on both sides Fasten the rod and ball joint in the middle hole on the front door Fasten the rod with the second ball joint into the hole on the door lever Open and close the front door using the lever...

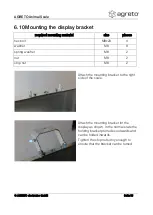
Page 15: ...M8x20 4 washer M8 8 spring washer M8 2 nut M8 2 stop nut M8 2 Attach the mounting bracket to the right side of the scale Attach the mounting bracket for the display as shown In the normal state the h...

Page 16: ...ale using the screw connection Rotate the weighing display in the desired direction and tighten the screw connection 6 12 Connecting the cabling Required mounting material size pieces cable tie cable...

Page 17: ...eite 17 Thread one cable connector each through the latch of the self adhesive cable brackets Glue the brackets to the underside of the side panel and attach the cables Use the additional cable connec...

Page 18: ...ale may even tilt Adjust the height of the weighing feet using the levelling screws The scale is placed with one of its sides against a wall or other object Set up the scale so that no part of the con...

Page 19: ...directly The decision on the existence of a warranty claim is the exclusive responsibility of AGRETO electronics GmbH The warranty period begins with the date of the first invoice to an end customer a...

Page 20: ...usehold waste For detailed information see Directive 2002 96 EC 10 Legal Notice All information specifications and illustrations are based on the product state as of 2019 subject to technical changes...

Reviews: