background image

3

KEY

QTY.

DESCRIPTION

A

2

Hex Bolt, 1/4-20 x 1-3/4" Long

B

5

Hex Bolt, 1/4-20 x 1-1/2" Long

C

2

Hex Bolt, 1/4-20 x 1" Long

D

1

Carriage Bolt, 1/4-20 x 3/4" Long

E

9

Nyock Nut, 1/4-20 Thd.

F

6

Flat Washer, 5/16" SAE

G

4

Nylon Washer

H

4

Flat Washer, 5/8"

I

1

Cotter Pin, 5/32" x 2"

NOT SHOWN FULL SIZE

F

H

I

J

A

B

C

D

E

K

L

M

N

O

Q

P

R

SHOWN FULL SIZE

G

KEY

QTY.

DESCRIPTION

J

1

Cotter Pin, 3/32" x 3/4" Long

K

1

Flow Control Link

L

2

Spacer Tube

M

2

Hub Cap

N

1

Grip

O

1

Vinyl Cap

P

1

Nylon Wing Nut

Q

2

Handle Grip

R

1

Adjustable Stop

Summary of Contents for 45-02104

Page 1: ...ion and Instructions Carefully 125 LB PUSH BROADCAST SPREADER PRINTED IN U S A FORM NO 41078 Rev 05 08 08 OWNERS MANUAL Model No 45 02104 Assembly Operation Maintenance Repair Parts the fastest way to...

Page 2: ...n handling and when applying lawn or garden chemicals 4 Read the chemical label instructions and cautions for handling and applying the chemicals purchased for spreading 5 Keep all nuts bolts and scre...

Page 3: ...Nyock Nut 1 4 20 Thd F 6 Flat Washer 5 16 SAE G 4 Nylon Washer H 4 Flat Washer 5 8 I 1 Cotter Pin 5 32 x 2 NOT SHOWN FULL SIZE F H I J A B C D E K L M N O Q P R SHOWN FULL SIZE G KEY QTY DESCRIPTION J...

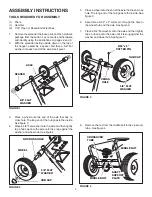
Page 4: ...5 32 x 2 cotter pin through the hole in the wheel hub and the axle See figure 3 7 Place a 5 8 flat washer onto the axle and then lightly tap a hub cap onto the axle until it is snug against the washe...

Page 5: ...9 Place the long handle tube onto the crossover tube on the side opposite from the shaft support plate Fasten with the bolt washer and nut removed in the previous step See figures 4 and 5 Do not tigh...

Page 6: ...rough the slot in the flow control mounting bracket and through the hole in the flow control link Secure with a 3 32 x 3 4 cotter pin See figure 9 20 Assemble both the flow control mounting bracket an...

Page 7: ...nough to hold flow control mounting bracket in place d Set adjustable stop at 5 Pull flow control arm against stop Verify that closure plate has opened about half way e If closure plate does not open...

Page 8: ...requireanadjustment of the flow rate to maintain the same coverage The faster you walk the wider the broadcast width 6 Always start the spreader in motion before opening the closure plate 7 Alwaysshut...

Page 9: ...sembled mark down the positions of the parts as they are removed The drive wheel and sprocket positions in relation to the slotted gear determine which direction the spreader plate will spin Be sure t...

Page 10: ...5 6 13 46 10 11 18 18 19 20 20 33 25 38 26 36 31 49 17 35 35 B A D E D 16 14 27 48 37 37 43 44 34 41 42 8 11 11 45 39 50 50 23 23 15 15 21 28 28 29 32 40 40 9 9 9 9 9 9 9 9 9 7 7 7 7 7 7 9 29 21 21 3...

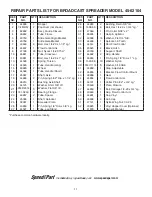
Page 11: ...305 1 Shaft Sprocket 25 04367 1 Spreader Plate 26 43850 1 Pin Spring 1 8 Dia x 5 8 Lg 27 44587 1 Tube Leg Stand the fastest way to purchase parts www speedepart com REF NO PART NO QTY DESCRIPTION 28 4...

Page 12: ...echanical including photocopying or recording or by any information storage or retrieval system without the express written permission of Agri Fab Inc Unauthorized uses and or reproductions of this ma...

Reviews: