background image

9

MAINTENANCE

CHECK FOR LOOSE FASTENERS


1.  Before  each  use,  make  a  thorough  visual  check  of 

the spreader for any bolts and nuts which may have  
loosened. Retighten any loose bolts and nuts. 

CHECK FOR WORN OR DAMAGED PARTS 

.  Check  for  worn  or  damaged  parts  before  each  use. 

Repair or replace parts if necessary. 

CHECK TIRE INFLATION 

3.  Check if tires are adequately inflated before each use. 

Do  not  inflate  tires  beyond  maximum  recommended 
pressure.

CLEANING 

4.  Rinse  inside  of  hopper  and  exterior  of  spreader  and 

allow to dry before storing. 

LuBRICATE

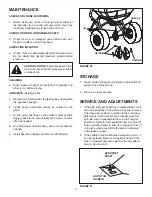
 (See figure 20) 

5.  Remove one small and two large hairpins and separate 

the gearbox housings. 

6.  Lightly  apply  automotive  grease  as  needed  to  the 

gears. 

7.  Oil the nylon bushings on the vertical sprocket shaft. 

Apply grease to the axle at least once a year, or more 
often as needed. 

8.  Oil (idler) wheel at least once a year or more often as 

needed. 

9.  Install gearbox housings and secure with hairpins.

STORAGE

1.  Rinse inside of hopper and exterior of spreader and 

allow to dry before storing.

.  Store in a clean, dry area.

SERVICE AND ADJuSTMENTS

1.  If the axle and gear assembly is disassembled, mark 

down the positions of the parts as they are removed. 
The large gear position in relation to the small gear 
determines which direction the spreader plate will 
spin. Be sure to reassemble them in their original 
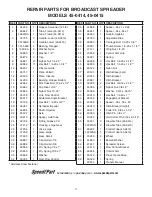
positions. (Refer to parts exploded view on page 10). 
Ensure washer (Refer to item 33 on page 10 and 11) 
is in place when assembling the axle components. 
Add grease to gears. 

.  If the agitator hairpin becomes damaged or worn, it 

can be replaced. Remove old agitator hairpin from 
hole in impeller shaft and replace with new agitator 
hairpin. See figure 21. 

OIL

GREASE

HAIRPIN

HAIRPIN

FIGuRE 20

SPROCKET
SHAFT

AGITATOR
HAIRPIN

FIGuRE 21

CAuTION: DO NOT 

inflate tires beyond the 

maximum recommended pressure printed 
on side of tire.

Summary of Contents for 45-0414

Page 1: ...M NO 40454 11 06 CAUTION Read Rules for Safe Operation and Instructions Carefully Model No 45 0414 45 0415 Safety Assembly Operation Maintenance Parts PRINTED IN USA the fastest way to purchase parts...

Page 2: ...handling and when applying lawn or garden chemicals Never operate tractor and spreader attachment without wearing substantial footwear and do not allow anyone to ride or sit on spreader attachment fr...

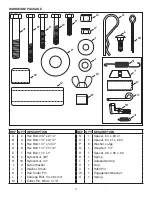
Page 3: ...lock Nut 1 4 I 2 Nylon Washer J 4 Washer Small K 1 Hair Cotter Pin L 1 Carriage Bolt 1 4 20 x 3 4 M 1 Cotter Pin 9 64 x 1 1 2 REF QTY DESCRIPTION N 1 Spacer 64 x 84 x 1 O 1 Spacer 64 x 1 x 2 94 P 6 Wa...

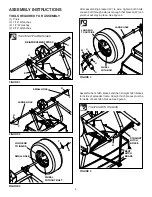
Page 4: ...E 5 D R P H H W LONG END TO OUTSIDE WHEEL WITH BOLT LARGE HOLE After assembling bracket W to axle tighten both bolts Loosen bolt through axle just enough that bracket W can pivot but will stay in plac...

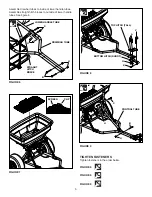
Page 5: ...E STRAGHT HITCH BRACE LOWER HANDLE TUBE FIGURE 8 FIGURE 9 B H C H CONTROL TUBE Assemble drawbar tubes to inside of lower handle tubes Assemble straight hitch braces to outside of lower handle tubes Se...

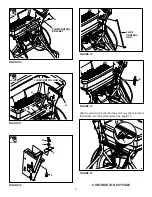
Page 6: ...LOW CONTROL BRACKET FIGURE 12 FIGURE 13 FIGURE 14 S H FLOW CONTROL ARM U J I E FLOW CONTROL ROD CONTINUE TO NEXT PAGE X FIGURE 15 Slip the small spring X onto the end flow control rod and then attach...

Page 7: ...he wing nut The higher the setting number the wider the opening in the bottom of the hopper 2 Refer to the Application Chart on page 8 and to the instructions on the fertilizer bag to select the prope...

Page 8: ...sure plate 7 Always shut the closure plate before turning or stopping the spreader 8 If fertilizer is accidentally deposited too heavily in a small area soak the area thoroughly with a garden hose or...

Page 9: ...r wheel at least once a year or more often as needed 9 Install gearbox housings and secure with hairpins STORAGE 1 Rinse inside of hopper and exterior of spreader and allow to dry before storing 2 Sto...

Page 10: ...8 52 8 42 66 53 45 52 45 65 8 61 39 5 8 52 62 33 35 33 9 8 8 8 45 8 8 29 25 29 30 26 33 31 31 22 32 27 62 57 33 33 36 33 4 4 3 45 56 56 8 8 8 47 60 44 50 58 48 49 59 51 44 60 9 47 8 9 25 28 31 37 20 2...

Page 11: ...46055 3 Pin Spring 1 8 x 1 32 43659 1 Pin Spring 3 16 x 1 33 49899 7 Washer 34 40304 1 Rod Flow Control REF PART NO QTY DESCRIPTION 35 23668 1 Spacer 64 x 1 x 2 94 36 48857 1 Spacer 64 x 84 x 1 37 489...

Page 12: ...REPAIR PARTS Agri Fab Inc 809 South Hamilton Sullivan IL 61951 217 728 8388 www agri fab com the fastest way to purchase parts www speedepart com 2006 Agri Fab Inc...

Reviews: