F08D/F10D
F08D/F10D
7-6
7-6
7.2
Grutage
Préparer la machine à gruter en
procédant de la manière suivante:
(1) Amener le commutateur de
marche (4-10/3) dans la position "0".
(2) Enclencher le rapport de trans-
mission "I" (4-11/13) (uniquement
pour modèles rapides » 30 km/h «).
(3) Enclencher le rapport hydrau-
lique "I" (4-10/1).
(4) Serrer le frein de parking
(4-10/7).
(5) Soulever et rabaisser la flèche
porte-godet de manière que le point
le plus bas de la flèche ou du godet
se trouve à au moins 30 cm au-
dessus de la voie (5-2).
(6) Verrouiller les vannes de blocage à
boisseau sphérique pour l'hydraulique
compl. et de travail (1-2/flèches).
(7) Fermer les portes.
(8) Rabattre le miroir extérieur
vers l'intérieur.
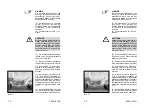
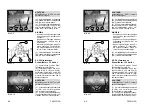
ATTENTION
Lors du grutage, faire attention aux
points suivants, figure 7-5:
- Le point d'attache (A
1
- machine sans
godet standard ou A
2
- machine avec
godet standard) du moyen de levage
(B) doit être parfaitement verticale au
centre de gravité (C
1
ou C
2
) de la
machine, de manière que le dispositif
de prise de charge se trouve
à
l'horizontale
au-dessus de l'axe
longitudinal de la machine.
- Les élingues (D) doivent être diri-
gés vers le haut perpendiculaire-
ment aux points d'attache de la
machine (7-6/flèches et 7-7/
flèches).
DANGER
Les élingues doivent être homolo-
guées pour une capacité de charge
minimum de 3,0 t.
7.2
Lifting by crane
The loader to be lifted is to be prepared
as follows:
(1) Set the drive switch (4-10/3) to
the “0” position.
(2) Set transmission stage "I"
(4-11/13).
(only for fast loaders » 30 km/h «).
(3) Set hydraulic drive stage “I”
(4-10/1).
(4) Apply the parking brake
(4-10/7).
(5) Lift or lower the bucket arm until
the lowest point of the bucket arm or
the bucket is at least 30 cm above
the road (5-2).
(6) Close the ball block valves for
the working and auxiliary hydraulics
(1-2/arrows).
(7) Lock the doors.
(8) Fold the outside mirror inwards.
CAUTION
The following items must be
ob-served when lifting by crane
(Figure 7-5):
- The lifting point (A
1
- loader with-
out standard bucket or A
2
- loader
with standard bucket) of the lifting
device (B) must be located
precisely vertically over the center
of gravity (C
1
or C
2
) of the loader
so that the lifting device is
located
horizontally
above the
longitudinal axis of the loader.
- The lifting ropes (D) must lead
vertically upwards from the lifting
points (7-6/arrows and 7-7/arrows)
of the loader.
DANGER
A permitted lifting capacity of at least
3.0 t is required for the ropes.
7.2
Lifting by crane
The loader to be lifted is to be prepared
as follows:
(1) Set the drive switch (4-10/3) to
the “0” position.
(2) Set transmission stage "I"
(4-11/13) (only for fast loaders
» 30 km/h «).
(3) Set hydraulic drive stage “I”
(4-10/1).
(4) Apply the parking brake
(4-10/7).
(5) Lift or lower the bucket arm until
the lowest point of the bucket arm or
the bucket is at least 30 cm above
the road (5-2).
(6) Close the ball block valves for
the working and auxiliary hydraulics
(1-2/arrows).
(7) Lock the doors.
(8) Fold the outside mirror inwards.
CAUTION
The following items must be
ob-served when lifting by crane
(Figure 7-5):
- The lifting point (A
1
- loader with-
out standard bucket or A
2
- loader
with standard bucket) of the lifting
device (B) must be located
precisely vertically over the center
of gravity (C
1
or C
2
) of the loader
so that the lifting device is
located
horizontally
above the
longitudinal axis of the loader.
- The lifting ropes (D) must lead
vertically upwards from the lifting
points (7-6/arrows and 7-7/arrows)
of the loader.
DANGER
A permitted lifting capacity of at least
3.0 t is required for the ropes.
Summary of Contents for AF 100
Page 61: ...F08D F10D F08D F10D Beschilderung Beschilderung Signalisation Signalisation Signs Signs ...
Page 76: ...F08D F10D F08D F10D 2 8 2 8 Schriftzug Lärmarme Baumaschine Schriftzug Lärmarme Baumaschine ...
Page 104: ...F08D F10D F08D F10D Beschreibung Beschreibung Description Description Description Description ...
Page 177: ...F08D F10D F08D F10D Wartung Wartung Entretien Entretien Maintenance Maintenance ...
Page 219: ...F08D F10D F08D F10D Störung Ursache und Abhilfe Störung Ursache und Abhilfe ...
Page 222: ...F08D F10D F08D F10D Dérangements causes et remèdes Dérangements causes et remèdes ...
Page 225: ...F08D F10D F08D F10D Malfunctions causes and remedies Malfunctions causes and remedies ...
Page 228: ...Anhang Anhang Appendice Appendice Appendices Appendices ...
Page 229: ......
Page 230: ......
Page 237: ......
Page 242: ...F08D F10D F08D F10D A 10 3 A 10 3 ...
Page 243: ...F08D F10D F08D F10D B 10 3 B 10 3 ...
Page 244: ...F08D F10D F08D F10D C 10 3 C 10 3 ...
Page 245: ...F08D F10D F08D F10D D 10 3 D 10 3 ...
Page 246: ...F08D F10D F08D F10D E 10 3 E 10 3 ...
Page 247: ...F08D F10D F08D F10D F 10 3 F 10 3 ...

