background image


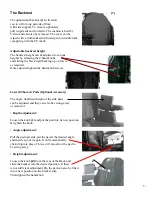
The Backrest

                                                                                               (1) 


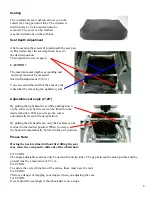
The upholstered backrest 

(1)

 will allow 

you to sit for long periods of time, 
with side support. To remove upholstery 
pull it upwards and forwards. The cushion is held by  
Velcro and can also be removed. The cover can be 
wiped with a cloth soaked with detergent or disinfectant 
complying with the CE mark. 


Adjustable backrest height

.  

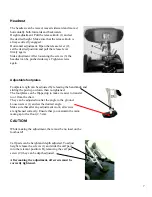
The backrest height can be adjusted to various 
heights by releasing the 4 hand knobs  
and sliding the black rigid backing up or down  
as required. 
Once adjusted tighten the hand knob screws. 


Lateral/Thoracic Pads (Optional Accessory) 
 

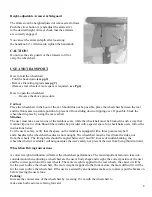
The angle, depth and height of the side pads  
can be adjusted and they can also be swung-away  
or removed. 
 
•  

Depth adjustment:


Loosen the knob 

(1)

 and put the pad into its new position  

& tighten the knob. 
 
•  

Angle adjustment:  

 
Pull the pad upwards, put the pad at the desired angle  
and then let go of it again. It will automatically  
click/drop into place. This is will also allow the pad to 
be swing away. 
 
•  

Height adjustment:


Loosen the knob 

(2)

 from the rear of the Back and                             

2


slide the bracket into the desired position. If there      


is not sufficient adjustment 

(1),

 the pad can also be fitted 

into a new position on the bracket 

(A).


Then tighten the hand knob.              


Summary of Contents for Relax Tilt in Space

Page 1: ...Relax Tilt in Space Wheelchair User Manual...

Page 2: ...be lifted with an occupant in it it should only be pushed Before each use the following should be checked quick release axles on the rear wheels Velcro on seats and backrests tyres and wheel locks Wh...

Page 3: ...eel locks The wheelchair is equipped with two wheel locks The wheel locks are applied directly against the tyres To engage push both wheel lock levers forward To release the wheel locks pull the lever...

Page 4: ...l position Tip assist Tube 1 Tip Assist tubes 1 are used by attendants to tip a wheelchair over an obstacle Simply step on the black tube to push the wheelchair for example over a curb or step Anti ti...

Page 5: ...tighten the hand knob screws Lateral Thoracic Pads Optional Accessory The angle depth and height of the side pads can be adjusted and they can also be swung away or removed Depth adjustment Loosen th...

Page 6: ...hand lever while pushing down on the silver cross bar the seat can be tilted into the desired position When you let go the seat is automatically fixed in the new position By pulling the left hand leve...

Page 7: ...e hand knob and sliding the post up or down then re tightened The footplates can be flipped up to make it easier to transfer to or from the chair They can be adjusted to alter the angle to the ground...

Page 8: ...be provided with a special space for wheelchairs users follow the instructions below For the user s safety verify that the space on the minibus is equipped with a three point safety belt and a headres...

Page 9: ...off the ground Finally pull the wheelchair up and pull it back Make sure that all four wheels have climbed over the obstacle before lowering the wheelchair Getting off a pavement Getting off a pavemen...

Page 10: ...utting pressure on their backs Stairs Going Down Always ask someone to help you Never use escalators neither on your own nor with an attendant Going down the stairs facing forward with an attendant s...

Page 11: ...th the ground Wheelchair squeaks and rattles Check to make sure all bolts are secure tighten if necessary Apply small amount of oil to moving parts REPAIRS AND SERVICE For all repairs and service to t...

Reviews: