Usage and Maintenance Instructions
Ver. 1 04/2013 (2614)
3
ASSEMBLY PROCEDURE
1.
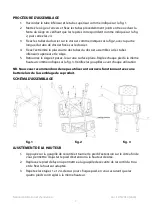
Join the Upper an d Lower Tubes as shown in Fig. 1.
2.
Lay the seat upside down and put the joined Upper and Lower Tubes into the slot
of the seat ensuring that marks correspond as per Fig. 2, then tighten all screws.
3.
Fix the backrest tubes onto the backrest board as shown in Fig. 2, with the long
part of the backrest tube attached to the backrest board.
4.
Fix the shorter end of the tubes on the assembled backrest onto the assembled
upper/lower tubes and seat.
5.
Turn the assembled Shower Stool the right way up on a flat surface. Equally adjust
each of the legs to the same height/number setting as per Fig. 3. Remember to
check the spring pins before each use.
NB. We do not recommend the use of a battery operated screw driver when assembling
this product.
ASSEMBLY DIAGRAM
Fig. 1
Fig. 2
Fig. 3
HEIGHT ADJUSTMENT
1.
Depress the securing pin and twist the extension leg to the side to allow you to
slide the extension leg up or down to the desired height.
2.
Rotate the leg back to allow the securing pin to pop out of the hole and fix the
height at the correct setting.
3.
Repeat steps 2.1 and 2.2 above for each leg, ensuring that all four legs are set to the
same height setting.


