


ASSEMBLY AND INSTRUCTIONS (continued)
8. Feed the female buckle and the long strap underneath
the base of the bed. Move the Bed Transfer Aid up and
down the bed to find the best position for the user to
safely lift themselves.
9. Ensure that the frame of the Bed Transfer Aid is square
to the side of the bed and that both of the black feet at
the base of the unit are touching the side of the bed.
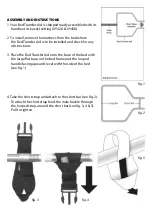
10. Clip the two buckles together and tighten the strap
ensuring the Bed Transfer Aid is secure in its position and
the buckle is clipped securely (see fig. 14).
Tuck away any excess strap to avoid trips.
11. Replace the mattress ensuring that the Bed Transfer Aid
handle is pointing upwards and the unit is in the
optimum position to suit the client’s needs.
12. If required a second strap set can be fitted
(Not supplied, order code VS247)
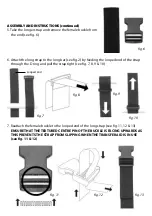
HEIGHT ADJUSTMENT (VY428 & VY438 ONLY)
The height of the handle on the Bed Transfer Aid can be adjusted to suit the client’s
requirements. To adjust the handle simply remove the two grey e-clips from the base of the
handle and lift the required height ensuring that you do not exceed the last pre-punched
hole on the base of the frame.
Once the desired height is achieved, re-insert the e-clips into the pre-punched holes,
ensuring that both clips pass completely through the tube frame, the inner tube and out
the other side and are in place securely (see fig. 15 & 16)
fig. 14
fig. 15
fig. 16


