


PT
PT
45
46
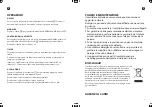
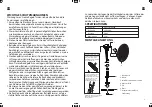
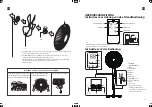
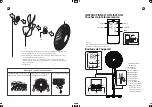
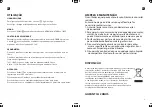
1. VELOCIDADE / VISOR
TEMPORIZADOR
2. TEMPORIZADOR
3. VISOR OSC
4. DESCANSO
5. NATURAL
7.“MODO”botão
8.“ VELOCIDADE” botão
9.“LIGAR/DESLIGAR” botão
10.“ TEMPORIZADOR” botão
11.“OSC” botão
12. Chave de Ajuste de Altura:
Gire no sentido anti-horário
e soltar para realizar o ajuste
de altura.
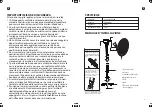
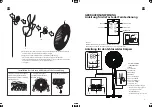
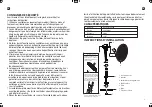
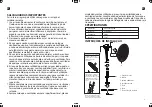
8. Porca de fechamento da grade: parafuse a porca de fechamento da grade
no sentido horário, e entretanto, repare a grade traseira.
9. lâmina: puxe a lâmina para girar após a instalação, de modo a garantir que a
lâmina pode ser normalmente girado.
10. trave a porca da lâmina: trave a porca da lâmina no sentido anti-horário, e
instale então a tampa dianteira do ventilador.
11. grelha dianteira and in the meantime, fix the rear grill.
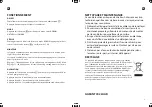
INSTRUÇÕES DE USO
Instruções para chave do controlo remoto
INSTRUÇÕES PARA CHAVE DO CORPO
1
2
3
1
2
3
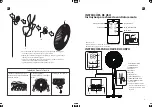
1. Alinhe a captura da proteção
frontal com a posição ilustrada da
proteção traseira.
2. Pressione guardas
sequencialmente com as duas
mãos.
3,Instalação Auto-Catch.
Instalação Frontal e Traseira
8
9
10
11
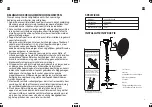
Dica atenciosa:
Alcance efetivo do controlo remoto: a uma distância de 5 m
eDeflexão de 30 graus na frente do produto.
1
7
8
9
10
11
12
2
3
4
5
6
Bateria
LIGAR/DESLIGAR
BOTÃO TEMPORIZADOR
BOTÃO VELOCIDADE
BOTÃO MODO
BOTÃO OSC