October 2006
-
3
-
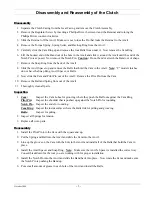
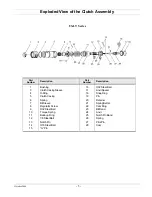
Disassembly and Reassembly of the Clutch
Disassembly
1. Separate the Clutch Casing from the Gear Casing and remove the Clutch Assembly.
2. Remove the Regulator Screw by inserting a Phillips Driver between it and the Retainer and turning the
Phillips Driver counter-clockwise.
3. Slide the Retainer off the Anvil. Make sure not to lose the Pin that locks the Retainer to the Anvil.
4. Remove the Torque Spring, Spring Setter, and Back-up Ring from the Anvil.
5. Carefully slide the Cam Ring up and remove the four Balls from under it. Now remove the Cam Ring.
6. Lift the hooked end of the Band out of the hole in the Anvil and slide it around the Anvil until the end of the
Notch Pin is exposed. Now remove the Notch Pin.
Caution:
Do not bend or stretch the Band out of shape.
7. Remove the Snap Ring from the back of the Anvil.
8. Slide the Anvil Spacer up and remove the Balls that hold the Cam in the Anvil.
Note:
“C” model clutches
do not have the Snap Ring, Anvil Spacer, or Balls.
9. Now slide the Cam and Pilot Pin out of the Anvil. Remove the Pilot Pin from the Cam.
10. Remove the Ball and Spring from out of the Anvil.
11. Thoroughly clean all parts.
Inspection
1.
Cam:
Inspect the Cam Lobes for grooving where they push the Ball out against the Cam Ring.
Pilot Pin:
Inspect the shoulder that is pushed up against the Notch Pin for rounding.
Notch Pin:
Inspect the ends for rounding.
Cam Ring:
Inspect the inside surface where the Balls ride for pitting and grooving.
Balls:
Inspect for pitting.
2. Inspect all Springs for tension.
3. Replace all worn parts.
Reassembly
1. Install the Pilot Pin into the Cam with the square end up.
2. Put the Spring and Ball into the Anvil and slide the Cam into the Anvil.
3. Line up the groove on the Cam with the hole in the Anvil and install all of the Balls that hold the Cam in
place.
4. Install the Anvil Spacer and Snap Ring.
Note:
Make sure the Anvil’s Spacer is installed the correct way.
Consult breakdown for the tool you are working with for proper installation.
5. Install the Notch Pin into the Anvil and slide the Band back into place. Now rotate the Cam and make sure
the Notch Pin is pushing the Band up.
6. Put a small amount of grease in each hole of the Anvil and install the Balls.
Summary of Contents for Lite-Touch Series
Page 2: ......


