background image

 30

WIRING


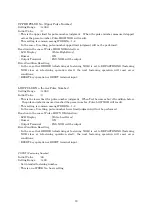
DIAGNOSIS(

Terminal Block Wiring Diagnosis


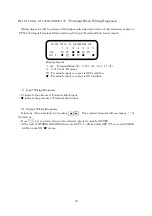
Wiring diagnosis will be performed through monitoring input status of external wires mated to 

UTM-1500 Input Terminal Block and through Output Terminal Block forced output. 


(1)

Input Wiring Diagnosis


・○

  indicate the absence of Terminal Block input 

・●

  indicate the presence of Terminal Block input 


(2)

Output Wiring Diagnosis


Select any of the terminals by touching 

.    The selected terminal will accompany “_“ at 

the bottom. 

Press 

  key to switch between the selected output terminal’s ON/OFF. 

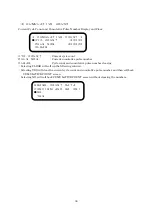
At the start of WIRING DIAGNOSIS screen, OUT 1~5 will be under OFF “

” state and VALVE 

will be under ON “

” status. 


WIRING  DIAGNOSIS


          1  2  3  4  5  6  V
IN  :  ○  ○  ●  ●  ○  ○ 


OUT:  ●  ○  ●  ○  ●      ●

Display Layout 

1~6:

Terminal Block No.

(IN1~6・OUT1~5)


V:VALVE

 Terminal 

○:

Terminal’s input or output is OFF condition. 

●:

Terminal’s input or output is ON condition. 

Summary of Contents for UTM-1500

Page 1: ...PO Box 16460 Portland OR 97292 0460 800 852 1368 Fax 800 582 9015 www aimco global com Fastening Counter UTM 1500 Instruction Manual Software Version 1 06 ...

Page 2: ...oice among terminal block input alternatives 28 1 Choice among terminal block output alternatives 29 WIRING DIAGNOSIS Terminal Block Wiring Diagnosis 30 1 Input Wiring Diagnosis 30 2 Output Wiring Diagnosis 30 MEMORY 31 BAUD RATE transmission speed 31 Tool Management tool management 32 1 TOOL 32 2 O U T S E T 32 3 CUMULATIVE COUNT 34 Pressure Value Setting 35 1 In the case of Shut off Tool TM 35 2...

Page 3: ... incombustible component to prevent a fire Keep away from combustibles to prevent a fire Avoid foreign matter intrusion to prevent a fire Set up Controller on a site that can bear its weight to avoid personal injury from accidental falling Keep your workplace well lighted and clean to avoid personal injury Never wear loose fitting clothes or dangling jewelry when using this System and always wear ...

Page 4: ...eration Assurance of work site safety by operators themselves prior to power switching operation is essential to prevent personal injury Never touch switching devices with moistened hands to avoid an electric shock Avoid touching the terminals of current carrying Controller even during Tool is under non operating conditions to avoid an electric shock Avoid damage mechanical stress load to cords an...

Page 5: ...n expert is allowed Be sure to take off metal articles wrist watch or ring prior to operation Inspect cords periodically for damage and have an expert make repairs or exchange if signs of wear is noticed Always use insulating tools at the time of servicing to avoid an electric shock and personal injury Always order us or our designated agent when overhauling becomes necessary to avoid an electric ...

Page 6: ...put 5 points 20P detachable type Sato Parts ML 100 AS 20 Pressure Signal Input Connection with the pressure sensor incorporated in Tool via the connector at the back allows power supply and analog signal input Analog Output Plug Size JISC6560 small single head plug φ3 5x15 Major Functions Fastening number control Fastening time control Pulse number control 1 Various judgments Others Two types of c...

Page 7: ...ve at an adequate point so as the length of the air hose up to Tool will be maintained as short as possible When the air hose between Solenoid Valve and Tool is unnecessary lengthy Tool stop timing will be delayed due to residual pressure in the hose even though the valve reacted normally 1 Shut off Tool TM When using UTM 1500 CN and External Pressure Sensor Assembly Place External Pressure Sensor...

Page 8: ...and hook up the cable from Air electric Relay Hose joint or Quick exhaust Attach TM Signal air hose to Coupler at the controller s back Pressure Sensor Incorporated Type UTM 1500 PS Polyurethane tube TP 4 Quick exhaust AQ240F 04 00 Part Code 909 442 0 Air electric Relay Assembly Part Code 909 851 0 Speed Controller AS100F 04 Part Code 909 449 0 UTM 1500 CN or PS ポ リ ウ Polyurethane tube TP 4 ...

Page 9: ... 24V 0V Solenoid Valve CP VP542 Part Code 909 749 0 Polyurethane tube TP 4 Connector incorporated with a rack type UTM 1500 RA CN ExternalPressureSensorAssembly Part Code 878 845 1 Pressure Sensor Cable Assembly 5m Part Code 910 820 0 PressureSensorCableAssembly 10m PartCode 910 821 0 ...

Page 10: ...sembly VP542 Part Code 909 749 0 Air pressure signal output from Solenoid Valve s back goes to Pressure Sensor Air pressure signal output from Solenoid Valve s back goes to Pressure Sensor ExternalPressureSensor Assembly PartCode 878 845 1 Pressure Sensor Cable Assembly 5m Part Code 910 820 0 Pressure Sensor Cable Assembly 10m Part Code 910 821 0 ...

Page 11: ...an also be used alternatively Always use the low tone buzzer at the maximum 5 volume setting as the buzzer does not produce audible sound with low settings Part Name Low tone buzzer unit Star PMB 06 Part Number 910 824 0 Judgment Lamp Count OK OK lamp will light up Count NOK NOK lamp will light up Fastening OK Lamps remain off Fastening NOK NOK lamp will flash During MENU screen operation OK and N...

Page 12: ...N P2 SHUT OFF Shut off BLOW START Blow start P1 Pressure at Blow start detection monitor P2 Pressure at Shut off detection monitor Third Line Pressure value monitor Fourth Line Judge Fastening Time Pulse Number Judgment Judgment related to fastening operation including OK PLS LOW NOK Fastening Time Time interval between blow start and shut off Pulse No Blow number from blow start to shut off in th...

Page 13: ...e less than DC24V Always use Y shape or round crimp style terminals when wiring Sensor Cable coupling connector Pressure Sensor can be installed with the connector removed ANALOG OUT Analog signals will be output from Pressure Sensor PC Connector Hook up the cable from PC Power cable connector Fuse spare fuse incorporated 1 2 3 4 5 6 ...

Page 14: ...this function Procedure Press Initialization Function This function will bring System back into factory default settings by initializing old settings and by erasing memory data saved Procedure Turn the power on while pressing 7 segment LCD Display Indicator Lamp Test 7 segment indicator lamps will all light up 7 segment will turn to 8 8 and LCD display will be painted black Turn the power on while...

Page 15: ...der Program Mode Note that Program Mode will render TM Tool or Standard Tool uncontrollable Consequently Valve Output will turn into ON status and you may not use Tool during Program Mode Press to return to Operation Mode JUDGE OK and NOK lamps will light up by turns under Program Mode Select any item by touching The current selection accompanies mark on the left Touch to move to the corresponding...

Page 16: ... Standard Tool As TM Signal will not be output in this case Tool Blow Start will be sensed using Tool s hand pressure Tool will not stop operation automatically and fastening time controlling via UTM will become necessary When Standard Tool is selected ON and OFF initial values will become 700 and 800 respectively SENSOR Pressure Sensor Input Type Initial Setting NO DISPLAY Select any among three ...

Page 17: ...When using TM Type or Standard Tool the corresponding name will be BLOW START and set a pressure value to effect Tool blow detection This setting is common among WORK No 1 4 PULSE LV Mpa Pulse Detection Pressure Setting Range 0 000 1 000 Initial Value 0 000 This is a setting to enable pulse detection PULSE Pulses of less than PULSE LV will not be counted Perform setting works under Auto Setting or...

Page 18: ...on or RESET terminal input LOW PULSE No Lower Pulse Number Setting Range 0 999 Initial Value 0 This is the lower limit for pulse number judgment When Tool becomes shut off condition before the pulse number measured reached the preset number Pulse LOW NOK will result This setting is common among WORK No 1 4 In the case of 0 setting pulse number lower limit judgment will not be performed Reaction in...

Page 19: ... will be rendered and judgment will be made on Limit Switch input COUNT OK judgment will be given when the preset fastening COUNT number is attained and ready to start the next work fastening operation status will be brought about when LS1 has been input and the old fastening number has been cleared If the preset fastening number is not attained at the time of LS1 input COUNT NOK judgment will be ...

Page 20: ...n will finish when COUNT OK condition resulted through NG handling operation LS1 LS3 LS2 Fastening operation range will be defined Operation will start counting down ready condition on LS1 input COUNT NOK judgment will be given when the preset fastening number is not attained at the time of LS3 input and in this case the range up to LS2 input ON will become NG handling range Fastening operation wi...

Page 21: ...e control timer gets started by utilizing the initial fastening judgment or QL wrench input COUNT OK judgment will be given when the preset fastening number is attained and the next coming work fastening operation will become ready when COUNT OK output output duration time can be set by using COUNT OK output timer is turned OFF If the line control timer has become time out before completing the pr...

Page 22: ...t attained at the time of WORK switching input OFF condition COUNT NOK will result In addition when WORK SELECT input is turned OFF before attaining the preset fastening number COUNT NOK will result Work Work flow NOK handling range WORK 1 operating range Judgment WORK 4 COUNT OK output Preset number completed WORK 4 Fastening Operation WORK SELECT 4 input WORK SELECT 1 input COUNT OK output timer...

Page 23: ... NOK RESET When a fastening error initial error cycle error occurs under this setting the next fastening signals cannot be accepted until such error condition has been cleared by inputting Fastening NOK RESET When TM Type Tool or Standard Tool is in use VALVE ON status will be kept ON until such error condition has been cleared and the next fastening operation cannot be accepted without error canc...

Page 24: ...ptions to view under Operation Mode Selections Standard initial setting or Fas time Standard Items on display WORK No Pressure Detecting Status Current Pressure Value Judgment Fastening Time and Pulse No Example Fas Time Fastening time Items on display Only fastening time will be displayed at full scale using all 4 lines Example Display switching is allowable also under Operation Mode Switch to Fa...

Page 25: ...hut off Pressure in the case of SHUT OFF selection Start fastening operation with a bolt seated In the case that Shut off Tool is in use perform fastening operation until shut off The buzzer sounds when the controller has read pressure values and the measured pressure values will be on display Return to when re measurement is necessary and press key when pressure values are obtained normally 4 Set...

Page 26: ...ained This is on a WORK No basis setting L CONTR sec line control timer Initial Value 100 Setting Range 1 999 Functions This function is used to effect fastening number count operation based on timer control This is on a WORK No basis setting WARNING sec alarm output timer Initial Value 0 Setting Range 0 999 Use this function when an alarm output before line control timer time out timing is necess...

Page 27: ... next fastening operation got started during Count OK output or when Count OK resulted after Count NOK In the case of less than 1000msec settings Turn OFF at the time when the preset time has been attained This is on a WORK No basis setting 1 PULSE msec Lowest Pulse Range Setting Range 0 9999 Functions This is Pulse Detection Timer Pulses with a pulse fall time of longer than 1 pulse will be judge...

Page 28: ...ed Fastening error conditions like an initial error and cycle error will be cleared QL Fastening numbers remained due to Tool breakdown or inadvertent fastening omission will be counted down when additional fastening operation has been performed with a micro switch installed Torque Wrench connected to QL terminal It will be counted down regardless of operating range PASS Inputting PASS will forcef...

Page 29: ...ening operation or OK condition has resulted by using PASS or NOK status has been cleared by RESET inputting OK Fastening OK external output signal Output duration can be set on Fastening OK Output Time Timer NOK Fastening NOK This signal will be output at the time of an initial or cycle error This output signal remains on until Fastening OK will be given by performing additional fastening operati...

Page 30: ...sence of Terminal Block input 2 Output Wiring Diagnosis Select any of the terminals by touching The selected terminal will accompany _ at the bottom Press key to switch between the selected output terminal s ON OFF At the start of WIRING DIAGNOSIS screen OUT 1 5 will be under OFF state and VALVE will be under ON status WIRING DIAGNOSIS 1 2 3 4 5 6 V IN OUT Display Layout 1 6 Terminal Block No IN1 ...

Page 31: ...be displayed When is pressed down the particulars of the item selected at DISPLAY column according to the Work No selected at WORK column will be displayed ERASE Make a choice among 1 2 3 4 and ALL 1 4 all inclusive by using keys and specify WORK No of which memory data you intend to erase When is pressed memory data corresponding to the selected WORK No will be erased BAUD RATE transmission speed...

Page 32: ...he arrow key and press key Then the character you selected will be put on the cursor position on the TOOL column on the 2nd line To erase the last character of TOOL column touch RESET key To return to Tool Management MENU screen press key while putting the cursor on END Up to 15 characters can be entered 2 OUT SET Enter Cycle Count and Cumulative Pulse Number intended for maintenance works CYC COU...

Page 33: ... messages like CYC COUNT1 or PULS NOS 2 will flash on the right of P 1 P2 Messages to display can be altered on your PC When CYC COUNT and PULS NOS were output at one time CYC COUNT and PULS NOS messages will be displayed by turns Buzzer When CYC COUNT1 PULS NOS 1 has been attained the buzzer will turn ON for 1 second and OFF for 1 second repeatedly until you press key When CYC COUNT2 PULS NOS 2 h...

Page 34: ... cumulative pulse number clearing Selecting CLEAR will call up the following window Selecting YES will clear the current cycle count and cumulative pulse number and then call back CUMULATIVE COUNT screen Selecting NO will call back CUMULATIVE COUNT screen without clearing the numbers CUMULATIVE COUNT CYC COUNT 30000 PULS NOS 200000 CLEAR ERASE COUNT DATA CONFIRM AND GO ON NO YES ...

Page 35: ...for more than 3 seconds and start MENU screen Set TOOL to TM TYPE on SET UP screen Then select SENSOR Return to MENU screen by touching key and touch key again to return to the measurement screen Read Free Running and Blow pressure values on the measurement screen Enter a value not exceeding Free Running pressure in LEVER ON column on SET UP screen Enter a midrange value between Free Running and B...

Page 36: ...ao Plaza Minhang District Shanghai China Phone 0086 21 34319246 Fax 0086 21 34319245 LIT MAN720 Rev 03 2016 Printed in USA 2016 AIMCO AIMCO CORPORATION DE MEXICO SA DE CV Ave Cristobal Colon 14529 Chihuahua Chihuahua 31125 Mexico Phone 01 614 380 1010 Fax 01 614 380 1019 AIMCO SPAIN Avenida Río Gallo 431 19174 Galápagos Guadalajara Spain Phone 34 673 34 99 25 ...

Reviews: